Renew or Roll the Dice on a New Tenant?
How to weigh a sure renewal against three prospects — and the tenant rights that can make or break the deal
Today is our fifth and final discussion on leasing where we will get into decisions you will need to make when managing your tenants and leases such as whether to:
Renew an existing tenant or try to find a new tenant.
Give a tenant a right to renew, expand, contract, or terminate their lease early.
All of this will build off of the four previous newsletters on leasing:
Leasing is dynamic.
It involves negotiating rights and obligations of each party (landlord and tenant). Some can be clearly measured financially. Others are non-financial in nature and harder to quantify.
Today I will break down the following:
The big four tenant rights: renewal, expansion, contraction, and early termination.
Defining “Deal Breakers”
Lease analysis example for decision making.
Let’s dig in.
The Big Four Tenant Rights: Renewal, Expansion, Contraction, and Early Termination
As discussed in How to Read Leasing Contracts Without Getting Burned, leases include rights and obligations for both tenants and landlords. Four of the rights that tenants often want that landlords may be more reluctant to give are:
Renewal Options
Expansion Options
Contraction Options
Early Termination Options
They are “options” in that the tenant has the option, but not the obligation, to exercise this right. Some of these options will be “unilateral”, meaning only one party (typically the tenant) has the right. Others will be “bilateral”, meaning both the landlord and the tenant each have the independent right to exercise the option.
Let’s define each one and then see how they factor into decision making.
Renewal Options
Definition: unilateral right of tenant to renew at the expiration of their lease.
Example: two 3-year options to renew at 100% of market rent.
Why Tenants Want It: gives them the right, but not the obligation, to continue running their business in that location.
Why Landlords Don’t Like It: a renewal option encumbers the space and reduces the landlord’s flexibility to lease to other tenants or sell the project to a business that wants to own and occupy the building (aka an owner user).
Typical Compromise: most landlords will give a renewal option or two at market rent unless they have specific plans for the building at the end of the lease.
Real World Example: We once leased a retail suite to a national restaurant chain with strong credit. It was a very attractive rent. The only negative was that the tenant would only do the deal if we gave them two 3-year renewal options at a pre-agreed upon fixed rent. This required us to pre-agree upon a rent in the future. We ended up agreeing to this fixed rate renewal option because the rent and tenant credit were so strong. The risk we took on is that the market rent could rise above the rent in the fixed rate renewal option.
Expansion Options
Definition: unilateral right of tenant to expand into another suite in the building or business park.
Example: existing tenant in suite A (10,000 square feet) has the ongoing right to expand into suite B (5,000 square feet) at 100% of market rent if the existing tenant in suite B vacates.
Why Tenants Want It: gives them the right, but not the obligation, to expand at the existing location if the business is growing.
Why Landlords Don’t Like It: an expansion right encumbers another suite and makes leasing more complicated.
Typical Compromise: most landlords will strongly resist giving this right.
Real World Example: Years ago we leased an office suite to a fast growing, venture capital funded technology start up in San Francisco. We gave the tenant multiple expansion rights at market rent in order to win the deal from another landlord because (i) the rent was strong (ii) the tenant improvements were low, and (iii) the space had been vacant for a year.
Contraction Options
Definition: unilateral right of tenant to reduce their leased square feet.
Example: existing tenant with a 5-year lease in suite A (10,000 square feet) has the one time right to reduce their leased square feet to 7,500 square feet at the end of year 3. Tenant will pay the cost of demising the suite.
Why Tenants Want It: gives them the right, but not the obligation, to downsize their business for any reason.
Why Landlords Don’t Like It: this reduces the stability of the landlord rent roll and income.
Typical Compromise: most landlords will strongly resist giving this right.
Real World Example: We bought an industrial park as part of a portfolio acquisition. The park was 30% leased. The existing tenant had multiple one-year contracts with its customers. As the tenant continued to bring on more customers, they expanded into a total of 70% of the park. In order to get these deals done, we agreed to give the tenant ongoing contraction rights with 3-months notice. It was worth it because (i) there were few other tenant prospects and (ii) the expanding tenant took the spaces immediately and without any tenant improvement costs.
Early Termination Options
Definition: unilateral (or bilateral) right of either landlord or tenant to terminate the lease early.
Example: either landlord or tenant may terminate the lease with 6-months notice at any time after the 36th month of the 5-year lease for a one time termination fee of $10,000.
Why Tenants Want It: gives them the right, but not the obligation, to downsize their business for any reason.
Why Landlords Don’t Like It: this reduces the stability of the landlord rent roll and income. A landlord may want this right if they plan to redevelop the project in the future.
Typical Compromise: most landlords and tenants will strongly resist giving this right to the other party.
Real World Example: Let’s go back to the tech startup example from the expansion option discussion. This same tenant signed a 10-year lease but negotiated a termination option at the end of year 7. We were able to accept this because (i) the termination penalty was equal to an additional year of rent and (ii) the other deal terms were so compelling.
As I said before, options can’t always be quantified financially. It helps to understand which options you can live with and which you can’t, which is where we will go next.
Defining “Deal Breakers”
As you can see by the real world examples, leasing is dynamic and full of trade-offs. Each party (landlord and tenant) will ask for things that the other party may not want to give.
Sometimes one party will not compromise on an issue no matter how compelling the other deal terms are.
These are “deal breakers”.
Knowing what your deal breakers are in advance will help you better analyze and negotiate leasing opportunities. Here are two examples:
Termination Option with Specialized Tenant Improvements
Situation: we had a tenant prospect that wanted to lease a suite for 7-years at a good rate but needed expensive tenant improvements to build a customized section in 30% of the space. Not only was the build out expensive, but it was also very unique. No future tenant would want to use it, so it would need to be demolished at the end of the lease. The tenant also wanted an ongoing termination right starting at the end of year 3.
Why It Was a Deal Breaker: we decided to pass on the prospect due to the combination of (i) the expensive, specialized tenant improvements and (ii) the ongoing termination right.
Expansion Option in a Strong Leasing Market
Situation: the leasing market was strong with high tenant demand. We had a tenant prospect who wanted to lease 10,000 square feet in a 50,000 square foot industrial park. The lease rate was good and the tenant improvements were low, but the prospect wanted an ongoing expansion option on the other 40,000 square feet for the entirety of their 10-year lease.
Why It Was a Deal Breaker: we decided to pass on the prospect due to the ongoing expansion option, particularly at a time when the leasing market was so strong. Note that we gave the expansion option in the tech startup example above. The difference was that (i) the tech startup was leasing 40,000 square feet vs. 10,000 square feet in this example and (ii) the leasing market was not as strong in the tech startup example.
Lease Analysis Example for Decision Making
Now that we have a strong foundation of leasing, let’s run through a lease analysis example to show how an owner might decide what to do in various leasing situations.
Imagine a situation in which you have a 5,000 square foot suite that is leased to a tenant that has paid rent on time for the last three years. Their lease is expiring and the tenant wants to renew.
You need to decide whether to renew your current tenant or lease to one of the three prospects your leasing broker has found. The deal terms are summarized in the table below.
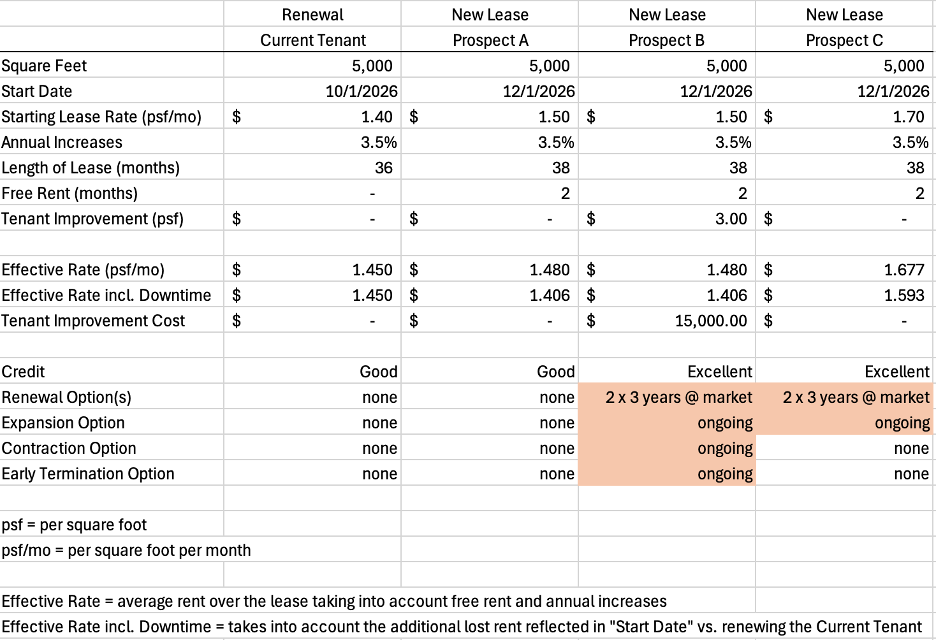
Table 1: Lease Comparison Example
So what does this table tell us? Prospect C is the best option. Let’s go through each one in detail to understand why.
Current Tenant vs. Prospect A
Current Tenant: will renew for three years as-is (no tenant improvements) for an effective rate of $1.450 psf/mo. As the renewal starts the day after the lease expires, the effective rate incl. downtime is also $1.450 psf/mo. This is our baseline.
Prospect A: will lease the space at a better start rate ($1.50 vs. $1.40) and effective rate ($1.480 vs. $1.450 - even with 2 months of free rent), but their lease will start two months later than the current tenant. This delayed start date reduces the “Effective Rate incl. Downtime” to $1.406 vs $1.450 for the current tenant.
Conclusion: unless the owner wants a higher start rate of $1.50 to present better optics for a stronger refinance or sale, the current tenant offers a better effective rate incl. downtime.
Current Tenant vs. Prospect B
Prospect B: same effective rate as Prospect A, but with $15,000 more in tenant improvement costs and all four of the rights landlords don’t like (renewal, expansion, contraction, and early termination).
Conclusion: unless the owner really wants the excellent credit, this is a worse deal than Prospect A. Current tenant is still the best deal.
Current Tenant vs. Prospect C
Prospect C: these are the best economics as compared to current tenant - start rate ($1.70 vs. $1.40), effective rate ($1.677 vs. $1.450), and effective rate incl. downtime ($1.593 vs. $1.450). They have excellent credit and don’t need any tenant improvements. The only downside is that they want renewal options and an expansion option.
Conclusion: the improved economics would likely be compelling enough for the owner to go with Prospect C over the current tenant, even with the renewal and expansion options. The only way the expansion option might be a deal breaker is if (i) the leasing market is extremely strong or (ii) the landlord has other plans for that suite.
Closing Thoughts
Not all leasing decisions will be obvious. They will be filled with trade-offs relative to financial and non-financial terms. Here’s the process I recommend to help you make decisions on which tenant to go with:
Start with the pure math on the financial terms to see the best deal.
Then layer in the tenant credit.
Finally, factor in the options the tenant is asking for. Are any of these deal breakers for you?
Then take the time to think about what is important to you.
Financially, do you care more about (i) cash flow or (ii) maximizing net operating income so that you can sell or refinance?
How important is tenant credit to you?
Are you willing to take on the risk and uncertainty associated with the tenant options? If you are selling or refinancing in the near term, make sure you talk with a sale broker and/or debt broker to understand how these options will be viewed by buyers and/or lenders.
Trade-offs will always exist. Take the time to think about them and understand what is most important to you.
Think.
Analyze.
Negotiate.
Repeat.
Be patient and focused to negotiate the deal that works for you.
How to Read Leasing Contracts Without Getting Burned
Breaking down the big three — listing agreement, letter of intent, and lease — and the one skill that makes them readable
We are making good progress in our discussion on leasing. Let’s anchor in on where we are.
What we have discussed thus far:
What is still to come:
Understanding broker listing agreements, letters of intent, and leases.
Analysis examples of new leases, renewals, expansions, contractions, and early terminations.
As you can see, there is a lot to cover. Leasing is exciting, dynamic, and complex.
But you don’t need to be intimidated.
As you spend more and more time on it, you will see that it is anchored in a handful of fundamental negotiation criteria: start date, lease duration, rent, leasing costs, and the rights both the landlord and tenant have during the lease term.
These are all concepts that end up in a lease. Understanding how to read and negotiate a lease will pay dividends for you over time.
Today I will focus on breaking down the three key contracts that go into leasing, culminating in a lease agreement:
Broker listing agreement.
Letter of intent.
Lease agreement.
These are the “big three” when it comes to leasing.
Let’s dig in.
What Is a Contract?
Let’s start by reminding ourselves what a contract is: a contract is a written agreement between two or more parties through which they commit to certain terms. We have covered contracts in three previous newsletters:
Selling/buying a property - Demystifying Real Estate Purchase Agreements
Hiring vendors to maintain your property - Vendor Service Contracts: What You Need To Know
Hiring contractors to upgrade your property - Navigating Construction Contracts
In the future we will cover two additional contracts: loan agreements and partnership/joint venture agreements.
Contracts can be short or long. They have a start and (usually) an end date and are signed by all parties involved. They are often written by lawyers.
And they have something called “defined terms”.
Defined Terms
To read and understand a contract correctly, you need to understand the concept of a “defined term”. Here are the basics:
It is any word or set of words that is capitalized, but not because it is the first word in a sentence. Examples: “Expansion Right”, “Effective Date”.
It means something special that may or may not be similar to what you think it means. That meaning will either be described in the paragraph in which the defined term is first introduced or in an exhibit that lists all the defined terms in the contract.
It usually is referred to in other parts of the document.
Here’s an example - “Expansion Right”: a tenant could have a right to expand into the adjacent suite under certain terms and conditions (a specific time window, rent, and tenant improvement package). The lease will define this expansion right and then refer to it in other parts of the document. For example, it might read: “If the Tenant is in default at any time, the Expansion Right shall become null and void.”
The use of defined terms reduces the need to repeat the same concept and words over and over again. They can be both helpful and confusing.
If you take one thing from this entire newsletter today, this is it:
As a reader, the key is to look out for these capitalized words and then look up their meaning. This way you will read and understand a contract correctly. Never assume a defined term means anything other than what is written in the definition.
Let’s move to the first of the three main leasing contracts.
Broker Listing Agreement
The broker listing agreement is a 2-6 page contract between a landlord and a broker. The landlord hires the broker to market and lease the property. There would be a similar agreement if an owner were to hire a broker to SELL the property.
At its most basic level, the listing agreement says that the broker will use commercially reasonable efforts to present qualified tenants to lease the space. The landlord will decide whether to lease to this tenant. If a lease is signed, the landlord will pay the broker.
Here are the key components that make up the listing agreement:
Listing Period (i.e. the length of the contract): Start and end date; typically, 6-12 months.
Commission Amount (note that structures and amounts vary between markets and product types). Here is an example: the broker will be paid if a lease is signed as follows:
6% of total rent for months 1 - 60 | 3% for months 61 – 120; nothing after 10 years. Note: it is typical for the broker to earn less for the latter years.
100% to listing broker if no outside broker involved | 50/50 to listing and outside broker if outside broker is involved.
Payment Timing: Example - 50% paid at lease execution | 50% paid when tenant takes possession of premises.
Re-Leasing: Listing broker may be required to re-lease space if tenant vacates/defaults within 1 year.
Marketing Budget: Owner may provide a specific marketing budget.
Exclusions: Renewals and expansions may be excluded from earning a commission; property sales are typically excluded.
I discuss this in further detail and have downloadable abstract templates for all three contracts in the Downloads section of my website: creprofessor.com/downloads.
I have a number of battle scars from poorly drafted listing agreements. Here are some things to watch out for:
If you are a new or smaller commercial real estate investor, the broker will prepare the listing agreement based on their company’s standard form. It often contains more than you want to agree to. Don’t be shy about pushing back on certain terms.
Make the duration of the agreement no longer than 6 months. You want the broker to feel the pressure that they don’t have unlimited time. You can always extend the agreement.
Exclude payments for renewals. I have seen situations where we renewed an existing tenant, not realizing that the listing agreement required the broker to be paid even though they weren’t involved in the negotiations.
Exclude a commission for a sale. I once had a situation where we decided to sell the property and found that the listing agreement, which had been prepared by the broker, included a clause that they would be paid 2% on any sale. We had to get out of this agreement before we could hire a separate broker that specialized in property sales to sell the property.
The key is to read and summarize the agreement to make sure you understand what you are agreeing to. As with all commercial real estate contracts, you can always (try to) negotiate out what you don’t want to agree to.
Let’s move to the next contract.
Letter of Intent
A letter of intent (“LOI”) is a 1-6+ page document that outlines the key terms under which a landlord and prospective tenant would use as the basis for a lease.
We went deep into negotiating LOI terms last week, so I’ll just highlight some key points here.
The LOI becomes the foundation for the terms that will be included in the binding lease agreement. In the majority of cases, most of the terms, other than confidentiality, governing law, and possibly exclusivity, are non-binding. This means either party can walk away from negotiations for any or no reason at any time.
Deal terms such as rent, start date, and tenant improvements are negotiated using the LOI. We discussed this process last week in Why the Highest Rent Isn’t Always the Best Deal.
Here are the key terms in an LOI:
Start and end date.
Rent, annual increases, and free rent.
Security deposit and any personal guarantors.
Condition of the space and any tenant improvements.
Options and rights such as renewals, terminations, expansions, contractions, and right to purchase.
Any brokers involved and any commissions that are different from the listing agreement.
Most of the time a broker will prepare and negotiate the LOI on your behalf based on their advice and your decisions.
Always remember, you are the property owner and the one who makes decisions. Brokers (and any other lawyer, consultant, or advisor) are there to give you opinions, but the owner is the one who makes the decision. Never forget this.
Once the LOI is agreed to, a lease is negotiated. However, not all leases need to start with an LOI. I have done deals where we verbally agree to the key terms and go straight to a lease.
But before we get to the lease agreement section, let me share one story that illustrates the downside of an LOI being non-binding.
I was negotiating a large lease with an excellent credit tenant. We had a signed, non-binding LOI and the lease was fully negotiated and ready for signature. We were just waiting on the tenant’s proof of insurance before we signed the lease.
The next thing we knew, the tenant told us they were backing out of the deal. Something unrelated to our space had changed on their end. Because we hadn’t signed the lease, they had the right to back out.
Key takeaways: (i) an LOI is non-binding and (ii) a lease is not valid until it is signed by both parties.
Lease Agreement
Lease agreements are typically 5-15+ pages with a series of exhibits. They can be simple and not negotiated at all using the American Industrial Real Estate Association's standardized lease form or they can be complicated and highly negotiated over weeks and months, costing $10,000+ in legal fees.
It all depends on (i) how reasonable each party wants to be, (ii) whether the tenant is under pressure to move in due to their business needs, and (iii) whether either party has a biased lease template form that they want to use (i.e. overly landlord or tenant friendly).
There is not enough space to go into all the terms of a lease, so I will limit this discussion to the main sections:
General: parties involved, square feet, building, permitted uses, parking.
Key Dates: start, end, early possession, timeline for completion of tenant improvements.
Rent & Other Financial Obligations: rent, increases, free rent, reimbursement structure (NNN vs modified gross vs gross), security deposit, late charges.
Delivery Conditions & Tenant Improvements: condition of the space, who completes and pays for the tenant improvements.
Tenant Options/Rights: renewal, termination, expansion, purchase, sublease.
Landlord Options/Rights: relocation, termination.
Alteration Rights & Maintenance Obligations: who maintains what and whether the tenant has rights to modify the premises with or without landlord’s approval.
Defaults, Damage, Condemnation: what constitutes a default and what happens if the building is damaged or condemned.
Other Tenant Obligations: estoppels, financial statements, subordination and non-disturbance agreement.
Exhibits: such as rules and regulations, rent payment instructions, insurance obligations, tenant improvement details.
You can visit creprofessor.com/downloads to dig in deeper into what goes into a lease and download my summary template.
Leases can be 30+ pages long with exhibits, but make sure you read them in their entirety. One property acquisition almost fell apart due to a clause deep in the lease that gave the existing tenant the right to purchase the property.
The seller had missed the clause and had to do a last-minute scramble days before closing to get the tenant to waive the right.
The deal eventually closed, but not without some significant effort and stress.
Making Sense of It All
As I said before, don’t be intimidated by contracts. You can understand them if you follow these key steps:
Think about the purpose of the agreement and what each party is trying to achieve.
Listen to the advice of brokers, lawyers, and experts, but remember that you make the decisions. If the advice seems unreasonable, ask questions and/or don’t follow the advice.
Be reasonable. Getting through a contract usually involves compromise. Talk with the decision maker on the other side to understand their perspective.
Create YOUR best environment to read the contract. For me this means printing out a hard copy and reading it first thing in the morning without distractions. I highlight the important parts, strike out the parts I won’t agree to, and note the areas for further discussion. Find what works best for you.
If you don’t understand something, don’t sign the contract. It is better to be embarrassed by asking a question that might make you feel stupid than to agree to something that you don’t understand and could bite you in the future. Try saying: “I am not clear on what situation would come up where this language in the contract would come into play. Can you give me an example?”
Take your time.
Ask questions.
Keep learning.
You got this!
Why the Highest Rent Isn't Always the Best Deal
How to market your space, understand a letter of intent, and see what an offer is really worth
Last week I introduced the 4 tools you can use to accurately project your rents: competitive set, lease comps, understanding your local market, and working with brokers.
Today we are going to take the next step to understand how to (a) bring prospective tenants to your property so you can (b) pick the tenants that will be the best fit for your property.
“Fit” is a broad word.
It covers things like rent, concessions, start date, length of lease, tenant credit, tenant improvements, and broker commissions.
Different owners will have different priorities, making “fit” unique to each owner.
Regardless of your priorities, you want to maximize your options. As with anything, having multiple options usually yields better decisions and outcomes.
For example, if you are ready to lease a car, it helps to get quotes from multiple car dealers. Having multiple quotes and options allows you to compare price, timing, and other criteria.
It is often the process of comparing bids that allows you to see what is most important to you.
Getting multiple bids when you are buying something is straightforward. Make the calls or visit the sellers.
Comparing multiple tenants to lease your space is a bit harder. You can’t control when someone needs space, but you can control your marketing outreach to make sure all the tenants that are looking for space to lease consider YOUR space.
This is what we are going to get into today.
How to market your property.
Negotiating the best deal for your property.
Residential and commercial are fundamentally different in these processes, so we will discuss them separately.
Let’s dig in.
Residential: How to Market Your Property
As a reminder, residential refers to both 1-4 unit residential and multifamily (aka apartments). The tenants (aka residents) are individuals, not businesses.
The residential marketing process involves three components:
Value add initiatives to show the units and the amenities in the best light.
Maximizing the exposure of your property to bring in prospective tenants.
Having an effective sales process once a prospective tenant comes in to see the property.
We discussed value add initiatives in The Many Ways You Can Add Value to Your Real Estate Investment.
Maximizing exposure includes all the ways you can get the attention of potential tenants from signage to banners to search engine marketing to social media. These are tried and true marketing techniques across many industries beyond real estate.
The unique aspect of residential real estate is the sales process led by a member of the property management team. The sales person literally walks the prospective tenant through the property, highlighting key features of the property and the location.
For 1-4 unit residential the focus will be on the individual unit and the benefits of the location.
100+ unit apartments are much more involved. There will be a specific tour path the sales person takes all prospective tenants on.
I personally experienced this as a prospective tenant when I went to my first large apartment complex. Here’s how it went.
Leasing Center: it started with a bright and lively leasing center.
Pool: we then walked by the pool, where I saw people sunbathing.
Gym: next it was the renovated gym. In my head I was thinking that I could cancel my gym membership and use this instead.
Unit: we moved on to the unit where the sales person highlighted the renovated kitchen and view.
Dog Park: we ended by walking past the dog park area where I saw dogs running free in a fenced area.
All the while the sales person was listening to my reactions and adjusting the sales pitch, including saying that she already had another person interested in the unit I liked best.
I signed the lease that day. A sales job well done.
The larger and more professionally managed the apartment complex, the more likely they will follow a similar process.
Residential: Negotiating the Best Deal For Your Property
In Leasing: The Engine That Can Turbo Charge Your Revenue, I oversimplified the leasing process by saying that adding value to residential (as compared to commercial) is about making the improvements and watching your hard work pay off as the rents increase.
The marketing section above debunks some of this simplification, but the distinction between residential and commercial still holds.
Fair housing law affects how larger operators manage the leasing of their apartment complexes. This law prohibits discrimination on the basis of protected classes. Larger operators adopt uniform pricing as a risk-management practice. One price for everyone is a clean way to prove you didn’t treat applicants differently.
For buildings leasing under the uniform pricing model, the prospective tenant either agrees to the rent and signs the form lease or doesn’t. It is a “go, no go” decision without any negotiations. The only flexibility the prospective tenant may have is choosing the length of the lease.
The 1-4 unit residential segment is more actively negotiated, but not as extensively as commercial. The negotiations will typically be limited to the rent and length of the lease.
Commercial real estate leasing is all about negotiations. This is where we will go next.
Commercial: How to Market Your Property
Whether industrial, retail, or office, tenants for commercial properties are businesses. Some of the same marketing fundamentals apply, but the primary method for commercial is direct outreach to individual businesses and their broker representatives.
This is where leasing brokers come in.
There are two main types of brokers when it comes to leasing: landlord rep and tenant rep. “Rep” is short for representative. Some brokers do both, but many specialize.
A landlord rep broker specializes in representing building owners in marketing and leasing their property.
A tenant rep broker specializes in representing businesses (i.e. tenants) in finding space for them to lease and negotiating the best deal for them.
Both landlord rep and tenant rep brokers are compensated by earning a commission if a lease is signed. This commission is paid by the owner. We will cover commissions in a future newsletter.
The leasing process is as follows:
Owner hires a landlord rep broker on an exclusive basis using a broker listing agreement detailing the length of the agreement and how much the broker will be paid. We will cover the details of the listing agreement next week.
The landlord rep broker markets the property to brokers and businesses in the area using a leasing brochure. See below for links to some examples.
A prospective tenant will tour a space with or without a tenant rep broker.
If the tenant likes the space, negotiations will begin.
Negotiations are where we will move to next.
Commercial: Negotiating the Best Deal For Your Property
Negotiations play a HUGE role in commercial leasing.
The owner and landlord rep broker set an “asking rate” that is usually shown on the leasing brochure. The tenant rep broker then uses this as a starting point to try to negotiate the best deal for their client (the business that is interested in leasing the space).
At this stage the parties are negotiating a non-binding Letter of Intent (LOI) that outlines the primary lease terms that will be incorporated into a lease. We will cover the details of the LOI next week.
See below for a table that shows how the negotiations for an industrial building might play out, using the example from last week’s newsletter.
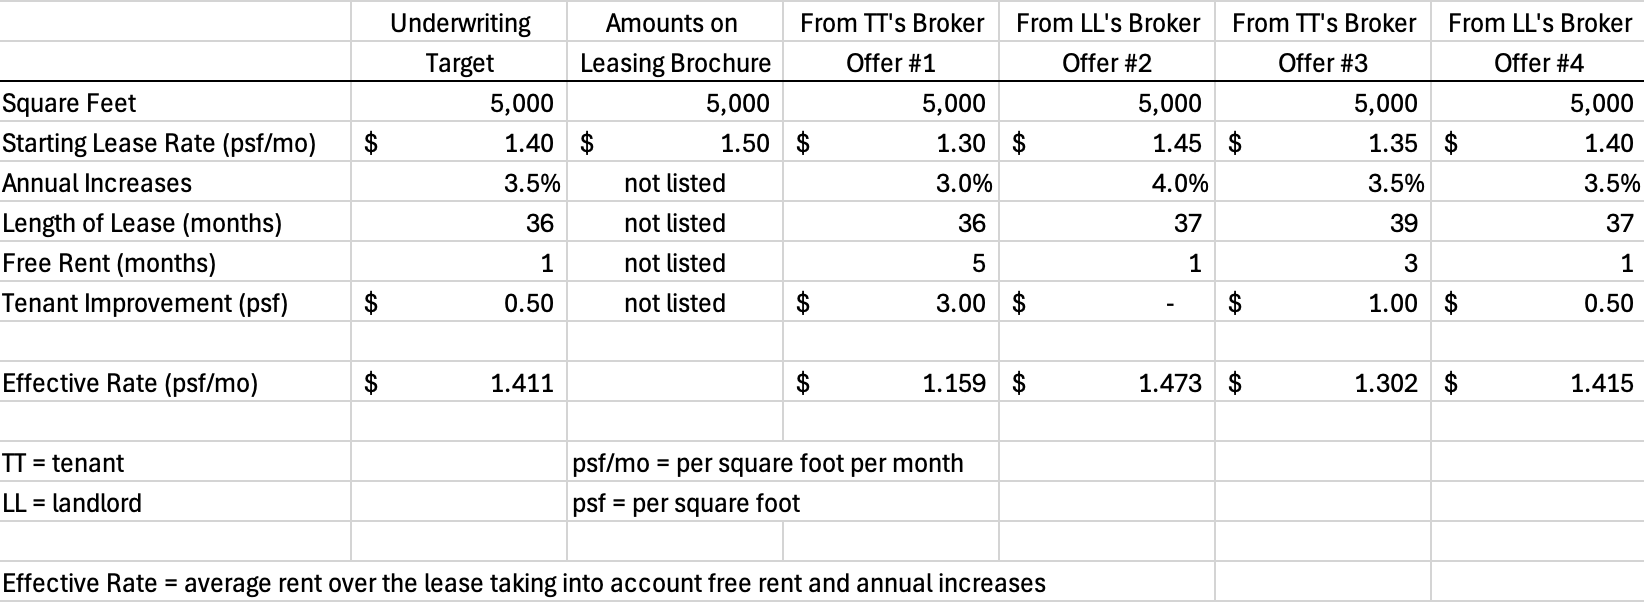
Table 1: Lease Negotiation Example
Let’s break down what is going on in the table above.
Asking Rate vs. Underwriting Target = $1.50 vs. $1.40: the asking rate is higher than the underwriting target to leave some room for negotiations.
Initial Offer from Tenant’s Broker: the broker started aggressively: $1.30 start rate (vs. the asking rate of $1.50) plus 5 months of free rent and $3 psf of TI’s. The effective rate is $1.159 vs. the underwriting target of $1.411. There is still a lot of work to be done.
Over the subsequent three LOIs, all parties came to an agreement on the terms shown in “Offer #4”. Let’s compare the amounts agreed to in Offer #4 vs. the Underwriting Target.
Start Rate: $1.40 vs. $1.40 = good outcome.
Effective Rate: $1.415 vs. $1.411 = good outcome. The owner was able to agree to 1 month of free rent but get an additional month of paid rent to help increase the effective rate (36 months of paid rent + 1 month free rent = 37 month lease).
Tenant Improvements: $0.50 vs. $0.50 = good outcome.
As I said in the beginning with any negotiation, you need to understand the criteria that are most important to you such as:
Maximum starting rent.
When the rent starts: start date plus months of free rent.
Length of lease.
Amount of tenant improvements (TI’s) you are willing to give.
Different owners will have different criteria preferences and these preferences will change over time. Examples:
An owner who plans to hold the property forever may be willing to take a lower starting rent in exchange for a sooner rent start date, no free rent, and no TI’s.
An owner planning to sell (or refinance) the property in the near term may want the complete opposite: maximize the starting rent but be willing to push out the start date and give more free rent and TI’s. This is because they want to maximize the net operating income to sell at a cap rate that maximizes the sales price.
Negotiations are about knowing which criteria are most important to you and the prospective tenant and then finding a deal that both parties can live with.
When it comes to comparing multiple prospective tenants, this can mean running parallel negotiations.
See below for a table that shows the initial offers (#1) from two prospective tenants.
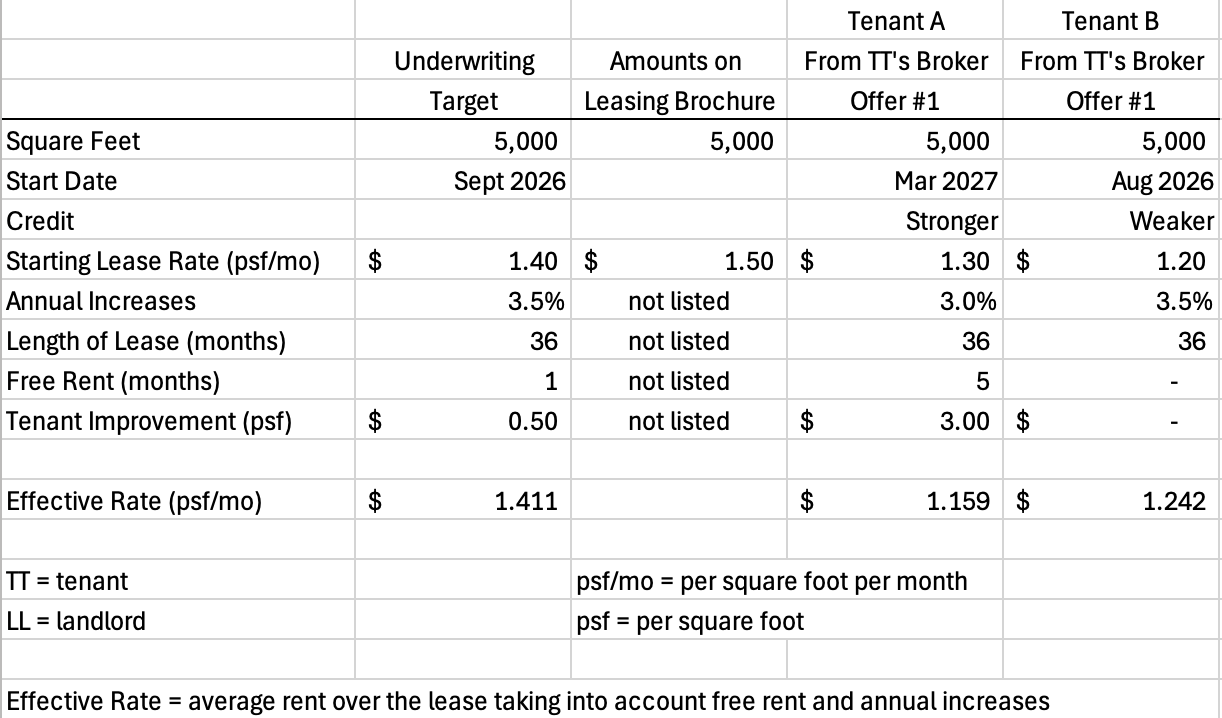
Table 2: Lease Offer Comparison for Two Separate Tenant Prospects
Let’s break down what is going on in the table above.
Starting Lease Rate: both offers are below your $1.40 target. Tenant A’s offer is better at $1.30 vs. $1.20 for Tenant B, but…
Effective Rate: Tenant A’s offer is worse at $1.159 vs. $1.242 for Tenant B.
Credit: Although Tenant B has a better effective rate, they have weaker credit.
Other Criteria: Tenant B’s offer is more attractive in other areas vs. Tenant A:
Annual Rent Increases: 3.5% vs. 3.0%.
Free Rent: none vs. 5 months.
Tenant Improvements: none vs. $3.00 psf ($15,000 in TI’s).
Start Date: I have introduced a new factor showing when the lease will start. You have an underwriting target of September 2026. Tenant A is proposing March 2027. Tenant B is proposing August 2026. That is a 7 month difference. 7 months at $1.40 psf/mo x 5,000 square feet = $49,000 of rent. This is huge, especially for an owner focused on cash flow.
Tenant B is a better deal despite the lower starting rate. You need to get comfortable with the weaker credit, but this is an analysis exercise.
So how do you approach this?
Understand the criteria that are most important to you.
Recognize that these are just the first round of offers. Remember Table 1. Things will evolve during the negotiations.
Accept that you often need to simultaneously negotiate with multiple tenant prospects at once to see where you end up.
Remember that you can say “no.” You won’t come to acceptable terms with all tenant prospects.
Negotiations can go on for weeks and even months. Or they can happen in a matter of days. Here are three real world examples of industrial leases I have experienced.
Example 1: Typical
Negotiations for the industrial building happened over two offers and then moved to the lease negotiations.
Example 2: Extremely Fast
We knew the tenant needed a building immediately and that they were considering multiple options. We skipped the letter of intent and sent them a lease ready for signature with terms that we felt were reasonable. They signed the lease immediately without any negotiations. Very unusual, but true.
Example 3: Extremely Slow
The negotiations with this Fortune 50 company over the LOI took over six months and then the lease negotiations took another year. Painfully slow, but we didn’t have any other tenant prospects.
Closing Thoughts
This discussion highlighted the similarities and differences between residential and commercial. They follow different formulas.
Residential
Effective Marketing + Strong Sales Process = Strong Leasing Performance
Commercial
Hire a Broker + Direct Marketing + Active Negotiations = Strong Leasing Performance
In both cases, you as the owner need to make sure you understand the criteria (ex. maximum rent vs. steady cash flow vs. spending more money) that are most important to you so that you can take action and make decisions that yield the best results for you and your investors.
Take the time to think about what you want, measure the results of your team’s actions, and make adjustments as needed.
You got this.
The 4 Tools to Nail Your Rent Projections
Competitive sets, lease comps, local market review, and broker intel - how the pros figure out what a property will rent for
Last week I gave you an overview of the leasing process and the differences between commercial and residential leasing.
Today we are going to deep dive into how to understand a market and where your property fits into it. This will help you accurately project (aka underwrite) your rent.
Real estate investing is about buying investment properties. This is fundamentally different from buying a home you will live in.
An investment property needs to perform by bringing in rent.
From the tenant’s perspective, rent is an expense. Tenants (i.e. businesses and individuals) want to minimize expenses. Therefore, they want to minimize rent.
Owners want maximum rent. Tenants want minimum rent.
This is where we see the tension of supply and demand.
When you are buying a property, you need to project what the property will rent for. Unfortunately, this is when you know the least about the property and you have a due diligence deadline. You run the risk of making a costly underwriting error if you estimate market rents too high.
But don’t worry. There are ways to mitigate this risk.
Today I will navigate you through the tools and techniques to understand the market in which your property is located. This mitigates risk. They include:
Your competitive set.
Lease comparables (aka lease comps).
Understanding the local market.
Working with brokers.
Macro factors that change market conditions.
How to make sense of it all.
Let’s dig in.
Tool #1: Your Competitive Set
Unless you are developing a property in the middle of nowhere (do not do this!), you should be able to use similar properties in the same market to better understand the leasing prospects for your property.
Similar properties in your property’s geographic market are known as your “competitive set”.
They won’t be exactly the same, but they will be similar. You will take into account things like location, building age, condition, square feet or number of units, multifamily amenities, occupancy, owner, and any other factors you think are relevant.
Creating your competitive set allows you to define your competition. These are the properties you will be competing with for tenants. As with any competitors, each will have strengths and weaknesses.
One property may be in a better location than yours, but have some functional challenges. Another might have worse curb appeal than yours, but have access to cheap electric or some other unique feature. Create your competitive set by:
Putting the buildings and their characteristics in an excel table with a picture of each asset.
Adding notes on the pros and cons of each property.
Adding a row for the asking rent for each property. This is how much the property is “asking” tenants to pay.
Creating a map of each building showing their location relative to your property.
Here is an example of a competitive set for an industrial property.
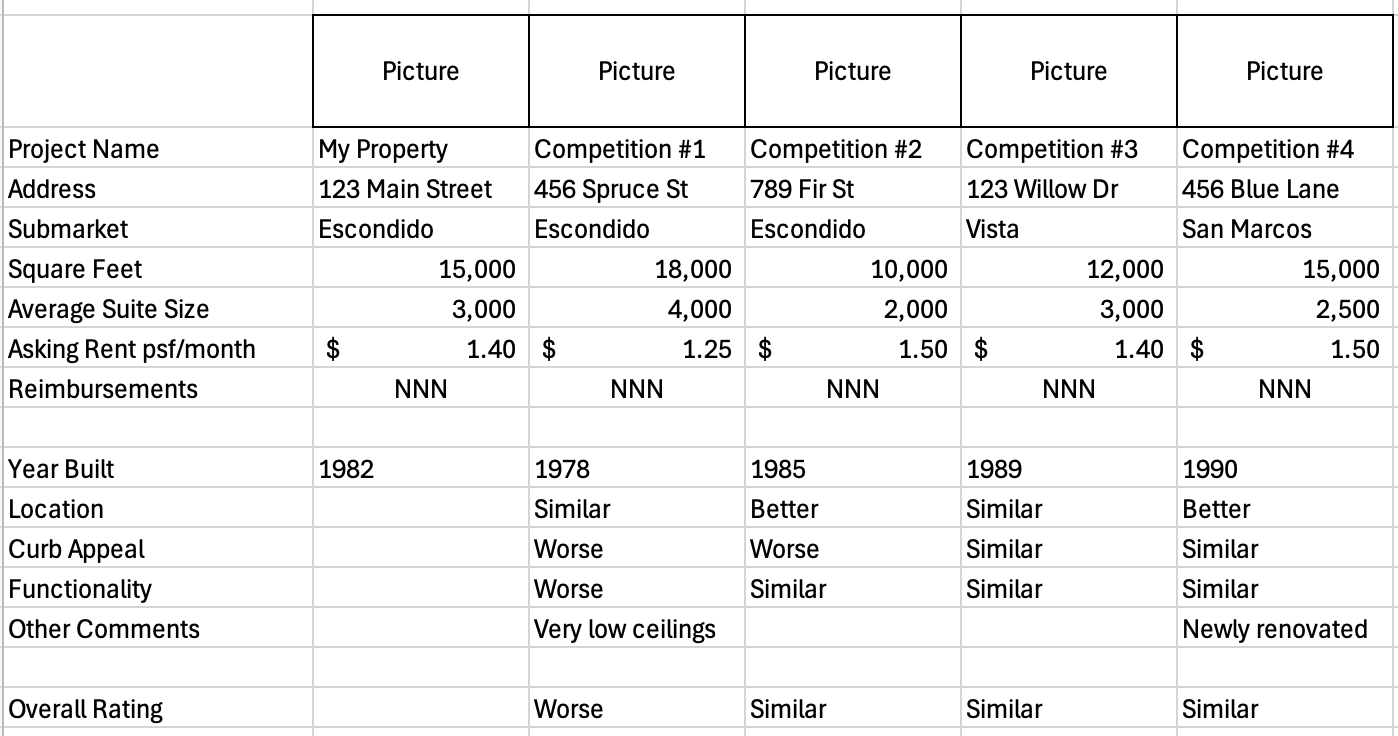
Table 1: Competitive Set Example for Industrial Property
Now let’s add in lease comps.
Tool #2: Lease Comparables (aka Lease Comps)
The competitive set helps you understand the market, but it is limited in that it only includes asking rents.
You want to look at deals that have actually been signed in the market.
This is where lease comps come in.
Lease comps are a table of data that includes details on leases that have been signed in your market in the past 12-24 months. You want recent comps because markets change over time and older comps become stale. Here is an example of a set of lease comps:
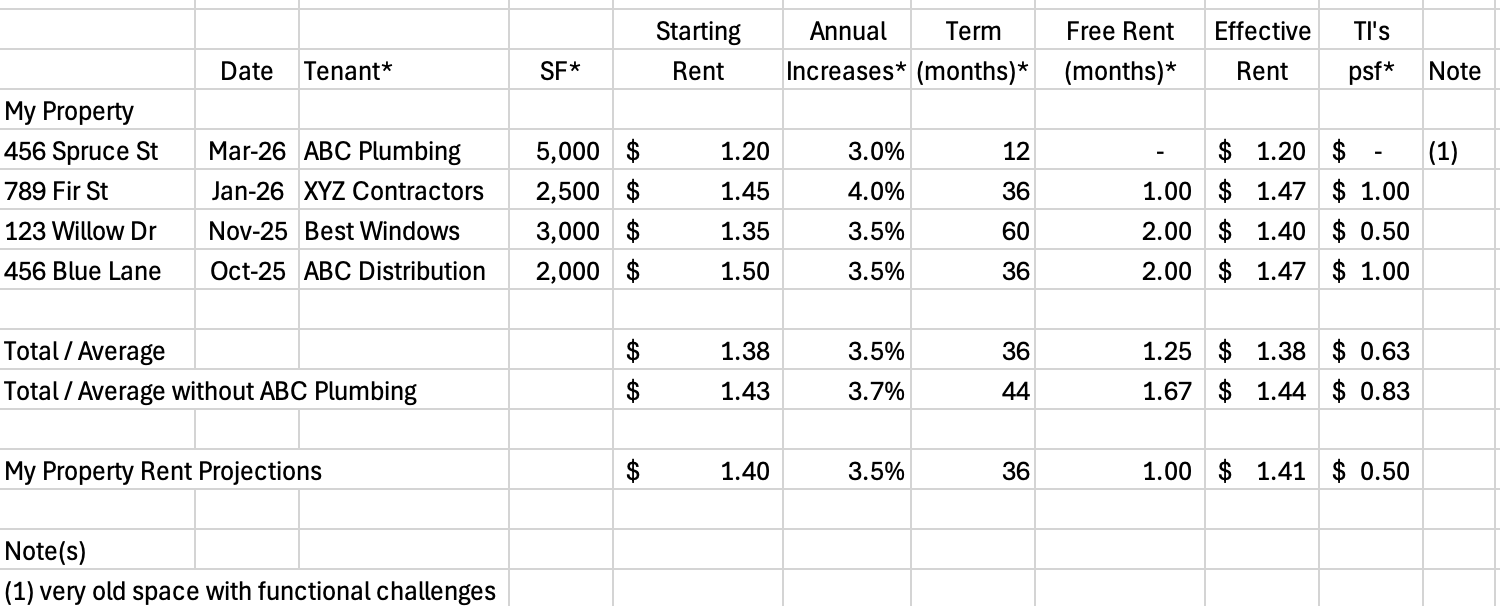
Table 2: Lease Comps Example for Industrial Property
Effective rent refers to the average rent taking into account annual increases and free rent over the full lease term. We will cover this in a future newsletter.
Lease comps are history, not speculation. They are made up of leases that have been signed at properties that are similar to yours.
In the table above, I compared my starting rent projections of $1.40 per square foot (psf) per month to the comp average of $1.38. We are a bit high.
Then I removed the first comp with ABC Plumbing because it was a short-term deal in a challenging space. This brings the average up to $1.43 compared to my assumption of $1.40, which makes me feel more comfortable.
The effective rent also checks out at $1.44 (after removing ABC Plumbing) vs. my assumption of $1.41.
It can be sobering to look at the lease comps relative to what you are projecting for rents for your property. Be realistic. If the lease comps don’t support your projections, this is a red flag.
In this case you better have some secret sauce to convince you, your investors, and your lender why you will be able to hit your rent projections.
I have made the mistake of not taking into account free rent and tenant improvements when looking at lease comps. I relied on a high lease comp to support my rent projections only to find out after I owned the property that the rent was so high because the owner had given 6+ months of free rent and a huge tenant improvement package to get the starting rent unusually high. This is why it is so important to track both free rent and tenant improvements as separate columns.
Don’t make this mistake yourself.
Sometimes you will see a lease comp that looks much higher or lower than the rest. Ask for details on this and consider removing it from your set of lease comps.
Let’s move on from lease comps to understanding your market.
Note on table 2: columns marked with an asterisk (*) refer to data used in commercial, not residential. For residential, the competitive set and the lease comp data are often combined into a single table that includes the asking rent but no lease comps.
Tool #3: Understand The Local Market
Each market has its own unique characteristics. These affect how a market will perform. Characteristics will include:
Population size.
Health of the local economy.
Major employers.
Universities and the quality of education.
Tax policy and whether the local municipality is pro or anti-development.
Access to freeways and airports.
Housing affordability.
Quality of life factors such as entertainment, outdoors, weather, and schools for children.
Any other unique factors of that market.
All of this translates into determining whether people want to live there. Can they find a job that allows them to afford housing, send their kids to a good school, and have a good quality of life?
The key is to understand the market you are investing in and how your property fits into it. Take the time to read research materials and talk with market experts.
Let’s move on to the role of brokers.
Tool #4: Working With Brokers
You may be reading this and wondering how you are going to get all this data to understand the market, develop your competitive set, and build out your lease comps.
There are professional databases out there such as LoopNet & CoStar for commercial and Zillow & Redfin for residential. These can be excellent sources of information but (a) they can cost money for premium subscriptions and (b) there is no substitute for talking with people who work a geographic market every day.
Local market brokers will be your market experts.
The key word in this statement is LOCAL. You want to work with brokers (and property managers for residential) that focus on the market your property is in. Finding a broker who has “done a deal” in that market is different from a broker who focuses on your market.
Always pick the broker with market focus. They live and breathe the market. They are the experts.
They will understand the market drivers, the characteristics of the other owners, and most importantly, what the tenants in that market value most.
They are used to helping investors new to the market understand it. Look at properties for sale that fit your target market and asset class. Find a broker who is selling one or two properties. Then reach out to them to say that you plan to invest in this market and would like to meet them to help get a better understanding of the key market drivers.
Make it clear that you are ready to invest soon, so they know you are not wasting their time.
They will put together competitive sets and lease comps from their database. The good ones will give you an overview of the market by (a) giving you a Google Earth tour of the market in their office and (b) driving you around the market to see the properties that make up the competitive set and lease comps.
Pro tip: don’t just take one broker’s opinion of the market. Try to talk with 2-3 brokers to triangulate the information. Lease comps are facts, but there is subjectivity as to which lease comps to select and how the competitive buildings compare to your building. Be respectful of brokers’ time, but don’t feel you need to be exclusive to just one.
That wraps up the four key tools, but there is one more thing to watch: macro factors.
Macro Factors That Change Market Conditions
So far we have been property specific while also understanding market factors.
But there can also be major changes in market conditions that can completely adjust how all properties in the market perform by fundamentally changing the supply and demand dynamics for a period of time.
Here are some examples:
Major new development(s): rents have been going up so developers decide it is time to build. A few years later, the market is flooded with new supply giving leverage to tenants and reducing rents. This is what has happened to the multifamily / apartment market over the past few years (2023-2025).
Global pandemic: the COVID-19 pandemic of 2020 and the resulting government actions completely changed the dynamics for multiple asset classes:
Apartments: increased demand due to stay at home orders.
Office: reduced demand due to increased amount of remote work.
Industrial: increased demand due to online shopping and consolidation of supply chains to be more local.
Retail: reduced demand due to stay at home orders.
Macro-economic slow down: when the economy slows, demand across all asset classes tends to decrease as both people and businesses cut expenses. The reverse happens when the economy is growing.
War and geopolitical uncertainty: fear tends to make people uncertain and spend less.
Some of these examples affect all markets and asset classes. Some are more local and asset specific. All tend to be uncontrollable from an individual property owner’s perspective. All you can do is decide how to interpret the information and take (or not take) action.
So how do you bring it all together?
How To Make Sense of It All
Competitive sets, lease comps, broker guidance, market factors…it is a lot to take in.
Here’s my guidance on how to make sense of it all.
Analyze the market before you make your first offer. Pick your niche. Take the time to understand the market before you have a due diligence deadline.
Kick the tires. Get out in the market. Walk and/or tour your competitive set.
If you will be adding value to your property, have two versions of your rent projections: (a) before your value add initiatives and (b) after. Compare your lease comps against each. You may even decide to create a second competitive set to compare your “post renovation” property to.
Talk with multiple, local brokers. Don’t just rely on one person’s opinion.
This is not a “one and done” exercise. Revisit the data and talk with brokers regularly. The market will continue to change, as should your projections and asking rates.
Markets go through cycles. Sometimes they favor the owners/landlords. Sometimes they favor the tenants.
At some point during your property ownership, most of you will be blindsided by some macro event that will turn your world upside down (examples: 2025 tariffs, 2020 global pandemic, 2008 great financial crisis, 2001 internet bust).
Welcome to living in an uncertain world. This is life.
When it happens, breathe.
Take it slowly.
Think. Don’t react too quickly.
The tools and techniques described here will help you navigate the market in good times as well as when the world feels like it has turned upside down overnight.
Competitive Set + Lease Comps + Broker Reconnaissance + Local Market Conditions = Accurate Rent Projections
The process is there to help and guide you.
You got this!
Leasing: The Engine That Can Turbo Charge Your Revenue
Why your leasing strategy is so important to increasing the value of your real estate investment
Welcome to another edition of Real Estate Investing Explained.
We are well underway on our current series: Executing Your Business Plan. So far we have covered:
Today we transition to leasing.
The most common way to add value is to physically upgrade the look and functionality of your investment and then execute your leasing strategy to increase revenue, which will drive up the value of your property.
Physical Upgrade + Leasing = Value Increase
Physical transformation first.
Leasing strategy second.
It doesn’t always work this way, but it is the most typical.
Sometimes the market rents increase (or decrease) regardless of what you do to the property.
Sometimes you will get lucky and find a property where the rents are below market and can be increased without doing anything. The previous owner may have not paid attention to market rents or had a different strategy.
Over the next set of newsletters we will get into all things leasing including:
Leasing strategies.
Analyzing lease comparables.
The leasing process and the role of brokers.
Negotiating a letter of intent (LOI) and a lease.
Leasing is not something that will fit into a single newsletter. It is much more complex.
But don’t worry! I will guide you through it.
Today we will cover:
Differences between commercial and residential leasing.
What to expect in the leasing process.
Defining your leasing strategy.
Leasing is one of the most interesting and dynamic aspects of the business. It is where all your hard work manifests into value.
Let’s dig in.
Differences Between Commercial and Residential Leasing
When it comes to leasing, there are some key differences between commercial and residential.
As a reminder, commercial refers to industrial, retail, and office. Residential refers to apartments and 1-4 unit residential.
Let’s start with the similarities.
Everyone wants tenants to lease their space. This is where revenue comes from.
These tenants should be able to pay the rent, not beat up the space, and be a “good neighbor” to the other tenants.
All tenants have a lease that details the rent, term (aka lease duration), and other “rules” of occupancy.
Proactive owners actively market their space and may be willing to offer incentives such as free rent.
That being said, they are fundamentally different in key ways.
Negotiating Rent: residential is covered by federal fair housing law to protect against discrimination. Every tenant needs to be offered the same terms. Therefore, rent is never negotiable. Commercial rents are actively negotiated in conjunction with free rent and tenant improvements. Commercial leasing is all about negotiations.
Tenant Improvements (TI’s): think of TI’s as a custom remodel of the suite for a specific tenant. This doesn’t happen in residential but is very common in commercial.
Leasing Broker Involvement: leasing brokers play an active role in most commercial leases. They are on the front line of the negotiations. Leasing for residential is typically done by someone on the property manager’s team.
To oversimplify, adding value to residential is about making the improvements and watching your hard work pay off as the rents increase.
Commercial is a two stage approach of making the improvements and then actively marketing and negotiating to get the right tenants in at the best combination of rents, TI’s, and tenant credit.
It is an oversimplification to highlight the differences.
As you read the rest of the discussion on leasing, keep these differences in mind to recognize which are going to be applicable to you as you pick your asset class (commercial or residential).
Let’s continue to the leasing process.
What to Expect in the Leasing Process
Despite the differences between commercial and residential, leasing does follow a fairly standard process. Here are the steps:
Understand the market and how your property fits into it.
Define your leasing strategy.
Assemble your leasing team: leasing broker and/or property manager.
Market and screen potential tenants.
Negotiations: letters of intent and leases.
Delivering the space for occupancy.
A simple process, but not always an easy one to execute. Much of this will depend on your leasing strategy, which is where we will focus on next.
Defining Your Leasing Strategy
Your leasing strategy should be part of your overall strategy beyond just leasing. We discussed this in The Risk-Return Spectrum: Choosing Your Real Estate Investment Strategy. There are three main strategies:
Core/Turnkey: low risk, low return. You buy a property that is well leased and maintained. There is minimal work to do.
Light Rehab: medium risk, medium return. There is some work to do, but it is mainly cosmetic (paint, carpet, clean up).
Value Add: high risk, high return. There is a lot of work to do. The property might even be vacant. You will be repositioning it and taking on a lot of risk for superior returns.
If you are buying core deals, you are unlikely to take an active role in leasing because there won’t be much to do. It is either a commercial property leased long term or a residential property with high ongoing occupancy and rents due to the location and construction quality.
Light Rehab and Value Add deals will require a more hands on approach. You will need to think about questions such as:
How aggressive do you want to be in your rent?
How important is maximum rent vs. occupancy?
How long can you last with low or no occupancy relative to your other expenses?
What is your budget for customizing the suite for the right tenant?
How important is the tenant’s credit and financial strength?
What is the condition of the economy and where are you in the real estate market cycle?
These are important questions that you need to really think about.
Talk with your partner and team. Ask for the advice from people you trust. Talk with your leasing broker.
The answers to these question should not be set in stone. They should be revisited regularly, particularly when circumstances change.
In your first year of ownership you may be full of confidence and enthusiasm. If things don’t go well, you could find yourself wishing you had done the lease you passed on 12 months ago.
Welcome to the dynamic world of real estate investing!
Time and changing circumstances change your perspective, adding to or reducing your confidence and tolerance for risk.
This is normal and to be expected.
But we are just scratching the surface of leasing.
This newsletter was just the teaser.
Next week we will dive deeper into the details with a discussion on how to analyze the market and the critical importance of understanding lease comparables (aka lease comps).
This is where things get interesting and the experienced operators start to distinguish themselves.
As always, I will share my knowledge and experience so that you can turbo charge your learning curve.
Stay tuned for next week.
This is going to be fun!
Navigating Construction Contracts
Pricing structures, change orders, and mechanic liens
Last week we discussed the critical role of contractors. I also reiterated the process of adding value to your real estate investment by taking the time to:
Understand your goals.
Focus (aka think).
Talk with experts.
Get a budget.
Develop a game plan.
I wrote about the importance of talking with experts and budgeting.
This week is about navigating the process of executing a binding document with a contractor to do the work.
It builds on the contract fundamentals I discussed in Vendor Service Contracts: What You Need To Know. Today we will expand our scope from a service contract to the specifics of construction contracts.
With the exception of the initial purchase of your investment property, construction will be where you spend the most amount of money at a single point in time. Understanding the components that make up contracts and where the risks are is critical.
Today we will cover:
Contract fundamentals.
Specific components of construction contracts.
The four types of pricing structures.
Being clear on the scope of work & navigating change orders.
Understanding mechanic liens and retainers.
Best practices.
As always, we will walk through the jargon of commercial real estate to understand the fundamentals and empower you with knowledge.
Let’s dig in.
Contract Fundamentals
The newsletter on vendor service contracts is a useful reference for some of the core components that will go into a construction contract. These components include:
Owners - both property owner (i.e. you or your entity) and vendor / contractors.
Scope of work.
Whether there is a warranty.
Cost and payment timing.
Duration, frequency, and termination.
Insurance.
Construction contracts build off of these components.
Specific Components of Construction Contracts
All the components above will exist in a construction contract with some caveats:
Cost: there are four alternative types of pricing structures to define the cost.
Scope of Work: this is critical to define clearly and include in the contract.
Payment Timing: how payments are managed is more nuanced. This process includes risks and leverage.
Let’s break down these additional components in the following sections.
The Four Types of Pricing Structures
The construction industry has evolved to have four fundamental pricing structures that each have pros and cons. Different circumstances lend themselves to individual pricing structures. The pricing structures are:
Time and materials.
Lump sum (aka stipulated sum).
Cost plus.
Guaranteed maximum (aka GMAX).
Let’s break down each one.
Time and Materials
Best For: small jobs with a single contractor (no subcontractors).
Pricing structure: based on number of hours at an hourly rate plus the cost of materials.
Example: electrician at $120 per hour for 6 hours = $720 in time plus $480 in materials = $1,200.
Pros: minimal paperwork to get contractor started. Sometimes you don’t even use a contract. The contractor just bills you for the work. Fast and efficient.
Cons: pricing uncertainty until the job is done.
Lump Sum (aka Stipulated Sum)
Best For: jobs where the scope of work can be clearly defined in advance and the cost is more than $5,000 or so.
Pricing structure: fixed fee for a defined scope of work. The contractor has taken the time to understand the scope of work and given you a fixed fee to complete this work. Sometimes they give you a breakdown of the costs by line item including their general conditions and profit (see role of contractors). Other times they just give you a single amount with no backup. Either way, they are saying they will do the work for that price.
Example: general contractor will clean up the interior of the suite / unit including paint, carpet, lighting, plumbing fixtures, and electrical improvements for a fixed price.
Pros: clarity in the scope and costs.
Cons: takes more time as the contractor needs to bid the work. This takes even more time for you as the owner when you are getting and comparing bids from multiple contractors.
Cost Plus
Best For: custom remodels where price is less important OR the scope cannot be clearly defined up front.
Pricing structure: whatever the general contractor pays their subcontractors PLUS agreed upon general conditions and a percent profit.
Example: a unit renovation where the owner or their designer is actively involved in each step, figuring out the materials and scope of work in real time as the job is being completed.
Pros: owner sees the cost impact of each decision but does not unfairly put the price increase risk on the contractor. This would be unfair because the scope has not been clearly defined. The contractor can’t accurately bid the work without a clear scope.
Cons: price uncertainty until the job is complete.
Guaranteed Maximum (aka GMAX)
Best For: very large jobs.
Pricing structure: similar to lump sum with transparent subcontractor costs BUT costs are tracked on an ongoing basis. At the end of the job any cost savings against the original contract are shared between owner and contractor at a pre-agreed upon split.
Example: major renovation (or even new construction) where the pricing is in the millions.
Pros: owner has a cap on their costs with the ability to see some cost savings.
Cons: only appropriate for very large jobs. You are unlikely to use this as a new or smaller real estate investor.
As I said earlier, the characteristics of the work will lend themselves to a specific pricing structure. You will likely use time and materials or lump sum 90%+ of the time.
Many contractors have their own contract forms or use the AIA templates. This is fine. Just read the contract before you sign it to understand what you are agreeing to.
Regardless of which pricing and cost structure you choose to proceed with, you will still have the risk of change orders. This is where we will focus next.
Being Clear on the Scope of Work & Navigating Change Orders
What is a change order? Have you heard of one? Does it make you squirm?
A change order is your contractor asking for more money to complete the work than already agreed to in the contract. [Note: this is not applicable for a cost plus structure. A cost plus contract is set up so everything is a change order because you are figuring out the scope as you go.]
A change order is a 1-3+ page addendum to your construction contract that adjusts the scope and cost. It must be signed by both the owner and contractor.
Change orders occur when (a) the owner changes the scope of work or (b) the contractor finds an “unforeseen condition”. Let’s give an example of each.
Example 1: Owner Changes the Scope of Work
At the start of the job the scope has been defined, the contract has been signed, and the work has started. You (the owner) see the work as it is being installed and you are having second thoughts. Maybe you don’t like the paint color or the broker gives you new information on something at a competitive building that is being well received by tenants.
You decide you want to make a change.
The contractor may be able to make the change without disrupting the timeline, but they will charge you for it.
This is fair and appropriate. A change order will be created.
Now let’s discuss the second example.
Example 2: Contractor Finds an Unforeseen Condition
The contractor is proceeding with the work and comes upon something unexpected. Maybe the wood framing is rotted out when they remove the drywall or there is a sink hole discovered under the flooring.
The contractor would have had no way of knowing this without tearing up the unit in advance. These are legitimate change orders. These are risks you take on as a real estate investor.
That being said, not all contractor initiated change orders are that clear. Sometimes you will have contractors issue a change order for something they should have known in advance or because the work is taking longer than they thought.
These are not always legitimate and you should push back on them. Discuss them with the contractor and work together to come up with a fair solution.
The best defense against all change orders is to be clear on the scope of work. If you want the job to be on time and on budget, define the scope of work in advance and stick to it.
Let’s move on to paying your contractor. This is where you have some leverage if you have a disagreement.
Understanding Mechanic Liens and Retainers
Contractors need to get paid for the work they do. In order to protect themselves from owners not paying them, there is the lien process.
A lien is a document filed against your property with the county when there is a payment dispute. This tells anyone looking at the title documents of your property that you have a dispute, which will affect your ability to sell or finance your property.
Bad news.
Avoid this.
Here’s the sequence of steps.
Your contractor sends you a preliminary notice saying that they are performing work on your property for a specific dollar amount. Some larger material suppliers will even follow this same process.
You pay them for the work. Keep evidence of your payments. You could even consider asking for a lien release for larger jobs. Once complete, move on.
If you don’t pay them for the work, the contractor could decide to file a lien which will be recorded against your property.
As long as you pay the contractor, all will be fine. For larger jobs there is the risk that the contractor doesn’t pay one of their subcontractors and the subcontractor files a lien. This is unusual, but does happen. Just keep careful record of your payments.
The flip side of this process is that not paying your contractor can be an effective tool for the owner. Just be careful and reasonable with this.
Large jobs with multiple payments made over time have a built in mechanism for this: the retainer.
A retainer is an amount that is not paid to the contractor. Example: 10% of each bill. It really only comes into play when the job is long enough in duration that there are monthly payments. You are unlikely to see this much if at all, but the concept is useful to discuss.
As soon as you pay your contractor for 100% of the work, you lose any leverage you had.
Why is this relevant?
Let’s say the job is 95% complete. Everything is done except for the final light fixture installations. The contractor tells you the work is basically done and the light fixtures will be installed in 2 weeks when they arrive. They ask for full payment.
Don’t pay them yet.
Pay them an amount equal to the percent of work complete.
You want to hold back some money until the work is 100% complete so you can keep some leverage. Contractors are busy. Once you pay them 100%, their natural inclination is to focus on the next job.
But…a contractor’s profit is often tied to the last dollars of payment. Be fair, but don’t give up this leverage to make sure the job is completed in a timely manner.
Now it is time to wrap all of this up in some best practices.
Best Practices
Construction is risky, whether it is a renovation of an existing property or building a new one. It often involves multiple trades and work on parts of the building you can’t see until you open up walls, floors, or ceilings.
This is the risk of being a real estate investor.
Here are some best practices to reduce your risk.
Define scope clearly in advance of bid(s). The only thing more important than having a clearly defined scope of work included in the contract is picking a contractor you trust.
Pay attention to payments. Track the cost and invoices in excel. Check that the amount you are being asked to pay (a) ties to the amount in the contract and (b) reflects the scope of work that is complete. Visit the property to verify this or have the contractor send you pictures.
Having pictures and notes sent from the contractor to you each week is an excellent protocol, especially when you are not able to get out to the property regularly.
Be clear on start date and duration. You want this in the contract. I once agreed to the scope and cost of a roof repair in the summer, signed the contract in September, but the contractor didn’t start the work until November at the start of the rainy season. It was a nightmare! Put the target start date and duration in the contract.
Manage the punch list. A punch list is a list of items that need to be fixed once the work is substantially complete. It could include paint touch up, missing electric outlet covers, or other small items that the contractor needs to fix at the end of the job. Walk the job with the contractor when the job is complete to agree upon the punch list items. Don’t pay them 100% until the punch list is complete.
Warranty documentation. If there is a warranty, make sure you get the documentation of this warranty from the contractor.
Watch out for liens. Keep records of your payments and the invoices. Consider asking your contractor for a lien waiver for larger jobs.
Make sure you get the contractor’s proof of insurance.
Work with a contractor you trust. This is the most important thing you can do. Things happen. Work with someone you trust so you can fairly navigate issues as they come up.
As always, keep learning. Increase your knowledge. Ask good questions and treat others fairly.
You got this.
Understanding the Critical Role of Contractors
How to know enough to not feel like an imposter
Last week I shared the many ways you can add value to your real estate investment: asset class by asset class.
Today I will discuss the critical role contractors play in helping you understand costs, refine your business plan, and execute your value add initiatives.
Contractors are the key player in bridging the gap between what you think you might want to do and what you can afford to do.
Have a vision of an amazing new porch on your 6-unit apartment or a new facade on your industrial building? It is all just a concept until you have a realistic sense of costs.
Contractors give you these costs.
Today we will get into the details. You don’t even need to know what a “contractor” is. I will explain it all including:
General contractors vs contractors vs subcontractors.
The role of a general contractor and how they make money.
How to find a contractor and the key questions to ask them.
How to go from an idea to a price estimate to a real bid.
Signing a contract and navigating change orders.
Best practices.
By the end of this newsletter you will know enough to work with a contractor without feeling like an imposter.
Let’s dig in.
General Contractors vs. Contractors vs. Subcontractors
These terms are used casually and often incorrectly. Let’s get them straight.
General Contractor (GC)
A general contractor is in the business of managing construction work across multiple disciplines. Disciplines refer to things like painting, asphalt, electrical, plumbing, etc.
The key word is “general”. They are generalists as opposed to specialists.
They typically don’t have a huge team that does all of the work across disciplines. It is more likely that they subcontract out some or all of the work to others.
Subcontractors
A subcontractor is someone who specializes in a specific discipline such as painting, electrical, or asphalt.
Sometimes they are hired by a general contractor. Sometimes they are hired directly by an owner.
They are specialists in one or more discipline. They are the ones who will actually do the work.
Contractors
The word “contractor” is used as a general term to refer to someone an owner is hiring to do construction work. For example: “We need to find a contractor who will help us with our value add plan.”
It could either refer to a general contractor or a subcontractor.
If you (as owner) hire a “subcontractor” to paint your building, you would likely refer to them as a contractor. They only really become a subcontractor when hired by a general contractor.
Now let’s discuss how a general contractor makes money.
The Role of a General Contractor and How They Make Money
Let’s use an extreme, but not that unusual example, to explain how a general contractor (aka GC) makes money. In this case the GC doesn’t do any of the work. They have a very small team and hire subcontractors to do all of the construction work.
They will typically add one or two line items to the cost reflecting money that is going to them as opposed to the subcontractors.
General Conditions or Overhead and Supervision: this reflects some allocation of their team that will oversee the work on a day-to-day basis.
Profit or Fee: this is the profit they will make on the job.
Combined these two line items will reflect a 15% to 20% increase over what the GC is paying the subcontractors. Example: if you have a $30,000 job, expect to pay an additional $4,500 to $6,000 if you hire a GC. [Pro tip: if you have a much bigger job - example $500,000 - you will likely be able to negotiate a lower percentage.]
So what to you get for this additional cost? Two key things:
Subcontractor Relationships: GCs work with lots of subcontractors. They know the good ones and the bad ones. They can put pressure on one when needed as they may be giving them work in the future. As an owner with one property, you don’t have the same leverage.
Project Management: the GC will manage the day-to-day project. This includes obtaining and evaluating bids, creating subcontracts, and managing the work. The painter doesn’t show up? The GC will deal with it. Timing and coordination issues? The GC will deal with it.
Many owners think the GC earns their fee. Others want to manage the subcontractors themselves.
My perspective: when there are multiple disciplines (aka trades) required such a painting, asphalt, electrical, drywall, and plumbing, I prefer the GC route. When it is only one discipline (ex. painting), I am more likely to go direct to a painter.
Your property, your choice.
Whichever route you take, there are some key questions to ask a potential contractor.
How To Find a Contractor and The Key Questions To Ask Them
Let’s say you have your first property and some value add ideas as discussed in last week’s newsletter: The Many Ways You Can Add Value to Your Real Estate Investment.
Ask your broker and/or property manager which contractors they have worked with and who they would recommend. Then pick one or two to talk with to ask them the following key questions.
How long have you been in business? You want at least five years. Longer is generally better as it shows they run a fair and profitable business.
Are you licensed and insured? It is risky working with a contractor who is not. You could also consider asking for references to speak with.
Is this type of work typical for you? “This type of work” refers to your specific scope of work for your property. You want a contractor who is comfortable with both the scope and size (aka cost) of your job. Don't work with a contractor who only does $500,000+ jobs if you have a $30,000 job.
Do you have in-house design capabilities? Maybe you want to do an exterior renovation that includes painting, wood, and metal work. Many contractors have in-house design teams that can come up with a plan so you don’t have to hire a separate architect or designer.
What components of my scope will require a permit and what is the permitting process? Not all work (ex. painting) requires a permit. Some permitting is fast. Some is slow. Some triggers other upgrades. You want to understand this.
How soon could you get started and what would be your estimated timeline for the work? You don’t want to spend a bunch of time with a group only to learn that they can’t get started for 6 months.
What is your level of interest in working together? You want someone who wants to work with you.
You can see by this list that there is more to selecting a contractor than only costs.
But costs are important so let’s transition to pricing.
How To Go From an Idea To a Price Estimate To a Real Bid
As I described in the last newsletter, there are multiple steps in going from ideas to pricing, most notably understanding what you can afford. The steps are:
Understand your goals.
Focus (aka think).
Talk with experts.
Budgeting. This is where we will focus now.
Develop a game plan.
There are two main stages of budgeting and understanding how much something will cost.
Stage 1: Price Estimate or Rough Order of Magnitude (aka ROM)
This is when you are in the early stage. You need some general sense of how much it will cost to paint vs. redo the parking vs. renovate a kitchen.
A contractor will help you do this, but they will be spec’ing their time to do so without a guarantee of getting the work.
Be mindful of this dynamic and don’t abuse it. Only work with one contractor at this stage.
Stage 2: Contract Pricing
Once you have defined your scope, then you move to getting real bids that you could go to contract on with a contractor.
Some like to get final pricing only from the same contractor that gave you the ROM pricing. Others like to get multiple bids.
Getting multiple bids is more work and guarantees you will have to tell 1-2 contractors they are not getting the work even though they put time and energy into the process.
But there is nothing like getting multiple bids. You always learn something and may find you get better pricing.
You don’t always have to pick the lowest price, but you do get a comfort level that you are not overpaying.
Signing a Contract & Navigating Change Orders
Once you have pricing you are comfortable with, you will move to signing a contract. There are multiple types of contract and ways contractors like to do them.
We will go through all the details of this next week.
Best Practices
So how do you make sense of all this?
Here are what I believe are the best practices.
Interview the contractor. Don’t skip this part. You will learn a lot in the process.
Value their time. Don’t view getting a bid as “free”. It may not cost you anything at the time, but you don’t have unlimited “credit” to exercise contractors for bids forever without at some point paying them to do some work (i.e. giving them a job).
GCs are a good fit when you have multiple disciplines. If only one, consider going directly to a subcontractor.
Don’t pick the cheapest option automatically. There is a saying in the contracting business: Cheap, Quality, Fast. You can only pick two. You may find the cheapest, but you may pay the price with low quality. Look at the total package.
The best contractors are found with experience and repeat business. If you are new, ask others for referrals. If you have a good experience with a contractor, keep using them. Build a win-win relationship over time.
It can be hard navigating your first job, but like anything you will get better with practice and repetition.
Good luck!
The Many Ways You Can Add Value to Your Real Estate Investment
Options for industrial, retail, office, multifamily, and 1-4 unit residential
Last week we kicked off the series on executing your business plan and I discussed the general ways you can add value to your investment: cosmetic and functional improvements that lead to better leasing (and revenue) performance.
Today we are going to get into specifics by asset class.
As discussed in Asset Classes Explained, there are five main asset classes:
Industrial
Office
Retail
Multifamily aka Apartments
1-4 Unit Residential
There are different ways to add value to each of them. The themes are similar, but the details are different.
In today’s discussion, we will focus on improving the physical building(s) in both cosmetic and functional ways. We will go asset class by asset class.
By the end of this reading you will have a clear menu of options to choose from for yourinvestment. You won’t be an expert, but you will know enough to be dangerous.
Let’s dig in.
Industrial
Industrial is the most straightforward asset class. It is basically a warehouse building made out of concrete with a small amount of office inside. Industrial is used for manufacturing, storing, and/or distributing product. Anything you buy online goes through an industrial building, typically referred to as a warehouse.
So if it is a simple concrete box, there is nothing to do right?
Wrong!
There are plenty of ways to add value:
Paint & Asphalt: It is hard to find a better bang for your buck to change the look and feel of a warehouse than painting the building and doing a new slurry coating (aka painting) the asphalt. It does nothing functionally, but it drastically improves the first impression of tenants.
Signage: Adding signs above each suite can give a better sense of identity. You could also add a monument sign on the street with slots for tenants’ names.
Facade Enhancements: There are ways to make a building look more modern and create better suite identity by adding additional material elements to the exterior. For example: wood panels or metal awnings in sections of the building.
Adding Parking or Re-striping Existing Parking: Industrial users often need space to store their trailers and other materials or for more parking for their employees. Sometimes you can expand or reconfigure your existing site to meet these needs.
Warehouse Improvements: Industrial tenants want functionality. Your space will lease faster and at higher rents with increased functionality. Talk with local leasing brokers to understand the local tenant needs. Then consider improvements to lighting, smoothing the concrete floor, air circulation, power, and truck doors.
Office Improvements: Although the office portion of a warehouse building may be a small percentage of the total square footage, it is important to make it clean and functional. Nothing fancy, but nothing too beat up. Your local leasing broker will guide you.
Let’s move on to retail.
Retail
Retail is much more complicated than industrial. It generally includes multiple buildings laid out across a site with ample parking. Example: a neighborhood shopping center anchored by a grocery store with 20 additional small suites such as restaurants, hair salons, workout studios, and various other stores. Customers are coming and going throughout the day, so traffic (and pedestrian) flow is very important.
With all these moving parts, there are many ways to add value.
Paint & Asphalt: Same concept as industrial.
Signage: Same concept as industrial, but WAY more important for retail. There should be a universal signage program that works for all tenants. It should look like a cohesive center. This often includes a large monument sign (10’+ tall) on the main road with major tenants listed.
Facade Enhancements: Retail buildings often incorporate lots of interesting architectural elements using different materials and elevations. See figure 1 below for an example.
Adding Parking or Re-striping Existing Parking: Same concept as industrial, but even more important. Few things deter retail customers from coming to your center more than not being able to find parking. Get the most parking you can.
Suite Improvements: Most retail tenants want their suite to be a clean, functional box to work with. Retail suites tend to be fairly consistent in size and shape, so national tenants are used to working with these sizes. They will then customize their improvements inside that consistent shape. Go into a few Subway sandwich shops or postal annex stores and you will see what I mean.
Amenities: Retail is about place making. The longer customers stay at your center, the more likely they are to buy from your tenants, and the more rent you can charge. The best retail operators figure out ways to make their centers inviting by adding things like outside seating, fountains, water features, fire pits, and other attractive amenities. They create places people want to hang out in.
Figure 1: Example of a Retail Facade
Let’s move on to office.
Office
When I refer to office, I am referring to buildings where people generally work on computers. I spent 20+ years of my career working inside office buildings. They can be a single building or an office park.
Here are some ways to add value.
Paint & Asphalt: Same concept as industrial, but not always an option. Many times an office building is made of a stone material and the parking is in a concrete structure. In these cases, there is little to be done.
Signage: Monument and building signage can be very valuable to tenants. Sometimes you can charge extra for these.
Adding Parking or Re-striping Existing Parking: Parking can be very important for office tenants. Sometimes you can even charge more for covered parking (in a structure or under a carport).
Suite Improvements: Office suites, particularly larger ones, are usually customized to the individual tenant needs. It is expensive and wasteful. Imagine if you remodeled an apartment every time a new tenant moved in. Welcome to the wonderful world of office! If you have a vacant suite, work with your leasing broker on a plan to create a clean, functional layout that will work for most tenants.
Amenities: Same concept as retail. Office tenants need to attract employees. Good amenities are appreciated by employees. They include workout facilities, coffee shops, attractive seating for lunch, and anything else that feels inviting.
Let’s move on to multifamily.
Multifamily
Reminder that multifamily is a fancy way of referring to apartment buildings. This could be a single 12 unit apartment building or a 10+ building community with 200+ units or a downtown tower with 300+ units. The higher the number of units, the more likely there are interesting opportunities to add value.
Paint & Asphalt: Same concept as industrial, but apartment buildings are often made out of wood. Sometimes the wood siding needs to be replaced.
Facade Enhancements: Same concept as retail. The more interesting and inviting you can make your apartment community look, the more likely you are to attract tenants.
Adding Parking or Re-striping Existing Parking: Same concept as office, including the potential to charge for covered parking.
Unit Improvements: Here’s where things get different than the other asset classes. Apartment tenants don’t have the ability to customize their space. They “get what they get”. The best multifamily operators do two things to their units that give them pricing power and reduce maintenance costs: (a) they put in the amenities that tenants want the most such as in unit washer & dryers, newer appliances, new cabinet doors, and new countertops and (b) they put durable materials in place that last longer such as luxury vinyl plank (LVP) flooring. These improvements command more rent, lease faster, and cost less to maintain when a tenant moves out.
Amenities: Just like retail and office, multifamily is often about place making. This is where people literally call home. The best operators add amenities residents want most such as secure dog parks, workout facilities, nice pools with seating, BBQ areas, and business centers.
Now let’s see how 1-4 unit residential compares to multifamily
1-4 Unit Residential
Let’s remind ourselves why this is a separate asset class. It is driven by the way it can be financed. Lender’s will consider giving you a loan for your property based on your personal credit. For all the other asset classes, they evaluate and underwrite the propertyperformance. This personal credit evaluation can mean it is an easier entry point for investors.
All the same concepts of multifamily value add apply to 1-4 unit residential, but the smaller size will likely limit the number of amenities you can add.
Now that we have covered all the asset classes, let’s touch upon some additional items that apply to all asset classes.
All Asset Classes
Sometimes you will be faced with the decision of whether to repair or replace a building system. Repairing will be significantly cheaper but replacing will last longer. If a building system is too old or has been left without proper maintenance, replacement may be your only option. This can be true with parking lot asphalt, wood siding, and HVAC units.
There are also two potential value add options that are applicable across all asset classes.
Convert the Use: Your property may be worth more if you convert the allowable use to a different asset class. Example: industrial to multifamily. It is not fast or easy, but can add a ton of value. You could then sell the land/building or redevelop it yourself.
Parcelization: This is the process of dividing an existing piece of land (aka lot or parcel) into two or more legal lots so they can be sold individually. You may have a property with a lot of excess land. Divide it into a separate parcel to sell or redevelop it.
How to Bring it All Together
We have covered a lot. Asset class by asset class. Many ways to add value.
So how do you make sense of it all?
Here’s the formula:
Understand Your Goals + Focus + Talk with Experts + Budgeting + Develop a Game Plan = Setting the Property Up for Success
Understand Your Goals: start here. Re-read Stop Chasing Every Deal: Why Successful Investors Pick a Niche. If you don’t know your goals, you will be lost at how to address each decision.
Focus (aka Think!): now is the time to focus on the list of options within your asset class. Which are most appealing to you? Drive the neighborhood your property is in and look at what your competitors are doing. Take pictures and keep notes.
Talk with Experts: this is the most important step where theory meets reality. Share your ideas and brainstorm with the local team (brokers and/or property managers) that will lease your building. They are the market and leasing experts. Ask them what they think of your property. Ask them to rank the list of options I gave you in order of priority and impact. Ask them what else they recommend doing. Check back on You Don’t Have to Do Everything Yourself: Building Your Real Estate Team to understand how to build the right team around you.
Budgeting: once you have narrowed and ranked your list of initiatives, it is time to start getting a rough sense of cost. You need a budget to work with. This is where contractors come in, which is next week’s topic.
Develop a Game Plan: Finally, look at all the information together and come up with a game plan. Don’t hesitate to circle back with the leasing team to re-visit the list now that you have a better sense of costs.
You may need to stagger your plan over multiple years due to construction lead times, seasonality, budget constraints, or timing of your leases.
Be patient and realistic.
As with many things in life, it can feel overwhelming. By breaking it down into manageable parts, you can make progress.
You can do this!
Step by step.
One piece at a time.
Stay calm and carry on.
New Series Kickoff: Executing Your Business Plan
From business plan creation through completion
We are making great progress in our journey of understanding how to personally invest in real estate. We have covered four main subject areas so far:
Introduction to Real Estate Investing
Investment Fundamentals
The Acquisition Process
Owning and Managing Real Estate
See the end of this newsletter for the link to all 20+ newsletters so far.
Today we are kicking off a new series: Executing Your Business Plan.
Whereas owning and managing real estate anchors you in the tasks with which every investor will be faced, executing your business plan leads you down a proactive approach to adding value to your investment and making you more money!
This is one of my favorite aspects of owning investment properties. The ability to take action to improve performance and make you more money.
Some like to say that most of the money is made in the buy (aka the acquisition).
I agree to a certain extent.
You can never change your original cost basis or location. These two factors play a huge role in how the property will perform.
But…they are not everything.
Your ability to identify and execute a business plan will play a material role in how well your property will perform over the months and years of your ownership.
In this series we will cover:
Ways to add value to your property.
How to create a property business plan.
Construction.
Leasing.
Investor and lender constraints and opportunities.
Today we will start with an overview of ways to add value to your property.
Let’s dig in.
Definition: Adding Value
The terms “adding value” and “value add” are thrown around a lot in real estate investing. They are very similar terms that mean different things.
Adding value is the act of doing something to increase the value of your property. Usually you have to spend some money to create the value, but this is not always the case. Let’s list some examples of adding value:
Cosmetic improvements
Exterior: this could be as simple as painting your property or cleaning up the landscaping. Anything that makes the property look better.
Interior: same concept for the inside of the property. Think paint and carpet.
Functional improvements:
Interior: we are staying inside the building, but we are improving the way the tenant can functionally use the property. Examples could include: improved lighting, an additional room, or new HVAC.
Exterior: same concept on the outside. Examples could include: expanded driveway or a new tenant signage program.
Leasing: sometimes the biggest value creation will be through leasing. This could be through renewing and/or restructuring the leases with existing and/or leasing to new tenants. As we discussed in Cap Rates: The Simple Math of Real Estate Investing, much of real estate value is determined by the NOI. The biggest driver to NOI is usually the rent the tenants are paying.
Improving the interior and/or exterior of a property usually go hand in hand with increasing the rents and driving up the property value.
These are examples of “adding value”. Let’s compare this to “value add”.
Definition: Value Add
Value add is most commonly used as an investment category signifying the amount of risk associated with a real estate investment. We discussed this in The Risk-Return Spectrum: Choosing Your Real Estate Investment Strategy. A quick summary:
Low Risk/Low Return ←――――――――――――→ High Risk/High Return
Core/Turnkey → Light Rehab → Value Add → Development
Core/Turnkey: low risk, low return. You buy a property that is well leased and maintained. There is minimal work to do.
Light Rehab: medium risk, medium return. There is some work to do, but it is mainly cosmetic (paint, carpet, clean up). If you do the work, you can increase the rent and value of the property.
Value Add: high risk, high return. There is a lot of work to do. The property might even be vacant. You will be repositioning it and taking on a lot of risk for superior returns. You will either find a tenant once the work is complete or sell it (fix and flip).
Development: highest risk, highest return. You build something from scratch.
So when someone says this is a “value add” deal, they are usually referring to the risk involved.
Comparison: Adding Value vs Value Add
Even in the lowest risk deals, there are often ways to add value.
However, not all deals with the ability to add value are considered “value add” relative to risk/return.
Again, similar terms with different meaning. Here are examples of how each might be used:
Value Add: “We have a big appetite for risk at our company. We focus exclusively on value add industrial deals.”
Adding Value: “The deal has a ton of upside because there are so many ways to add value in the first few years.”
We will focus on adding value in this series.
A Menu of Options: Choose Your Own Adventure
Those of you born in the 1970s or 1980s may remember a book series called “Choose Your Own Adventure”. In it, the reader started in chapter 1 and was faced with a choice at the end of the chapter. Choose one option, go to page 22. Choose a different option, go to page 45. This continued throughout the book.
Creating and executing your property business plan requires a similar approach.
You start by assessing the opportunity and options available to you. From there, you start executing the plan and adjust as you go.
You have to adjust because (i) you continue to learn more about the property and the impacts of your plan as you go and (ii) the world and circumstances are always changing.
A Variety of Approaches
I introduced the analogy of three types of cars to give examples of types of real estate in Daily Issues You Will Face While Owning Real Estate. They were:
A top of the line Mercedes
A reliable but basic Honda
A car that constantly breaks down
Understanding the type of property you have at acquisition and the type of property you want it to become will guide your business plan.
For example, you may buy a property that is beat up (#3) but have a plan to turn it into a clean, functional property (#2) by executing your business plan.
Or you buy a property similar to a Honda (#2) but plan to not put a dime into it during your hold period knowing that it may get beat up over time (trending towards #3) but you will be able to maximize the near term cash flow.
Your money. Your property. Your choice.
What’s Next
Next week I will expand on the menu of options by sharing specific details of the ways to add value to each of our five main asset classes: 1-4 unit residential, multifamily, industrial, retail, and office.
This will give you a comprehensive “menu” of what can be done to add value.
You will then be able to combine this menu with the characteristics of your specific property and goals to come up with your own business plan.
Get ready to get your creative juices flowing.
This is the fun part!