Getting Organized for Success
Building a foundation of property information so you can focus on adding value
You are on the path to becoming a real estate investor.
You will identity your niche, study a market, find a property, and go through the acquisition process to closing. At that point you will be a real estate investor.
Then what?
How do you set yourself up for success?
The key is to build a foundation of information based on everything your learned during the acquisition and due diligence process. Half a day of organizing information could save you 100’s of hours of searching for what you need during your ownership of the property.
More importantly, it will help you stay on track with your business plan and make better decisions.
I have found there are four ways to organize and access your property information. I like to use all four, but everyone’s brain works differently. Develop the method that works best for you.
Digital folder of documents.
Photo library.
Master excel and site plan files.
Physical notebook of most important / current information.
I will walk you through all four so that you can (a) see an example of each approach and (b) adapt them to what works for you.
Let’s dig in.
Why Take the Time to Organize the Property Information?
As discussed in Due Diligence: Your Property Investigation Checklist, you will spend significant time creating a detailed understanding of the property. You will review the Offering Memorandum (OM), develop your own financial analysis and business plan, review various reports, and get to know the market.
In short, you became an expert on the property at that moment of time.
Don’t let this knowledge waste away!!
Take the time to organize and summarize it in a way you can easily reference when you need it.
I highly recommend you do this within the first week of owning the property. The acquisition information will be fresh in your mind. Block out 4-6 hours on your calendar. Go somewhere without distractions. Organize everything at once.
If you already own a property without a system, it is not too late. Start now.
Let’s get into the details of the system by starting with the documents.
Creating Your Digital Folder of Documents
Almost everything you review and receive will be digital. You may print some of the information, but it will have likely been created in digital format.
Your task is to organize it into a logical folder system that you can reference (and add to) in the multiple years you will own the property.
Here’s a property folder structure that works for me:
01-Business Plan:
Documents: business plan, underwriting model (financial analysis/projection).
02-Acquisition
Documents: OM, due diligence reports, closing documents, title policy.
03-Legal Ownership
Documents: LLC or other legal ownership entity, grant deed.
04-Loan
Documents: loan documents as discussed in Debt: An Amazing Tool with Strings Attached.
05-Equity (if you have outside investors or a partner)
Documents: partnership/JV agreement, investor communication.
06-Plans & Pics
Documents: site plans, floor plans, ALTA survey, pictures.
07-Leases
Documents: leases, form lease agreement (i.e. your standard lease template), lease proposals.
08-Marketing
Documents: broker listing agreement, marketing materials, marketing reports.
09-CapEx & R&M
Documents: folder for each job with proposal, contract, invoices, costs, etc.
10-Income Statements
Documents: Financial reports organized by date for ease of reference.
11-Property Management
Documents: Property management agreement, tenant correspondence.
12-Insurance
Documents: insurance policy and certificates, folder for each claim (if any), insurance broker related documents.
13-Property Tax
Documents: property tax bills organized by date, property tax appeal info (if any).
14-Appraisals & Sale Comps
Documents: all appraisals organized by date, any relevant sale comparables.
15-Zoning City
Documents: zoning report / information, parking counts, city correspondence.
You can do this in dropbox, iCloud, your c-drive…it really doesn’t matter what format you use. However, I strongly encourage you to use something that (a) is backed up to the cloud and (b) can be accessed from multiple devices including your phone. Example tools:
Cloud storage: Dropbox, Google Drive, iCloud, OneDrive.
Note-taking: Evernote, Notion, OneNote (for digital notebook alternative).
Spreadsheet: Excel, Google Sheets.
Photo organization: Google Photos, iCloud Photos.
Important note: Your property documents likely contain sensitive information (financial details, tenant data, legal agreements). Ensure your cloud storage has strong password protection and two-factor authentication.
You will be referencing and adding to documents all the time. This structure gives you a place for everything. As you buy more properties, mirror the folder structure so it is easy to navigate from property to property.
Let’s move on to pictures.
Photo Library
Photos are critical to help you make decisions from afar. Even if you live in the same city as the property, it is helpful to be able to get a visual of what you are focusing on - anywhere, anytime.
Enter your phone.
Here are the steps I recommend.
Take pictures from every corner of the property, both exterior and interior.
Put the pictures in a dedicated photo folder on your phone.
If you want to go to the next level, organize and label these photos in a powerpoint or other digital file. Example: you might label one as “view from northwest corner”.
These photos will be so helpful to you as you operate the property day to day. Not only will it reinforce your property knowledge as you build the photo library, but it will also save you many avoidable trips to the property. You can use your time to focus on making good decisions.
Let’s move on to the two critical documents you should create.
Document #1: Master Excel File
Even if you are not a “numbers” person, I encourage you to create a master excel file. I like to name mine “[Property Name]-Key Info-[year].xlsx”. At the end of each year I create a new one and archive the old one.
Here’s what is in the excel file. Each bullet represents a separate sheet.
Notebook Cover: we will get into this later.
Cash Flow: a monthly cash flow that includes the property performance and a running cash balance so I know what distributions I can make. Here’s my update protocol:
Monthly: update current month information based on report prepared by the property manager.
Quarterly: when making investor distributions.
As Needed: when forecasting future capex and leasing assumptions.
Rent Roll: list of units / suites at a property with information on square footage, tenants, rent, lease start, lease end, and many other pieces of information. I update the rent roll when a lease is signed or modified.
Vendors: list of contact information for vendors I use for the property. Put the ones you use most regularly in your contacts on your phone.
Property Tax: list of property tax billing details by year.
This is the file I go into the most for my property.
Let’s move on to the second critical document.
Document #2: Site Plan
Having an aerial view of the property will be very helpful. This can be as simple as a snapshot from Google Maps (aerial view) with labels of key information. Here’s a screenshot of one I made in powerpoint.
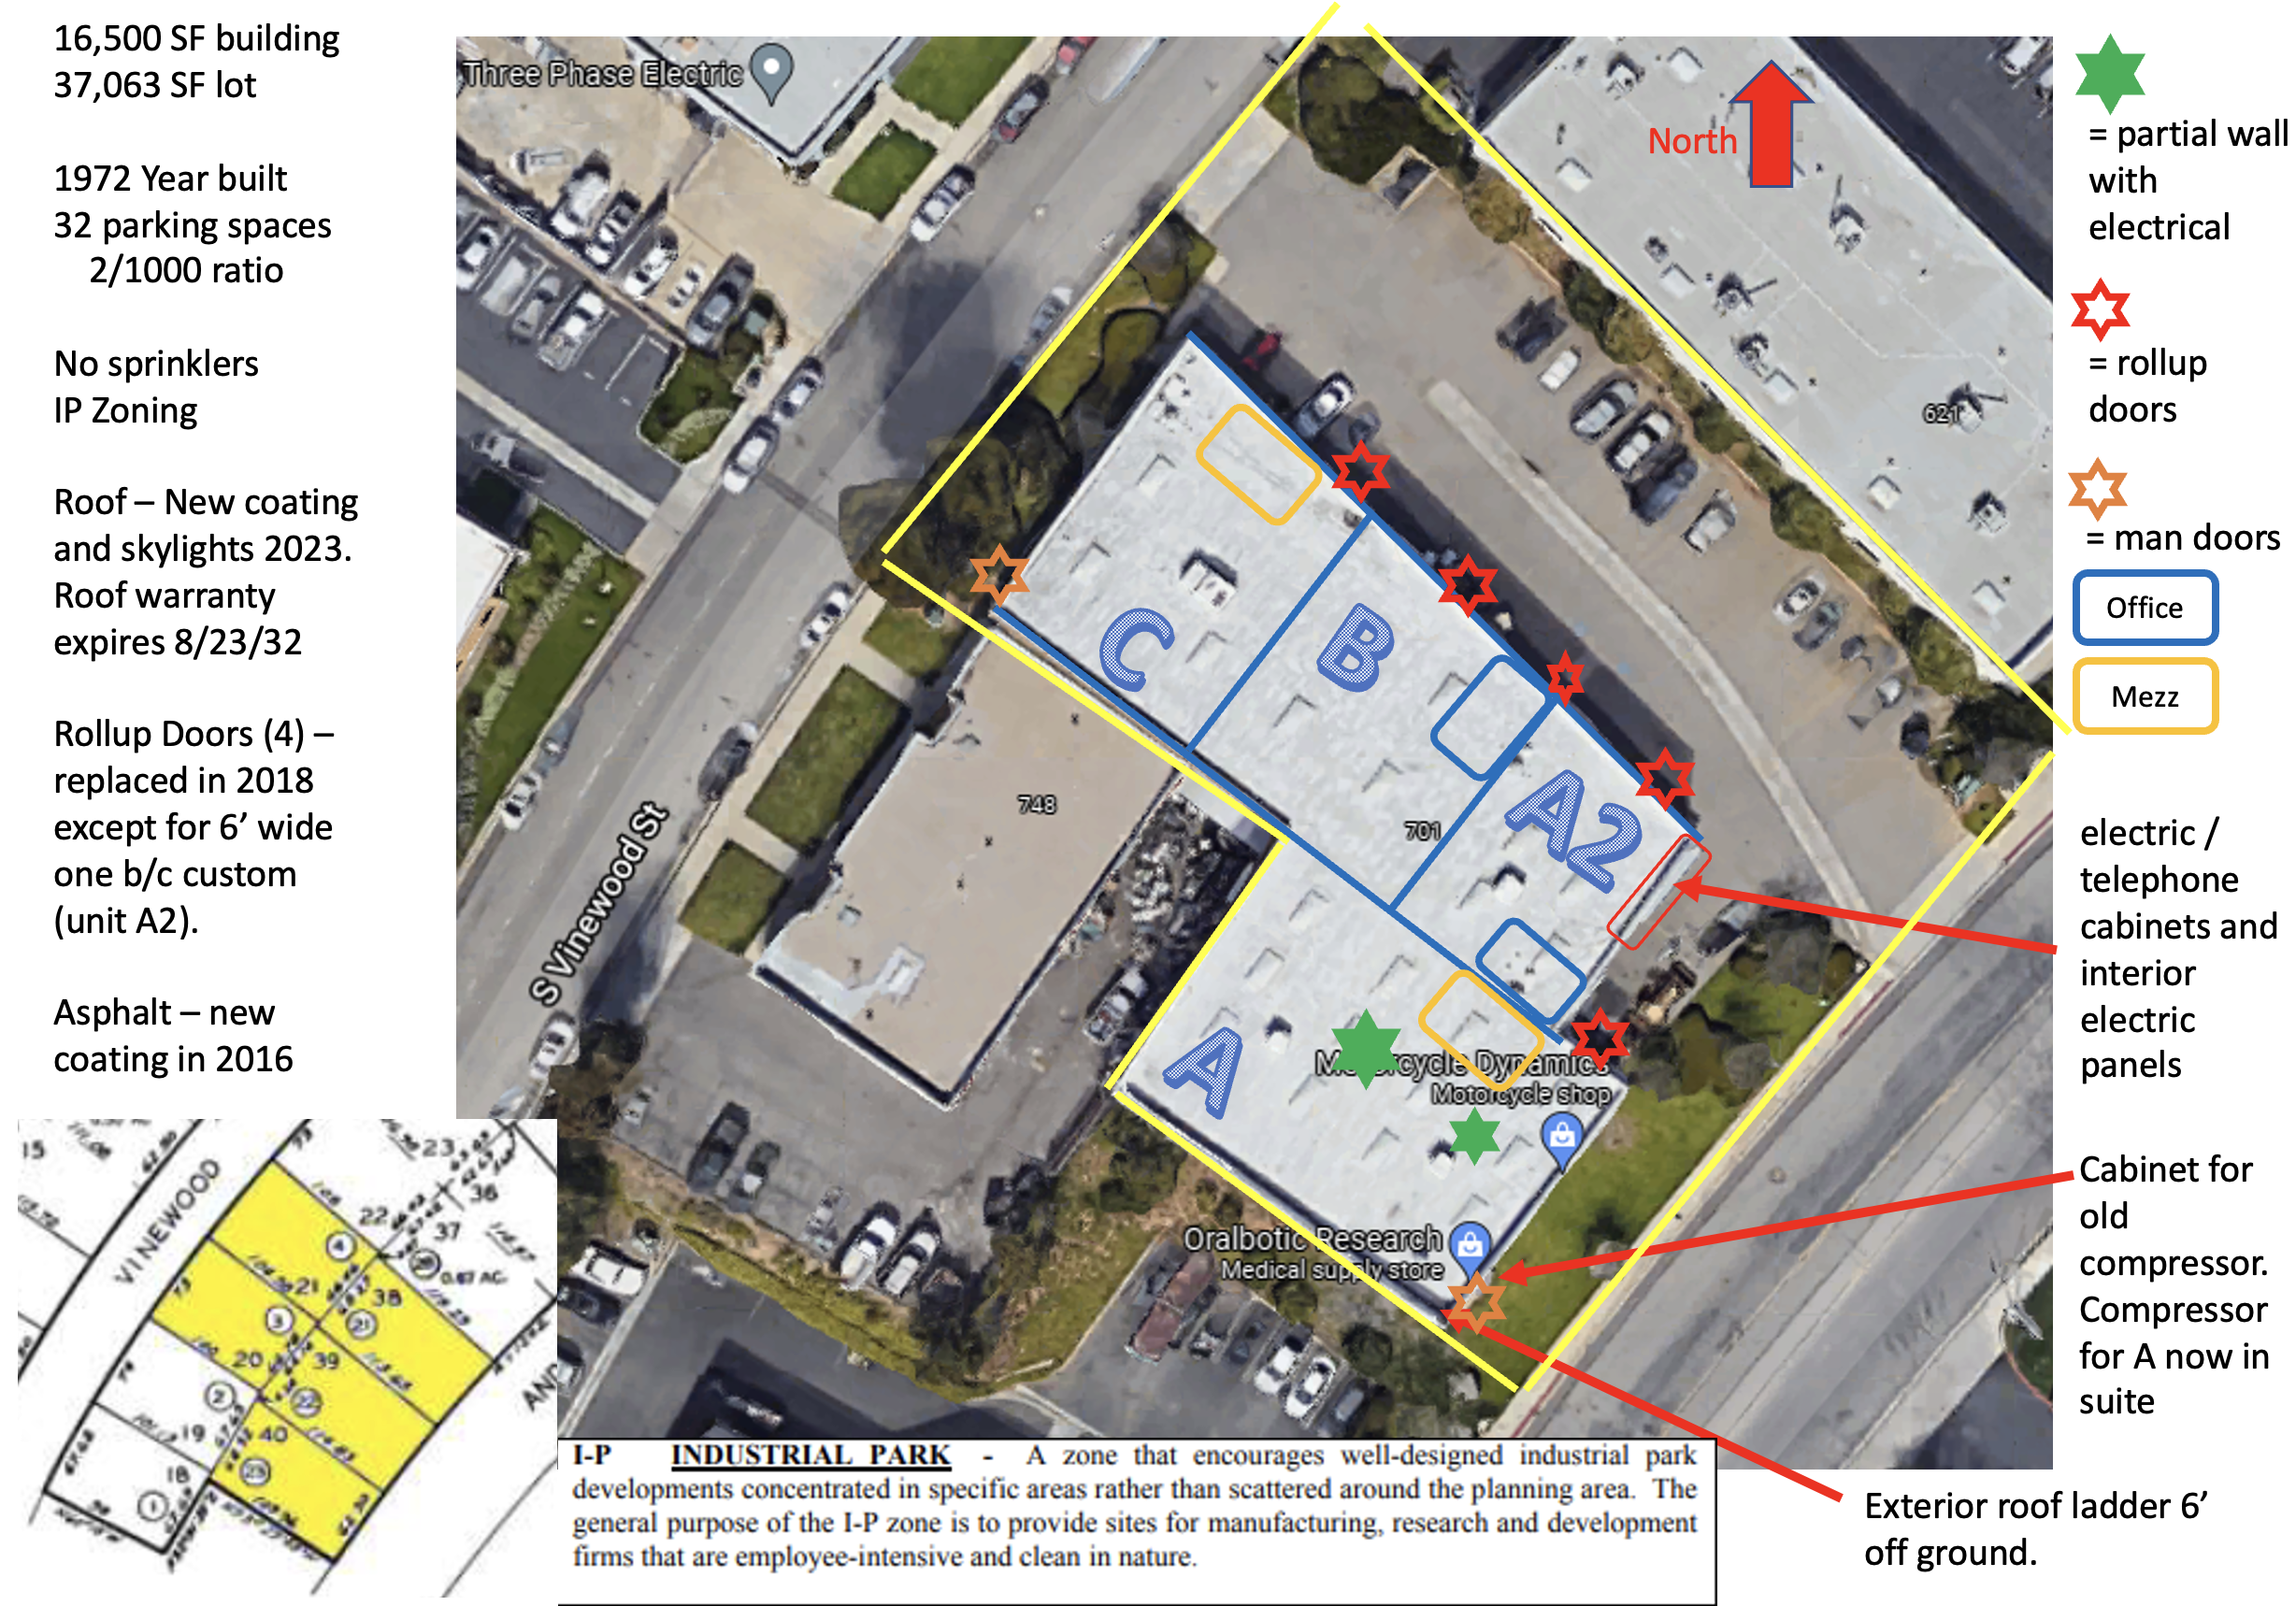
Image: Example Site Plan with Notes
I am not looking for perfection on this. I am looking for something that I can reference easily.
Now let’s move on to what I believe is the most critical piece: your property notebook.
Your Property Notebook
A notebook you say? Why can’t it all be digital?
You can go digital only, but I don’t recommend it.
Having spent 25+ years organizing property and other information, I believe having a single purpose notebook sets you up for success.
A “single purpose notebook” is just as it sounds. One notebook. One purpose.
In this case the “purpose” is your property. Once you own a portfolio of properties, you will probably want to expand and restructure it to include the whole portfolio but for now let’s stick with one property.
You can do this with a three-ring binder, but I really like the Circa system by Levenger. It is like a spiral bound notebook that you can have blank sheets of paper for note taking but also add print outs of digital files. The key is to have multiple divider tabs for the areas of the business you focus on regularly.
Here’s the structure I use for a property:
Cover Page: this is the “Notebook Cover” sheet from the master excel file. It is my working page of the most important information about the property. It includes:
Financial Snapshot: an abbreviated cash flow that includes eight lines - revenue, operating expenses, NOI, capex, leasing costs, debt service, net income, investor distributions. I have one column for previous year and one for current year.
Capex: list of the major building systems with anticipated (or most recent) replacement year and comments. These could include roof, exterior painting, asphalt, and any other part of the building I am focused on.
Loan Info: loan amount, interest rate, loan expiration date, and any operational items the lender needs to approve (see Debt: An Amazing Tool with Strings Attached for a refresher).
Key Initiatives: this is the most important. What am I planning to do to add value the property? It should include what, when, and the anticipated cost.
Action Items: this is a blank area I handwrite in as needed. I like a pencil so I can add and erase as I get things done. Example: call broker about leasing status or get bids to replace the roof.
Waiting: same concept as “action items” but to keep track of what someone else said they would do for my property. Example: broker - update on tenant prospect or PM - update on electrical repair.
Tab #1: Notes: blank pages I can take note on while talking to someone or working through an issue.
Tab #2: Projects: key documents related to value add or other projects I am working on. For example, it might include a rendering and cost estimate of an exterior renovation.
Tab #3: Leasing: any leasing and marketing activity. It might include the leasing brochure, market reports, and notes on potential tenants.
Tab #4: PM: this is a separate section for the key vendor list and any ongoing issues I am working with the property management team on.
Tab #5: Building: this is where I put the site plan and other important building information in.
Tabs 2-5 change over time depending on what I am working on. When I was replacing the roof and skylights, I had a dedicated tab for this. Once complete, I repurpose the tab.
The most important aspects of the notebook system are:
I have a portable system I can take with me to the property, office, home, anywhere.
I have one place that I take notes and reference key property information.
It is dynamic. The structure changes with my changing focus areas.
It is a visual reminder that I need to stay focused on the property.
So what do you do with these techniques?
Making Them Your Own
The key to any organizational system is to make it your own.
Do you like to have a folder for every item? Then make a detailed folder system.
Are you a minimalist? Then have a minimal number of folders.
Are you an iPad only person? Then create a system that leverages your iPad.
It doesn’t matter how you do it. What matters is that you use a system.
Don’t wing it by trying to remember everything.
This system works for me. In a year I will have probably modified it a bit.
Find a system that works for you and make it happen. You will be making property decisions all the time. You want the information at your fingertips.
This is why having a system is so important.