The Power of Promote: A Real Deal, Fully Broken Down
Understanding equity waterfalls and the impact of fees on returns
Over the past five weeks, we have covered four case studies and compared what it is like to invest as a general partner (GP) and a limited partner (LP).
Today I am going to bring these two concepts together by building off of the home run deal from When the Market Bails You Out and integrating the fees and promote introduced in GP vs. LP: Who Does the Work, Who Takes the Reward?.
The case study was about an investor who bought an industrial building and lost operational focus. The investor was bailed out by rising rents and decreasing cap rates resulting in a home run deal.
The deal yielded a 2.30 equity multiple: $206,914 net sale proceeds (before tax and excluding cash flow) on a $90,000 equity investment over a four year hold period.
If only all deals would perform this well!
We are going to build off of this deal and see what would have happened if the investor (i.e. you) had raised 95% of the equity from limited partners (LPs) and only invested 5% of the equity yourself by forming a joint venture partnership.
Today we will cover:
The joint venture structure
The process of raising equity
The financial performance
The key takeaways
Let’s dig in.
The Joint Venture Structure
Let’s do a quick recap on the 100% leased industrial deal from the case study When the Market Bails You Out.
It was a $300,000 deal funded by $210,000 of debt and $90,000 of equity. The equity was 100% funded by you. The cap rate on costs was 7.5% and the interest rate on the interest only loan was 6.5%. This positive leverage (cap rate > interest rate) resulted in an initial cash-on-cash return of 9.9%. You operated it for 4 years and sold it at a 7.00% cap rate, making a 2.3 equity multiple as described in the introduction.
Let’s rewind the clock and see how this could have looked if you had raised money from LPs to create a joint venture structure. Here is how it would look:
Equity: 5% by you. 95% raised from LPs.
Fees:
Acquisition: 1.5% of purchase price. $296,000 x 1.5% = $4,440 one time fee.
Asset Management: 1.5% of equity. $98,000* x 1.5% =$1,470 per year.
Property Management: 4% of gross revenue. $1,200 per year.
Equity Waterfall:
Equal amounts (aka pari passu or pro rata) until an 8.0% internal rate of return (IRR) and then
80% to all investors, both GP and LPs, based on their 5% / 95% ownership and 20% to promote (100% to GP)
Let’s decipher what this means.
*We will get into why the equity rose from $90,000 to $98,000 in the Pro Tip below.
Equity
This is straightforward. Instead of funding 100% of the equity yourself, you raise 95% of it from LPs.
Fees
Again, fairly straightforward. You have decided to charge a collection of fees, both one-time (acquisition) and recurring (asset and property management).
Equity Waterfall
This is a bit more complicated, but you will grasp it.
Remember, promote is the ability for the GP to earn a higher percentage of the total profits than the percentage of their original equity investment if the deal does well.
In this case you structured the deal such that you earn promote if the deal does better than an 8% IRR. You get 20% of all the amounts over an 8% IRR. This additional amount is known as promote.
IRR is a common calculation used in real estate investing. It is effectively a deal's annualized return, taking into account the time value of money. IRR is the single discount rate that makes the present value of all the cash in and out equal zero — it rewards getting money back sooner.
Pro Tip: those of you comparing the original case study with the fee calculations above may notice something. The equity went from $90,000 to $98,000. Why? Three reasons: (i) the acquisition fee of $4,440, (ii) increased acquisition cost of hiring a lawyer to help you with the joint venture agreement, and (iii) the fact that the lender is giving you a fixed loan amount of $210,000 regardless of whether you have LP partners or not. See table 1 for summary.
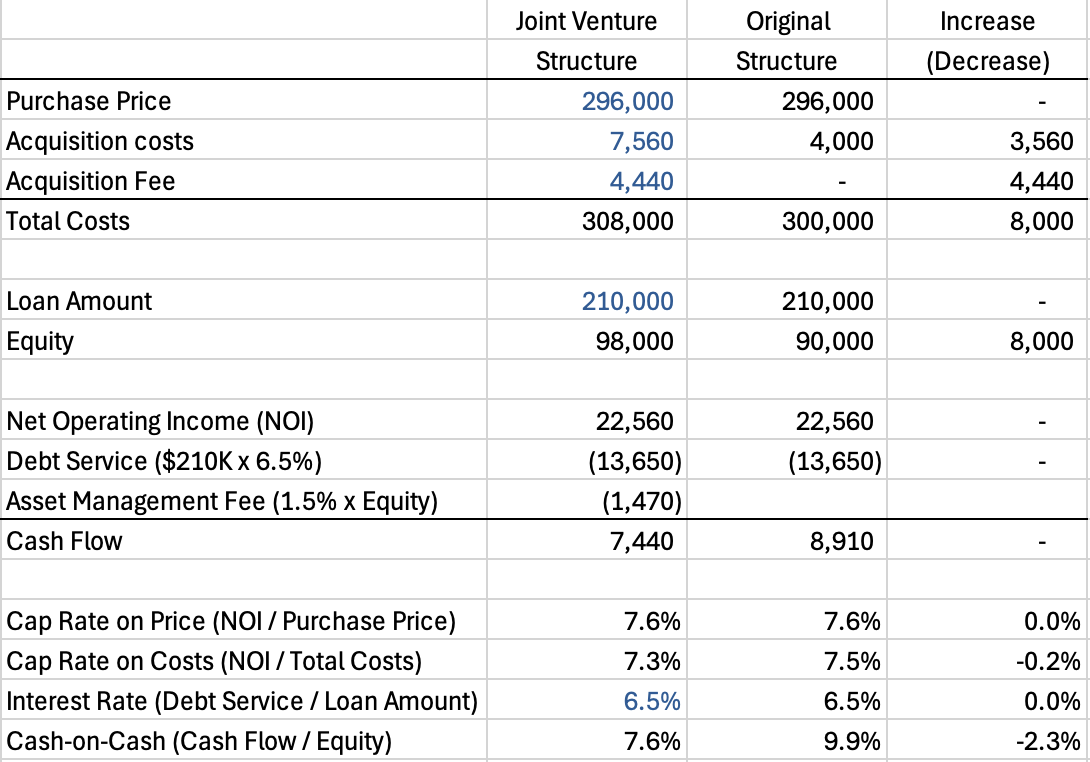
Table 1: Increased Costs of Joint Venture Structure
You should notice something else from the table. Two of the key return metrics went down: (i) cap rate on costs from 7.5% to 7.3% and (ii) cash-on-cash returns from 9.9% to 7.6%.
The cap rate on costs went down because the NOI remained constant while the costs increased from $300,000 to $308,000.
The cash-on-cash return went down for two reasons: (i) increased equity —$90,000 to $98,000 — due to the acquisition fee and increased structuring costs and (ii) the 1.5% of equity asset management fee you are charging. Any fee that is a percentage of equity charged on an annual basis directly reduces the cash-on-cash return.
Key Takeaways
Fees Reduce Returns: charging fees directly reduces the deal returns, especially cash-on-cash returns. The legal and structuring costs of a joint venture also increase costs.
Don’t Get Too Greedy: choose the fees and equity structure you feel are reasonable, recognizing that the LP investors will need to get excited about the returns after fees. Do the research to see what other GPs are doing.
The Process of Raising Equity
Books could be written on the process of raising equity. There are teams at large real estate companies that focus on it.
Here are what I believe are the most important considerations for individual investors acting as a GP:
Great Deals Sell Themselves: it starts with having a great deal. Find a deal you are excited about and your potential LPs should get excited too.
Be Realistic: don’t load the deal with too many fees. Look at the after fees returns and think about whether the LPs will get excited about these returns.
Start Small: you may want to anchor low on fees and promote structure for your first deal or two. Once you have a successful track record, you can justify charging more.
Look At $$$, Not Just %: the asset management fee above starts at $1,470 per year. This is just over $100 per month. You may find it is better to skip this fee and maintain a higher cash-on-cash return percentage. Instead, you could consider a disposition fee.
Whatever structure you choose, you will still need to follow a typical sales process to raise equity:
Create clear marketing materials that describe the deal and returns.
Reach out to many investors, likely starting with your friends and family.
Get enough investors to commit the 95% of equity.
Get everyone to sign the joint venture agreement and fund their money.
Do all of this fast enough to meet your due diligence and closing deadlines.
None of this will be fast or easy. You will need to work hard and persevere.
The Financial Performance
You are a hard worker. You persevere and raise the 95% of equity from the LPs. Now let’s look at the financial performance under this fee and promote structure.
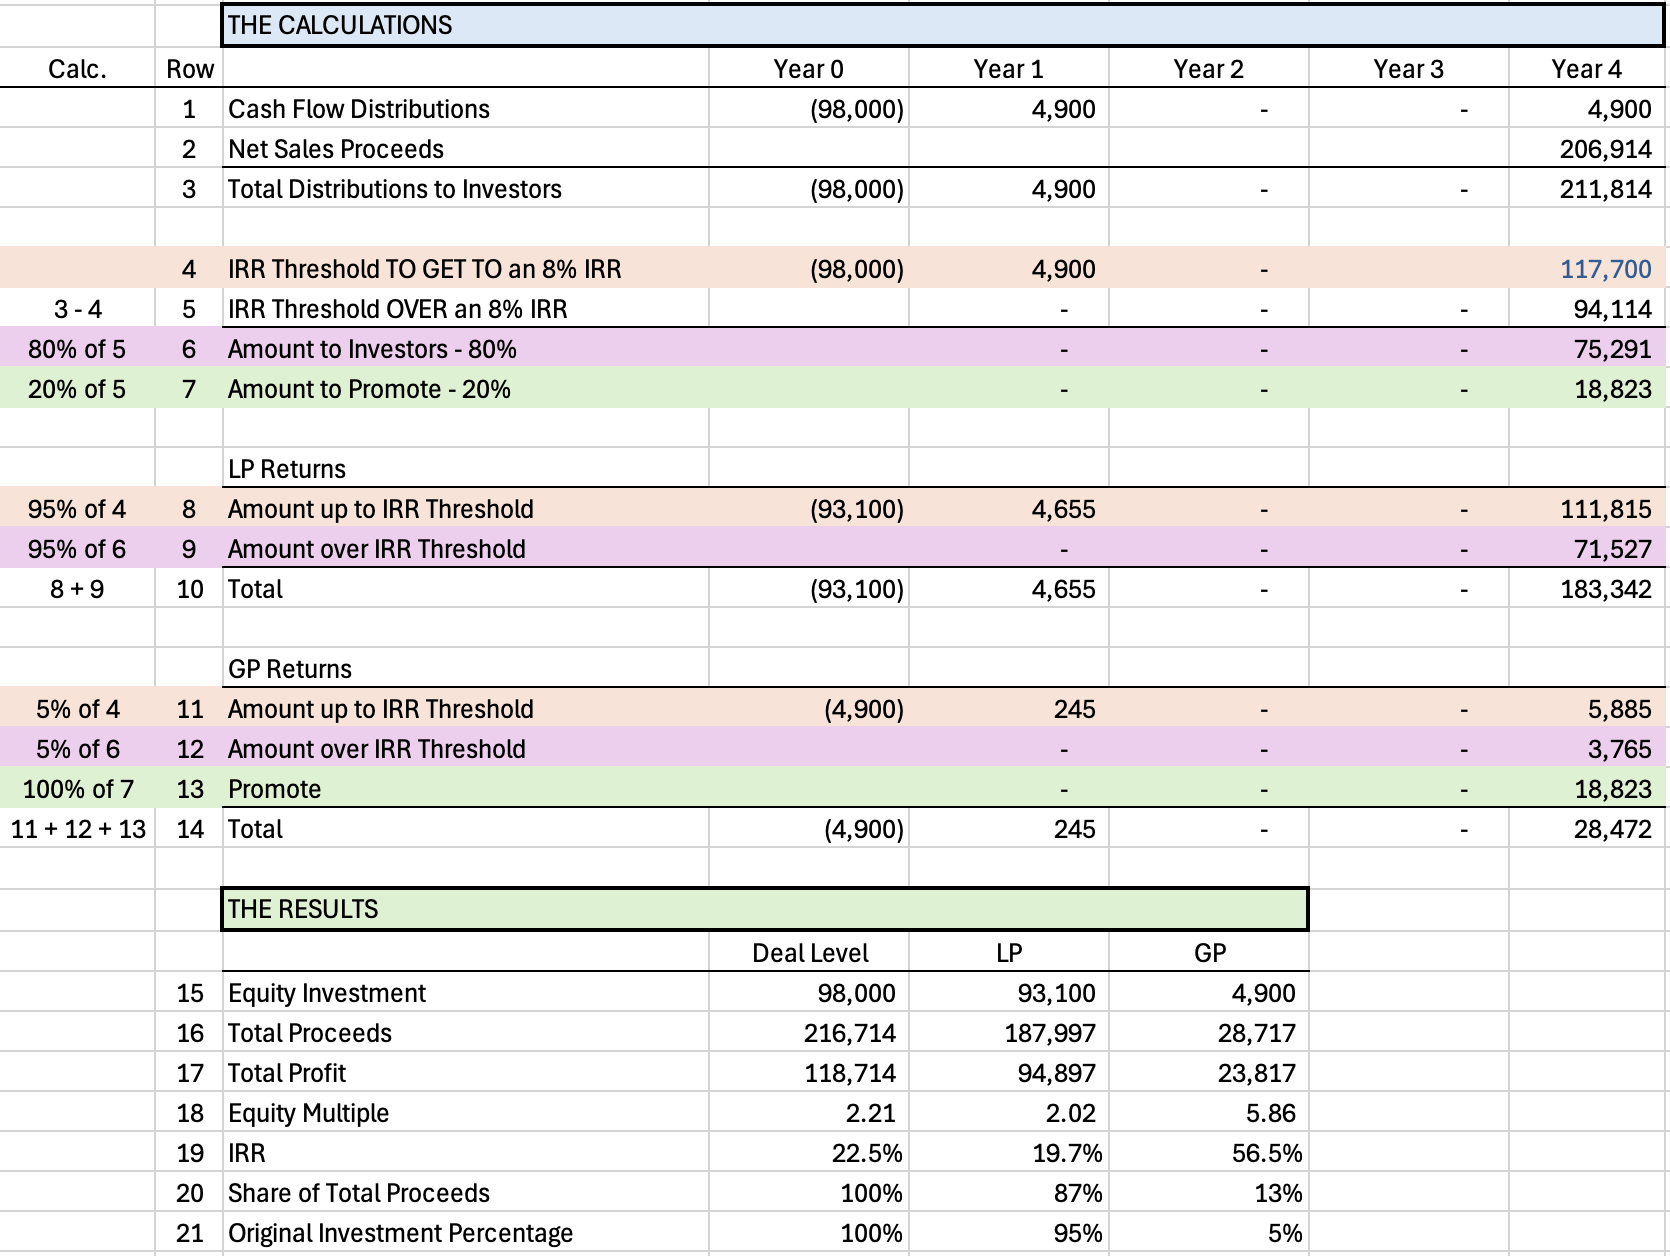
Table 2: Equity Waterfall With Promote Structure
The Calculations
Everyone gets an equal share of the distributions up to an 8.0% IRR. Above this 8.0% IRR, the distributions go 80% to all investors (LPs and GP) and 20% to the GP as promote. Here’s the breakdown.
Deal Returns (rows 1-3): before any promote calculations.
Promote Calculations (rows 4-7):
Row 4 shows the amount TO GET TO an 8.0% IRR <shown in orange>.
Row 5 shows the amount OVER the 8.0% IRR.
Row 6 shows 80% of row 5 going to all investors (LPs and GP).
Row 7 shows 20% of row 5 to promote (GP only).
LP Returns (rows 8-10)
Row 8 shows the LP getting 95% of the amount TO GET TO an 8.0% IRR <shown in orange>.
Row 9 shows the LP getting 95% of the amount OVER an 8.0% IRR <shown in pink>.
Row 10 adds up row 8 and 9 for the total LP returns.
GP Returns (rows 11-14)
Row 11 shows the GP getting 5% of the amount TO GET TO an 8.0% IRR <shown in orange>.
Row 12 shows the GP getting 5% of the amount OVER an 8.0% IRR <shown in pink>.
Row 13 shows the GP getting all of the promote from row 7 <shown in green>.
Row 14 adds up rows 11-13 for the total GP returns.
It’s a lot of math and not for the faint of heart. Understanding promote models (aka equity waterfalls) takes time and practice. You may want to re-read this section several times.
The Results
All of this results in the LPs and GP getting different returns as shown in rows 15-21.
Because the deal did so well (22.5% IRR - row 19), the promote was big ($18,823 - row 13) and the GP had a strong equity multiple (5.86 - row 18) and IRR (56.5% - row 19).
The LPs still did very well with a 2.02 equity multiple and a 19.7% IRR.
Everyone did well, but the GP’s equity multiple and IRR are much better than the LPs’. The GP invested 5% of the equity (row 21) and earned 13% of the total proceeds (row 20). That is the power of promote.
The Key Takeaways
So what do you make of all of this?
Here are my key takeaways:
The Joint Venture Structure Reduces LP Returns: charging fees reduces the deal returns, especially cash-on-cash returns. There is also the legal cost of structuring a joint venture agreement. The promote further reduces the investors’ returns, so only strong performing deals will be able to support this joint venture structure.
Everyone Wins If the Deal Does Well: there were no bad results in this example. Both the LPs and the GP did well, doubling their money in 4 years.
If the Deal Does Well, the GP Does REALLY Well: in terms of equity multiple and IRR, the GP did really well. They invested $4,900 (row 15) and pulled out $28,717 (row 16) in proceeds resulting in a 5.86 equity multiple before tax. This is an amazing way to turn limited investment funds into bigger dollars in a way you couldn’t do if investing by yourself.
IRR & Promotes Are Very Sensitive to Sale Proceeds: look at how much of the deal performance came from the sale: $206,914 (row 2) of $216,714 (row 16). Over 95%! Remember our sensitivity table from the case? Let’s look at an updated version, taking into account the GP/LP structure. Look at the IRRs below. If the rents were lower, the IRR barely reaches (or doesn’t reach) the promote threshold. Deals and promotes are highly sensitive to how well the deal does at time of sale.
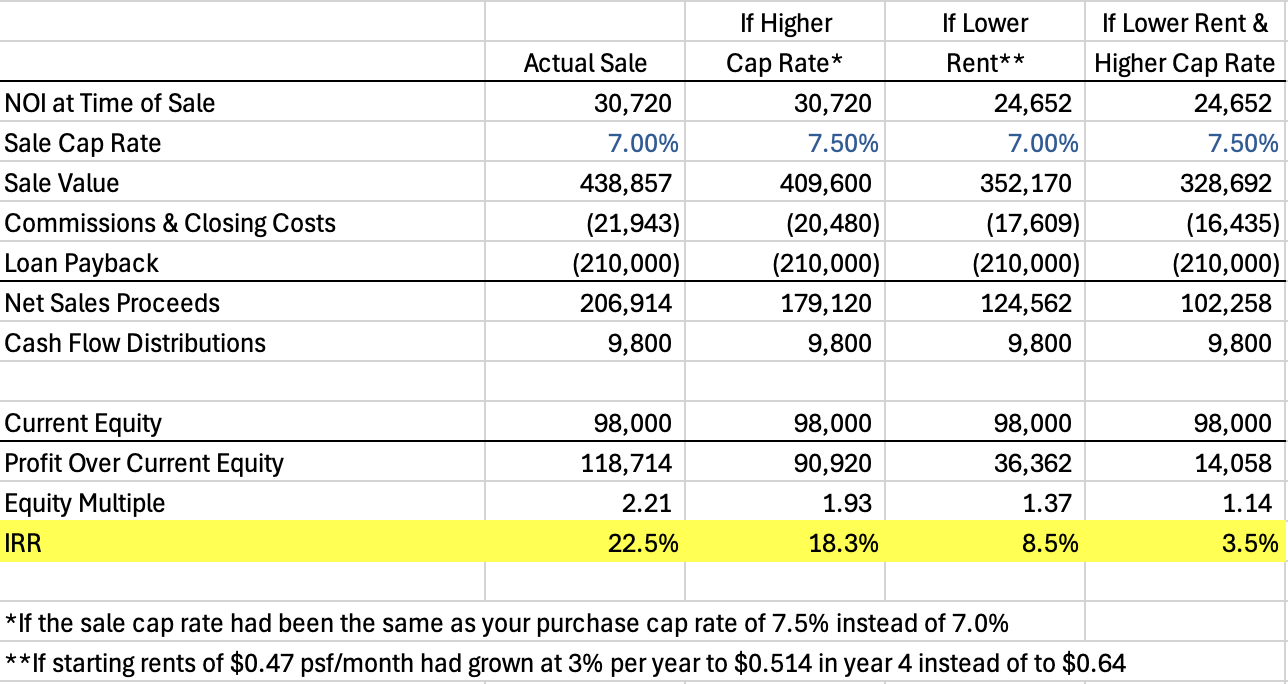
Table 3: IRR Sensitivity
Raising money from LPs is more expensive and a lot more work, but for the right deal it can be an excellent way to turbocharge your returns.
Try adding a zero to “The Results” from table 2: you invest $49,000 (row 15) and make total proceeds of $287,170 (row 16). Bigger deals = bigger dollars.
But remember to walk before you run. Do a deal or two on your own to develop your real estate investing skills.
By learning the fundamentals, you will drastically increase your chances of success when considering becoming a GP.
GP vs LP: Who Does the Work, Who Takes the Reward?
Why both investment options should have a place in your portfolio
Today we kick off a new series on the difference between investing as a general partner (GP) and a limited partner (LP).
You may have heard the terms GP and LP before, but I challenge you to take a moment and try to define what they really mean when you hear comments like:
“I have 5 LP investments that are crushing it. Easy money.”
“The fees and promotes that come with being a GP are too hard to pass up. Easy money.”
So which is better?
Today I will explain the key differences and trade-offs between being a GP and an LP. Here’s how we will approach it:
Defining what a GP and an LP is
Responsibilities & rights
Fees
Promote
Why I do both
By the end of this newsletter, you will have a clearer understanding of how to evaluate GP and LP investing relative to your goals.
Let’s dig in.
Defining What a GP and an LP Is
Here is a comparison of a GP and an LP:
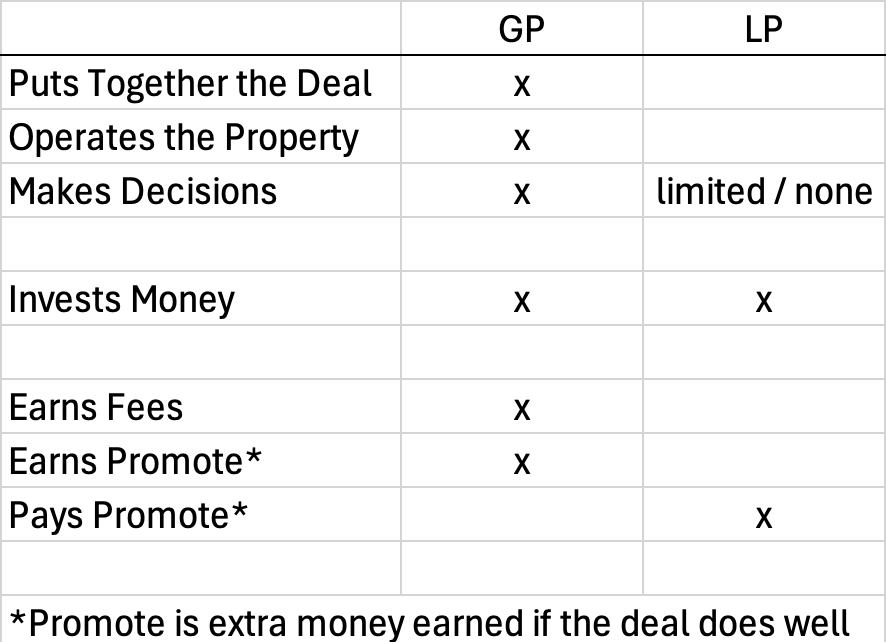
Table 1: GP vs. LP
Let’s break this down.
Putting the Deal Together
The GP runs the deal from start to finish, starting with finding a property to acquire. They lead all the steps outlined in The Acquisition Process series starting with Finding Your First Real Estate Deal.
It is not fast or easy. Time, money, and the GP’s reputation are at risk at every step of the way.
Operating the Property & Making Decisions
Once the deal is closed, the GP operates the property and executes the business plan.
Things rarely go as planned.
Things break. Tenants default on their leases. The economy gets better or worse.
The GP is the one who is always thinking and acting like the owner.
The GP has to work through it all, making most of the decisions from leasing to capital expenditures to building the right team to refinancing and to selling the property.
Pro Tip: sometimes the LP has limited approval rights. We will get into these in the next section.
Investing Money
Both the LP and the GP invest money in the property. For example, the GP might invest 5% of the equity and the LP(s) would invest the remaining 95%. Note that in many cases there are multiple LPs who collectively invest the 95%.
Earning Fees & Promote
As the GP does all the work, they are the only one who earns fees. They also have the potential to earn promote: extra money beyond their percentage share if the deal does well. The extra money for the GP comes out of the LP’s share. We will get more into the promote later in the newsletter.
All of this should start to paint the picture of how the roles and earning potentials of the GP and LP differ.
Responsibilities & Rights
The GP is the one doing (and getting paid for) all the work. They have full responsibility for the success or failure of the deal. Yes, there are many things outside of their control, but the GP is the one on the front line of executing the business plan.
That is not to say the LP doesn’t have any rights. Here is a list of approval rights that the LP might have:
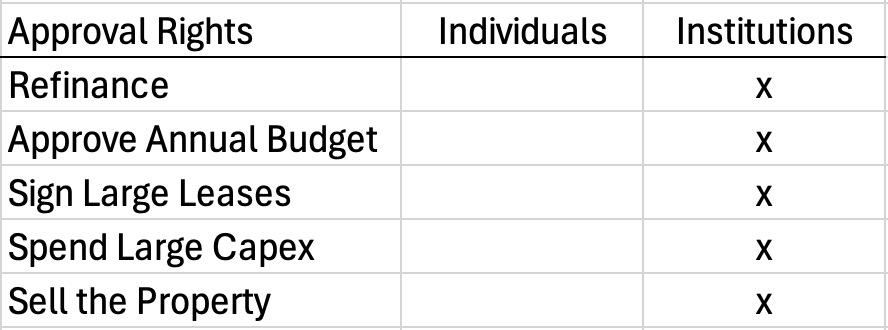
Table 2: LP Approval Rights
The table above adds in another layer to this discussion: the difference between individual investors and institutional investors.
Individual investors are people like me and you. We might invest $10,000 to $100,000+ in a deal with a GP. There could be 1-30+ of us investing together in a single deal operated by a single GP.
Institutional investors are private equity firms, pension funds, insurance companies, and university endowments. They write much bigger checks in each deal or fund (example: $10 million to $500+ million).
As the table above shows us, individual investors don’t really have any approval rights. The GP has broad discretion to operate the property as they see fit.
Very Important Note: one of the biggest negatives of being an LP investor without any decision making rights is you have no control over liquidity. None. Need your money out so you can buy a car or repair your home? Too bad. The GP is the one who controls when the property will be sold or refinanced.
Pro Tip: there are exceptions to this lack of control for individual LP investors. Specifically, if you are a very large (or the only) individual LP investor in a deal, you may be able to negotiate some approval rights.
Institutional investors have many rights. I only listed the big 5 in the table above.
Logistically, these approval rights require the GP to get the LP’s written approval to do certain things. GPs and LPs don’t always agree on everything. Even when they do, this adds a layer of logistical friction to the GP’s ability to operate the property.
Regardless of whether the GP has individual or institutional investors, there will be a joint venture (aka partnership) agreement that documents all of this. You can review and download an example in the Downloads & Deep Dives section of my website under Equity and Joint Venture Agreements.
Fees
In case I haven’t been clear enough, let me reiterate:
Being a GP is much more work than being an LP.
As an individual LP, you can be a complete vegetable while the GP does all the work. You could literally disappear into a mountain cabin without cell service once you have written your equity check.
The GP is the one sweating it out day-to-day, not only doing the work but also taking on the stress of the ups and downs of the property.
So why be the GP? Two reasons:
Earning Potential: you can earn more money than the LP in the form of fees and promote.
Mindset: if you are wired to want control, this will better suit your temperament.
Let’s start with fees. Here is a list of fees the GP might earn:
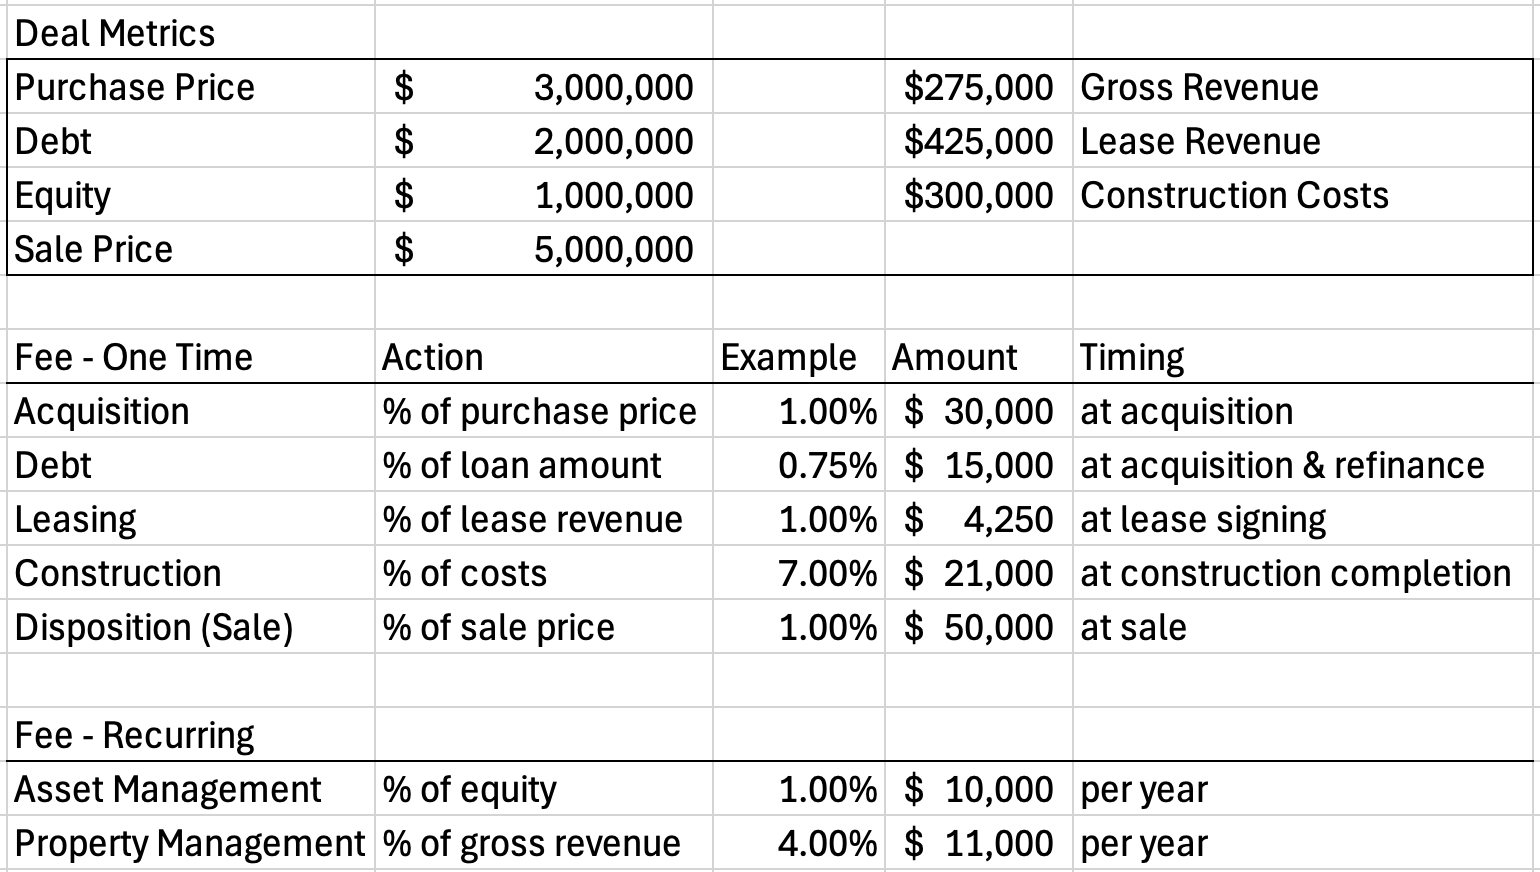
Table 3: Potential GP Fees
The top section includes one time fees tied to specific events. Example: $30,000 acquisition fee for acquiring the property (1% x $3,000,000 purchase price).
Other fees are paid on a recurring basis. Example: $10,000 per year asset management fee (paid monthly or quarterly) for operating the property and executing the business plan (1% x $1,000,000 equity).
Important Note: fees are paid by the property to the GP. Because they are paid by the property, all equity investors are effectively paying the fees because the property returns are diluted by the cost of these fees. Said another way, even the returns of the GP’s 5% investment are diluted by the fees.
But…the GP is the only one who can earn promote.
Pro Tip: the fees in the table above are just examples. Every GP will (try to) charge different types and amounts of fees.
Promote
Promote is the ability for the GP to earn a higher percentage of the total profits than the percentage of their original equity investment if the deal does well. Here’s an example:
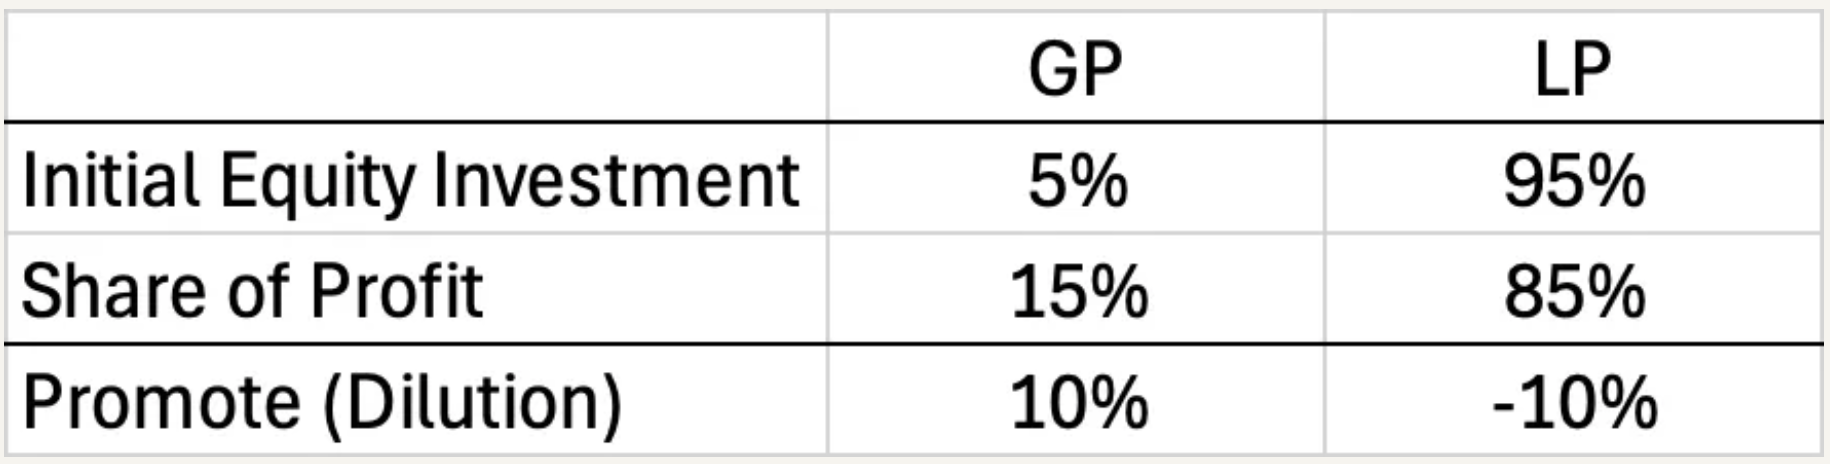
Table 4: Simplified Promote Example
Keep in mind that the example above is an oversimplification to teach the theory. Behind the scenes there will be math done in excel and language in the joint venture agreement that says the GP will earn a certain percentage of the returns over an internal rate of return (IRR) threshold. Example 20% over an 8% IRR.
Don’t worry about this for now. We will do an example next week.
For now just digest the concept that the GP has the potential, not the guarantee, to earn extra money if, and only if, the deal does well.
Pro Tip: there is the risk of misalignment of interest between the GP and LP relative to fees and promotes. Watch out for fee heavy deals where the GP may be motivated to hold the property long-term for the fees, especially if there is little promote.
Why I Do Both
By now you may be falling into two different camps:
GP: you like the earning potential of being a GP and are excited about being front line with the real estate.
LP: being a GP sounds like a lot of work that you don’t have the time or inclination for. The LP route sounds good to you.
Both camps are right.
I have done about half of my 60+ investments as a GP and half as an LP. Here’s why I believe both are good options for your investment portfolio.
The Argument for Investing As a GP
Being a GP Teaches You More: there is no better teacher than running your own deal as a GP. You will miss most of this learning as an LP.
Being a GP Increases Your Earning Potential: fees and promote can be meaningful over time and a path to turbocharge your limited equity capital.
Being a GP Gives You Control: you control not only the business plan and sale timing, but also when money is distributed from cash flow. Said another way, you are the one who controls liquidity.
The Argument for Investing As an LP
It’s Totally Passive: write your check and then you are done. This a great fit if you don’t have much time or interest in managing a property. Being a GP includes running the property AND working with the LPs, some of whom will constantly call you for updates and give you their opinion.
Being a GP Is Stressful: the pressure is on you. LPs rightly (and wrongly) point the finger at the GP when things go wrong.
Fees & Promotes Are Normal: are you a stock investor? If so, then be aware that your returns are reduced by the high salaries and stock paid to the CEO and senior executives. Being a real estate LP investor is the same thing. That is the way investing works.
Diversification Is Easier as an LP: even if you are a GP or work for a GP, you will probably have an asset class you specialize in (example: apartments). Investing as an LP can allow you to diversify into other asset classes (example: industrial or retail).
Pro Tip: How To Be a GP Without Taking On As Much Risk
There is a way to “hack” the system: work for a GP.
Find a real estate company where you can invest as a GP while still earning a salary and bonus. Not every company offers this, but many do. You get the best of all worlds:
Security of salary and bonus.
Learn from the expertise of the founders and senior executives.
Participation in the promote once you have been there long enough.
Don’t expect to be able to participate in the promote from day 1. Play the long game by joining a good company and working your way up.
Closing Thoughts
Again, there is no single right approach.
As I discussed in The Risk-Return Spectrum: Choosing Your Real Estate Investment Strategy, my real estate investing over the past 20+ years has had two main stages:
GP Investing Through Employer: I spent most of my career with a GP focused on industrial. By joining an established firm with leaders who understood industrial, I was able to get paid to learn. I executed 100+ business plans, earned a salary and bonus, and participated in the promote after I had been there for years.
LP Investing: In 2015, I started making LP investments with a multifamily GP focused on generating consistent cash flow distributions. The LP investing gave me diversification in terms of both asset class (multifamily) and investor returns (cash flow, not just equity multiples).
It is important to keep in mind that there are trade-offs in being a GP and an LP investor. Neither is better than the other.
Take the time to understand yourself: your time, your demeanor, your goals.
Then evaluate these criteria against the trade-offs.
There is a real estate investing path for everyone.
You will find yours.
Case Study 4: Fix & Flip — The Easy Path to a Quick Profit?
Investing $130,000 in a fix & flip
Our case study series continues today with a fix & flip investment in a 2-bedroom home in Tempe, Arizona.
This is our fourth case study. Here’s a quick review of our first three:
Duplex: you diligently followed the principles I presented in the previous newsletters. The market and the economy were steady over your investment period. Everything went smoothly.
Fourplex: you were in a 1031 tax deferred exchange, so cut some corners to acquire your next property. This led to some unplanned capex costs. Then the leasing market slowed down. The net result was that your equity value was flat for your four year hold period (i.e. you didn’t make any money beyond your annual cash flow).
Industrial: you invested $90,000 in an industrial building. Things were easy due to the longer leases. You lost focus and were unorganized when the property needed your attention most. But the leasing market saved you and it ended up being a great deal, despite your stumbling efforts.
These three case studies showed a variety of outcomes impacted by factors both within and outside of your control.
Today I am going to wrap up the case study series with a fix & flip. Fix & flips are as they sound: you buy a vacant property with the intent of fixing it up and then immediately selling it.
As it is vacant, there is no income nor leases. These are speculative deals sold to future homeowners.
As with the last three weeks, we will follow a consistent format:
The Target Niche
The Acquisition
The Rehab Period
The Sale or Refinance
Let’s dig in.
The Target Niche
You live in Phoenix, AZ and sell software for a living. You have listened to two of your colleagues talk about their side hustle: fix & flips of homes in Tempe, AZ.
Here is the formula:
Buy a vacant home. It should be old and a little beat up, but in a good neighborhood. Ideally, the other houses are nicer and more expensive.
Fix up the home with a rehab that focuses on making it look consistent with the nicer properties in the neighborhood. This could include paint (interior and exterior), flooring, kitchens, bathrooms, and landscaping. See The Many Ways You Can Add Value to Your Real Estate Investment for further details.
Sell the home at a similar sales price to the nicer buildings in the neighborhood for a quick profit in 12 months or less.
You recently had one of your best software sales of your career so have money to invest. You are ready to give it a try.
You define your niche:
Asset Class: Single family home
Geography: Tempe, AZ
Strategy: Fix & Flip
Key Takeaways:
Don’t Reinvent the Wheel: learn from those who have “been there, done that”. Knowing (and trusting) someone who is already doing what you want to do.
Pick a Niche: without a niche, you will be looking at anything and everything.
The Acquisition
You spend more time learning the strategy from your colleagues and driving around Tempe. They turn you on to a local broker they have worked with and show you how to regularly check Zillow and other property listing sites.
You take your time waiting for the right deal. You are starting to learn the market by following the key steps.
Over the course of 90 days, you look at 40 properties for sale. You find your deal and come to an agreement on price ($293,500). Other nicer properties in the same area are selling for $450,000.
Here are the financial details:
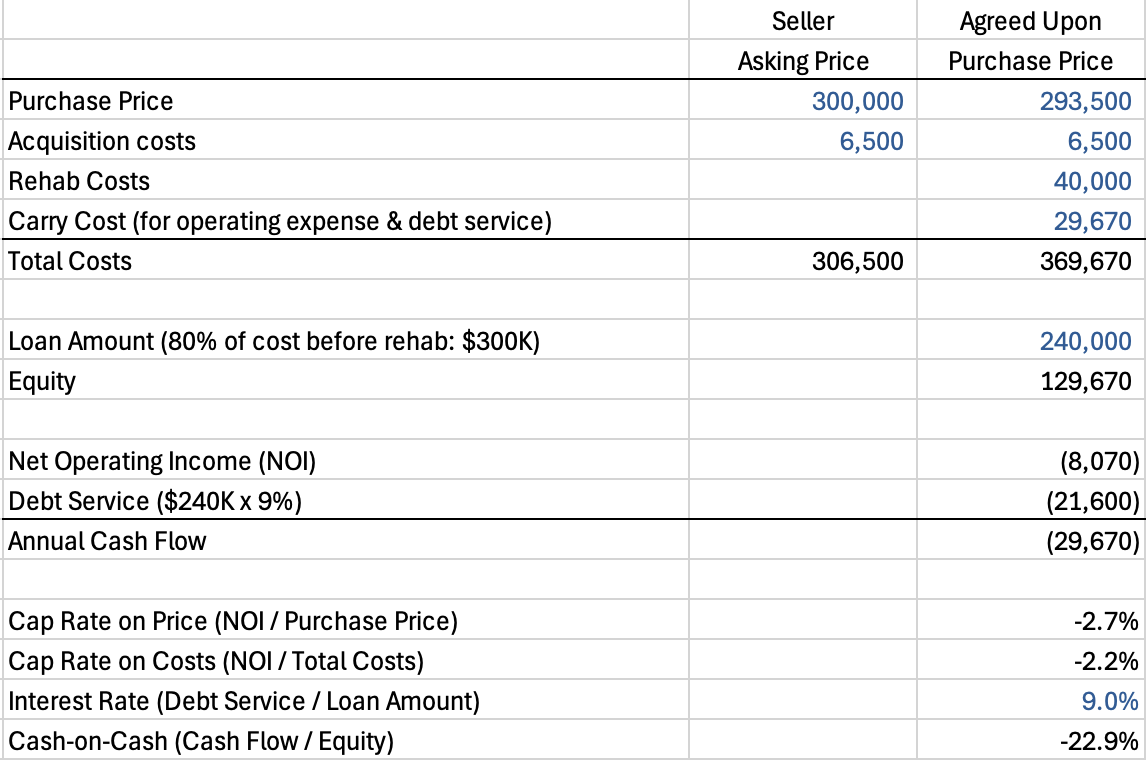
Table 1: Acquisition Financials
What does this tell us?
Equity & Debt
You were able to negotiate the purchase price down to $293,500 from $300,000.
You believe you can get a loan for $240,000 (80% of $300,000 cost before rehab). $300,000 is more than your purchase price but you believe the property will appraise at $300,000 and the lender will size the loan based on appraised value. Note that the lender will not be funding any percentage of the rehab costs or debt service. This will need to come out of equity (i.e. you).
Your interest rate is 9.0%, much higher than the first three case studies. Lenders are taking on more risk with a fix & flip because there is no revenue. It is not uncommon for them to charge a loan origination fee of 1-2% of the loan amount at time of acquisition and a loan payoff fee of 1-2% at time of sale. This is why the acquisition costs are more than the industrial case study of a similar purchase price.
Your equity required at time of purchase will be $60,000: $300,000 cost before rehab minus $240,000 loan = $60,000. Your total equity required will grow to almost $130,000 with your $40,000 rehab cost and $30,000 operating costs (negative NOI and debt costs).
Financial Return Projections
Your cap rate on cost is negative. There is no revenue, so the NOI is negative. Cap rates are not a relevant metric in fix & flips.
Your total costs after rehab and carry costs will be just under $370,000. This leaves a good amount of room for profit if you can sell it for $450,000 after rehab, in line with the nicer properties in the neighborhood.
As I described in the first three case studies, you use a purchase and sale agreement template and hire local vendors to perform your due diligence. The local broker refers you to a debt broker who helps you get a loan in line with your projections.
One of the most critical aspects of a fix & flip is that you want to get a good handle on your rehab costs before you buy the property.
Why is this so important?
Because a fix & flip only works if you keep your total costs below what you think you can sell it for after rehab. Under pricing your rehab costs will directly reduce your profit.
Make sure you use the due diligence period to get in contractors to accurately price out the rehab costs.
Key Takeaways:
Get to Know the Market: talk with a local broker and tour the market with them.
Be Patient: it is only by looking at many deals that you start to have a sense of the market and the deal that looks better than the rest.
Use Due Diligence to Price Out Your Rehab: Nailing down your rehab costs is critical. Cost overruns will directly eat into your profit. Follow the principles in Understanding the Critical Role of Contractors.
The Rehab Period
Time is your enemy with fix & flips. As there is no revenue to offset your operating and debt costs, you are burning money (and increasing your costs) every month.
Fortunately, you decided to work with the contractor your experienced colleagues had recommended. You involved them in the acquisition process and they were able to start the rehab work 1 month after closing.
The rehab goes smoothly.
The contractor has “been there, done that”. They knew what to look for during the acquisition so don’t come across any surprises.
You were candid with them, telling them this was a fix & flip. With this knowledge, they recommend (and you approve) a build quality that is appropriate for the strategy: reasonable quality that will look good. If you were going to live in the house, you might select higher quality, but this is fine for a fix & flip.
The rehab work is complete at the end of month 5.
Key Takeaways:
You Worked With a Good Contractor: this was key. The right contractor is essential for fix & flips.
You Made Reasonable Choices on Quality: you didn’t over improve the property. You recognized that this was not your home, but an investment.
Your Rehab Costs Were Accurate: they came in line with your acquisition budget.
The Sale
So far, so good. Everything is going according to plan.
As the construction is coming to completion, you reconnect with the local broker to talk about a sale. The broker likes what she sees and believes she can sell the property for $450,000.
Let’s go!!! You are pumped.
Here are the projections:
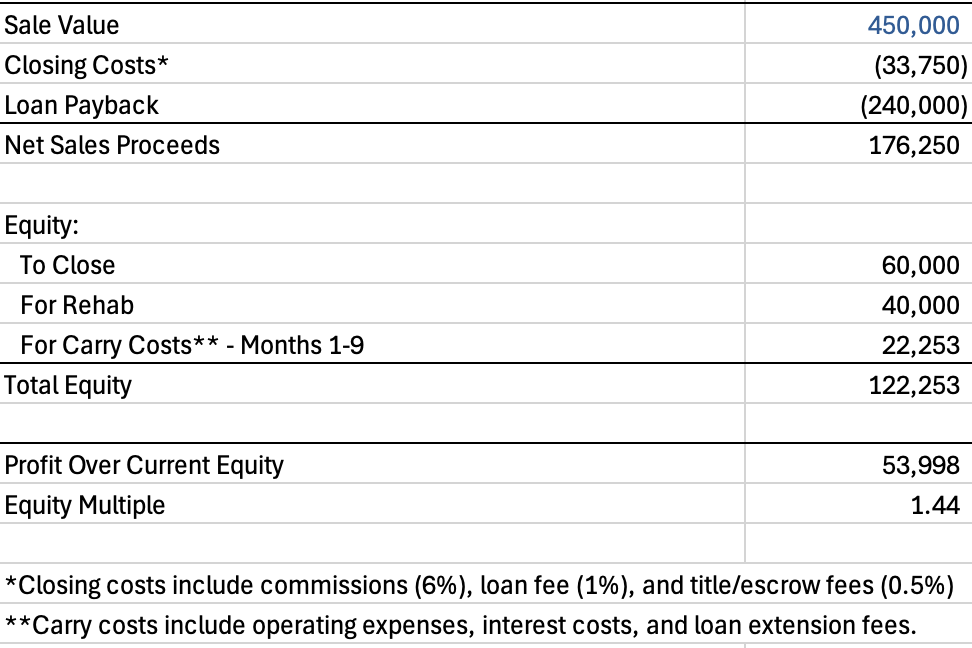
Table 2: Sale Projections
You are going to make a quick profit!
Your broker moves quickly. Note that the home sale process moves faster than investment properties. The marketing material is easier to produce as there are no cash flow projections. Home buyers normally close in 30 days, not the 60-90 days with investment properties.
You sell the property for $450,000 at the end of month 9, giving you a before tax profit of $53,998 — a 1.44 equity multiple on your $122,253 equity investment in just 9 months.
You are feeling like a successful real estate investor!
Is it always this easy?
No.
Let’s explore some other ways this could have gone. See below for a table of four different outcomes that could have happened.
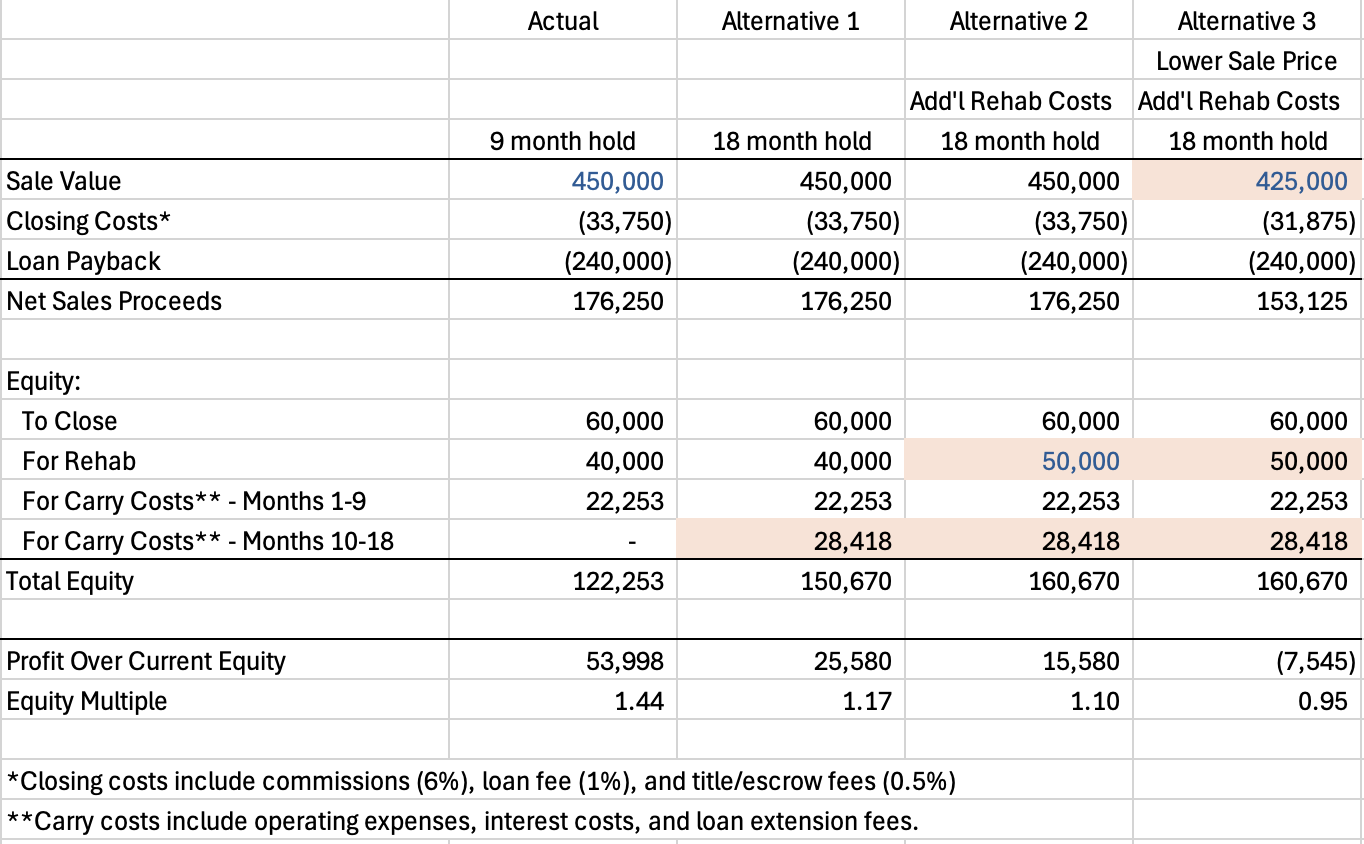
Table 3: Alternative Performance Outcomes
The table above shows how the outcome could have been significantly different. Let’s go through each one.
Alternative 1: 18 Month Hold Period
The rehab could have taken longer and the property could have taken longer to sell. Remember that there is no revenue. Each month you are paying operating expenses and interest costs. Another 9 months of holding the property will cost you $28,418, directly reducing your profit.
Lenders that loan on fix & flip properties typically give you a short-term loan. In this case, they gave you a one year loan with the ability to extend for 6 months at a fee of 2% of the loan amount: $4,800. In addition to operating expenses growing at 3%, this loan extension fee is why the second 9 months cost so much more than the first 9 months.
Alternative 2: 18 Month Hold Period & Additional Rehab Costs
Same scenario at alternative 1, but your rehab costs grow from $40,000 to $50,000. Again, this directly reduces your profit.
Alternative 3: 18 Month Hold Period, Additional Rehab Costs, & Lower Sale Price
Triple whammy. The sale price is not what you anticipated. You sell the property for $425,000, not $450,000. In this case, you don’t even break even.
Closing Thoughts
There are no shortage of stories of people who have made money on the fix & flip strategy. It is easy to think that they always go smoothly.
Unfortunately, the stories of those that have lost money are less prevalent. People tend to brag of their success while remaining quiet on their failures.
Here’s what to keep in mind:
Fix & Flips Are Different: in the other three case studies, we focused on properties that were leased to tenants. We based values on cap rates on the stabilized NOI. Fix & flips are vacant properties that are sold to homeowners. The valuation process is entirely different. The first three are investments. The fix & flip is someone’s home, making it much more of an emotional purchase.
Buy the Ugly Duckling With Potential: you want to buy a property in a good neighborhood that doesn’t look as nice as the other properties, but could with some cosmetic work.
Do the Research: accurately projecting your sale price is critical. Talk with multiple brokers. Tour properties for sale that are already listed at your target sale price. Watch what they actually sell for.
Time is Your Enemy: you want to complete your rehab and sell quickly. Each month you will be writing a check for operating expenses and interest costs. This directly reduces your profit.
Work With the Right Contractor: you need to estimate your construction costs right and move quickly. The right contractor will help you do this.
Pay Attention to Your Loan Terms: there are lenders that focus on fix & flip owners, but they are not cheap. Interest rates and fees will be higher and the loan duration (length) will be shorter. Read the loan documentscarefully.
Profits Are Before Tax: profits from a fix & flip investment will be treated as ordinary income. You don’t get the tax advantages of other investment properties. Make sure you look at your potential profits on a before and after tax basis.
The fix & flip strategy is not for the faint of heart.
Things can easily go wrong.
Be prepared to spend nights staring at the ceiling wondering why you got into this.
But…things can also go extremely well. It is one of the fastest ways to make money by being a real estate investor.
Go in eyes wide open, understanding both the risk and opportunity.
You may find it is a strategy that works for you.
Lessons From All Four Case Studies
We have covered four case studies with different outcomes. Here’s what they teach us about real estate investing.
Discipline Pays Off: following the steps in the process I have outlined in all the newsletters maximizes your chances of success.
Sloppiness (Usually) Leads to Failure: if you don’t maintain focus in executing your business plan, you will increase your chances of the deal going badly.
Luck Can Play a Material Role: you can’t control the economy, your tenants’ business success, or what your competitors do. Sometimes this will work for you. Sometimes it will work against you.
If being a real estate investor was easy, everyone would do it and investor returns would keep going down.
Recognize that it is an investment class that combines strategy, discipline, and operating performance.
This is what makes it so fascinating and rewarding.
Case Study 3: When the Market Bails You Out
Investing $90,000 in an industrial building
Our case study series continues today with an investment in an industrial building in Fort Worth, Texas.
This is our third case study. Here’s a quick review of our first two:
Duplex: you diligently followed the principles I presented in the previous newsletters. The market and the economy were steady over your investment period. Everything went smoothly.
Fourplex: you were in a 1031 tax deferred exchange, so cut some corners to acquire your next property. This led to some unplanned capex costs. Then the leasing market slowed down. The net result was that your equity value was flat for your four year hold period (i.e. you didn’t make any money beyond your annual cash flow).
With these two case studies, I am demonstrating that some things are within your control and some things are outside of your control.
Today I am going to discuss an investment where you screw up some of the things within your control, but manage to hit a home run based on things outside of your control.
Luck was on your side.
As with the last two weeks, we will follow a consistent format:
The Target Niche
The Acquisition
The Operating Years
The Sale or Refinance
Enjoy this one. Having the wind at your back is a lot of fun!
Let’s dig in.
The Target Niche
You live in Dallas and have seen the Dallas Fort Worth area continue to grow. You have a full-time job, so want to find an investment that is relatively passive.
You talk with other investors and create your niche:
Asset Class: Industrial
Geography: Fort Worth, Texas
Strategy: Very Light Rehab
Key Takeaways:
Industrial is one of the easiest and most passive asset classes to operate. The tenants take care of the maintenance inside their suites and often pay 100% of the operating expenses as additional rent. This is known as a triple net (aka NNN) lease. The leases are generally 1-5 years long, vs. 6-12 months for residential and multifamily.
You have the benefit of investing in a property that you can drive to.
You have a niche that suits your limited time availability.
The Acquisition
You get a referral for a broker from another investor you trust. You have a call with the local broker and describe your niche.
Over the course of 60 days, you look at 15 properties for sale. You are starting to learn the market by following the key steps to finding your first deal.
In month three you see a property for sale that is a little better than the rest.
This is the one to pursue.
You have the broker write up an offer for you and, after a few rounds of negotiation, you come to an agreement on price and other deal terms with the seller. The property is 40 years old and 100% leased to two tenants for multiple years. Here are the financial details:
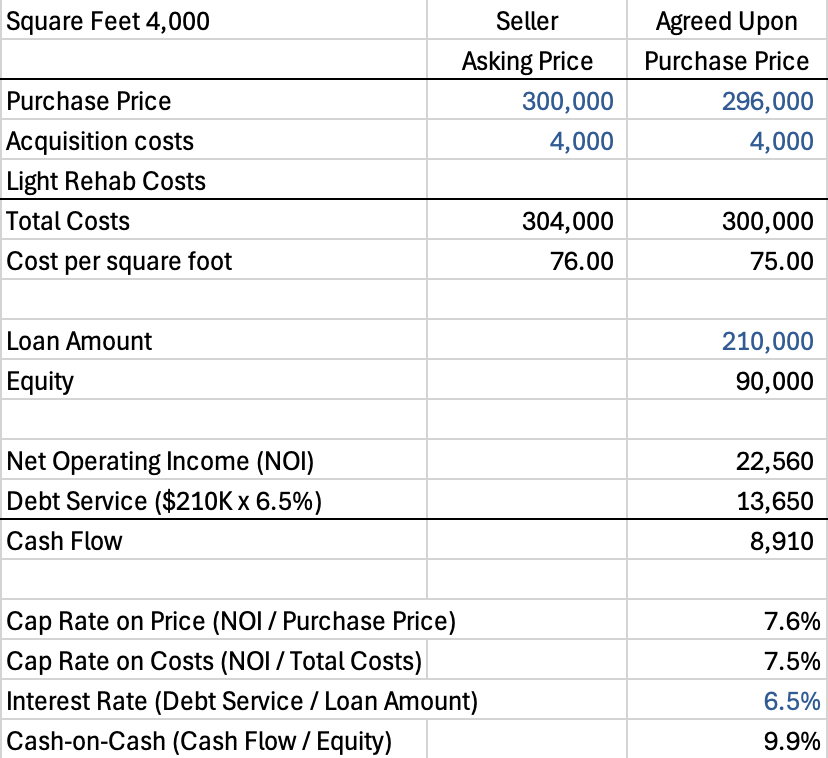
Table 1: Acquisition Financials
What does this tell us?
Equity & Debt
You were able to negotiate the purchase price down to $296,000 from $300,000.
You believe you can get a loan for $210,000 (70% of $300,000 total costs).
Your equity required at time of purchase will be $90,000.
Financial Return Projections
Your cap rate on cost is 7.5% and your interest rate is 6.5%.
You have positive leverage (7.5% > 6.5%) giving you a cash-on-cash return of 9.9% at time of purchase.
You don’t have any plans to materially increase the rent beyond 3% per year. You view this as a relatively passive investment that will give you steady cash flow.
You use a purchase and sale agreement template and hire local vendors to perform your due diligence. The local broker refers you to a debt broker who helps you get a loan in line with your projections.
The due diligence did not uncover any significant deferred maintenance items.
Key Takeaways:
Get to Know the Market: talk with a local broker and tour the market with them.
Be Patient: it is only by looking at many deals that you start to have a sense of the market and the deal that looks better than the rest.
Build a Team: having a (local) team that can help you is critical. You want a team that does each function regularly as they know the pitfalls.
The Operating Years
Initial Onboarding
The initial onboarding goes smoothly because you used the local property management and accounting team referred to you by your broker.
Year 1 - Smooth Sailing
All goes well in year 1.
Industrial turns out to be relatively easy to operate. The property manager handles the small number of tenant issues. Everything goes as planned.
You visit the property once a month, but soon cut this back to once a quarter as there is really nothing to do.
Year 2 - You Start Paying Less Attention to the Investment
Things went so smooth in year 1, that you start to lose focus on the property.
The money keeps coming in, so you focus your attention on other things. You successfully earn a promotion at your job, which means you take on a team of direct reports. This requires more hours and attention at work.
You are so busy that you are not paying much attention to the emails from your property manager asking how you want to handle the pending vacancy in unit 1 coming up at the end of year 2.
Year 3 - Unit 1 is Vacant
The end of year 2 comes around and the tenant in unit 1 vacates.
You have no real plan.
You drive out to the property on a Saturday and walk the unit. You can’t decide how you want to fix it up: paint? lighting? new carpet in the small office area? new roll-up doors?
You send an unorganized and confusing list of items to your property manager and ask them to get three bids from contractors to do the work.
Your lack of clarity with the construction scope results in contractor bids that are all over the place.
You are distracted and unorganized all year and don’t make any decisions on how to fix up the space.
To make matters worse, the tenant in unit 2 is vacating at the end of the year.
Year 4 - The Market Bails You Out
The only good thing you did at the end of year 3 was re-engage with the local broker.
He has great news for you.
While you were spinning your wheels trying to decide how to fix up the units, market rents have grown significantly. They were $0.47 per square foot (psf) per month when you bought the property. By the end of year 3, they are $0.64 psf/month.
The broker is able to lease both units at the new market rent on an “as-is” basis — you did not need to fix up the interior of the units nor give any free rent because the market was so strong. Your only leasing cost was a $5,700 commission paid to the broker: 6% of the total base rent for the two 3-year leases.
Four Year Financial Summary
Here’s a table that summarizes it all:
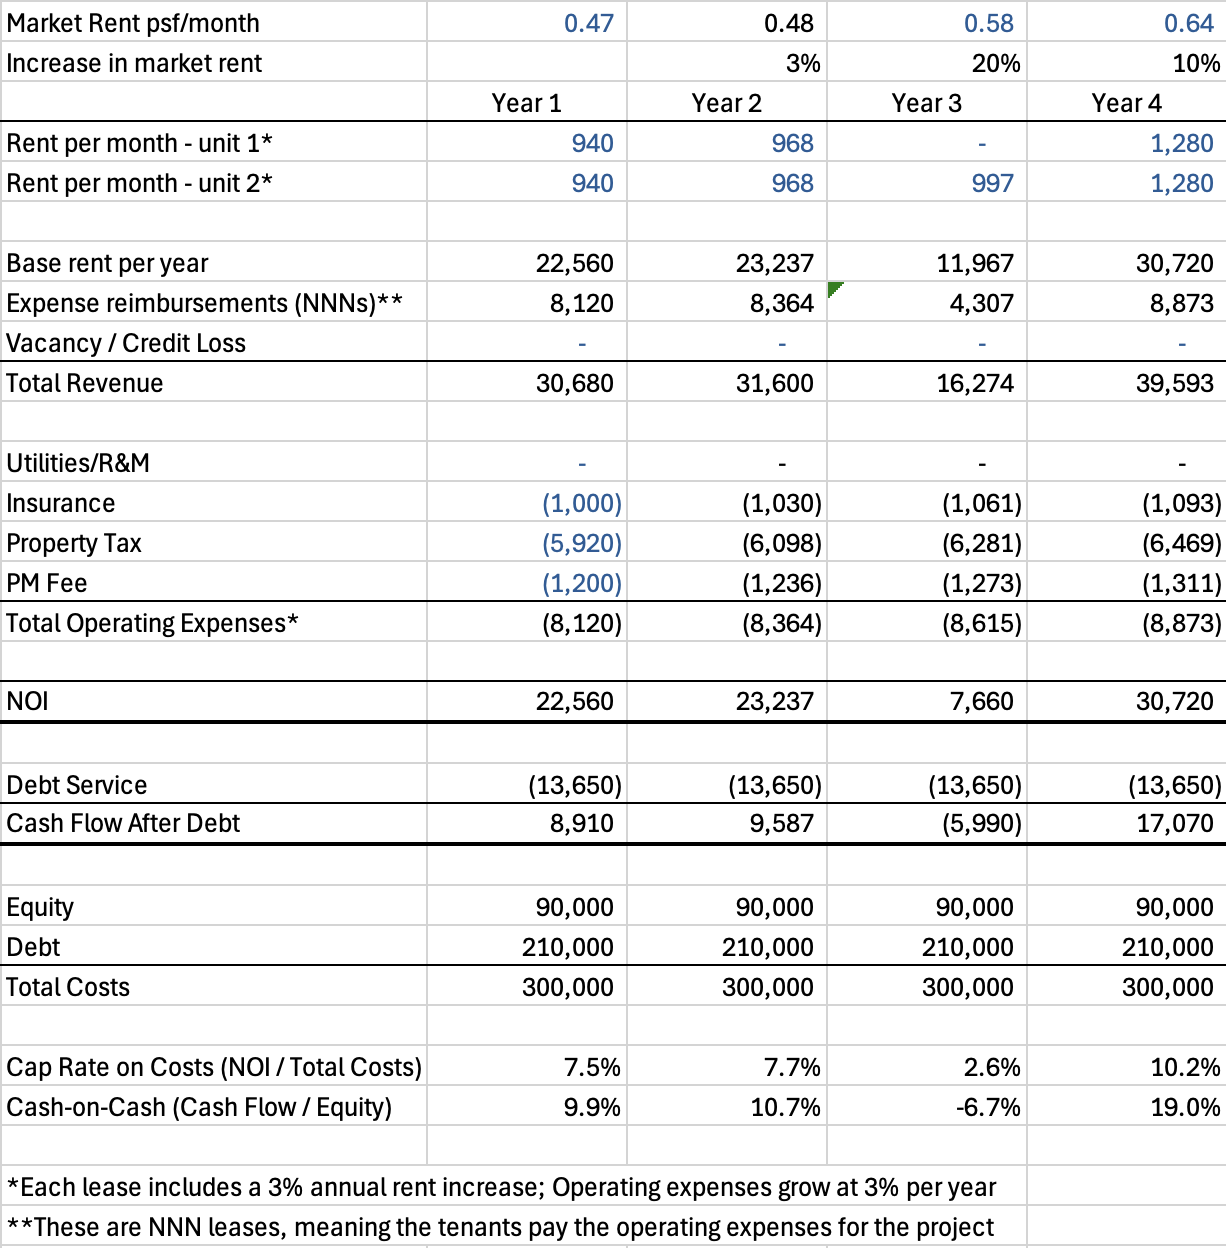
Table 2: Operational Summary
Key Takeaways:
You Lost Focus: commercial properties (industrial, retail, and office) tend to have leases that are 1-5+ years long. This can mean there are extended periods of time where there is nothing to do. This is both positive and negative. The positive is that it can be quite passive. The negative is that you can lose focus and not address upcoming items that need your attention (ex. tenant lease expirations). This is what happened to you.
The Cash Flow Suffered: your lack of focus resulted in a full year of vacancy and $1,683 of negative cash flow in year 3. Not only did you lose the base rent for unit 1, but you also lost their share of the expense reimbursements revenue (aka the NNN revenue).
You Were Unorganized: one of the most critical aspects of managing commercial properties is preparing units for the next tenant when they are vacant. This could be as simple as a deep clean or as extensive as major construction work. Pro Tip: involve your local broker BEFORE the unit is vacant. You want their guidance on how to fix up the space. They are the experts.
You Were Sloppy With the Contractors: giving a contractor unorganized information to give you a pricing bid for construction work wastes everyone’s time and does not give you an accurate price estimate.
The Leasing Market Saved You: despite your many blunders, the leasing market was on fire — with market rents increasing over 35% since you acquired the property (from $0.47 psf/month to $0.64 psf/month). You had no control over this and would not have been aware of the increase if you hadn’t re-engaged with your local broker. You got lucky.
The Sale or Refinance
With the increase in market rents, more investors want to buy industrial properties in Fort Worth.
Your broker believes you can sell it for an 7.00% cap rate on the $30,720 of annual NOI for just over $438,000. See below for the calculations:
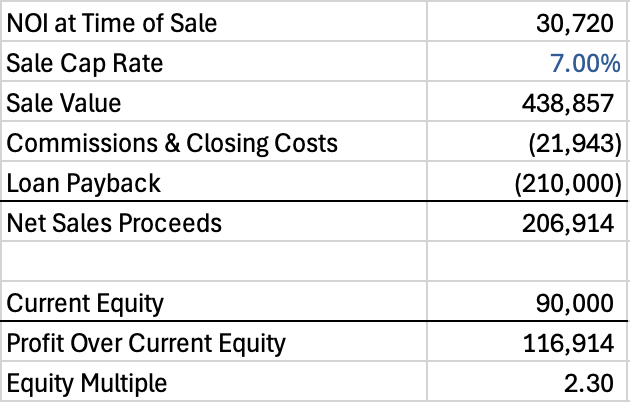
Table 3: Sale Projections
Over the next 90 days, you work with the broker to market and successfully sell the property for just under $438,000, in line with the broker’s projection.
As investor demand was so strong, it was a quick and smooth sale.
This nets you $206,914 vs. your equity invested of $90,000 giving you a before tax profit of $116,914 and a 2.3 equity multiple. Note that this equity multiple counts sales proceeds only. A full return picture would also include any cash flow distributions from the property.
Boom!! Crushed it!
Key Takeaways
Higher NOI = Higher Value: the rents increased significantly, growing from $0.47 psf/month to $0.64 psf/month. This increased your NOI significantly.
Cap Rates Move: cap rates are always changing. You bought the property for a 7.5% cap rate on total costs and sold it for a 7.0% cap rate.
Higher NOI + Lower Cap Rate = Turbo Charged Sale Value: see below for a summary of how your value would have been different if (i) rents had not grown and/or (ii) the sale cap rate had not decreased. What a difference!
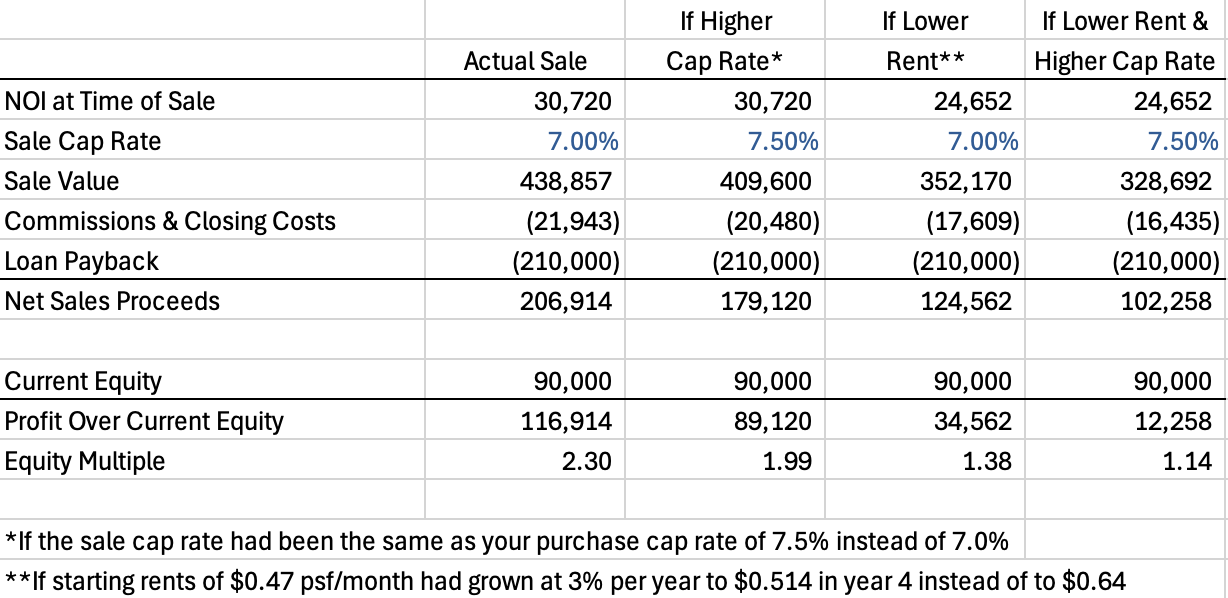
Table 4: Effect of Changes in Market Rent and Cap Rate on Sale Value
Take the time to really look at the “Profit Over Current Equity” and “Equity Multiple” in each column.
It is the combination of increased NOI (through increased market rent) and lower cap rate that really drives up the sale value.
A Note on the Refinance Option
In this case you chose to sell the property. You could have instead pursued a cash-out refinance. Assuming you could get 70% of the market value in refinance proceeds, you would have pulled out over $300,000: 70% x $438,000 = $306,600 before refinancing fees and costs.
This is $96,000 more than your existing $210,000 loan. Said another way, you would get back all your $90,000 original equity and still own the property. Just remember, there are also downsides to a cash-out refinance.
Closing Thoughts
This is an example of a deal where the outcome was much more impacted by things outside of your control than within your control.
You Were Unorganized: you were slow to react to the upcoming vacancies. You didn’t have a clear plan to clean up the units. You wasted the contractors time and got unreliable bids. You didn’t involve the broker early enough.
You Finally Re-Engaged With the Broker: you took your time, but you were smart enough to eventually engage with the leasing expert — the local broker. Better late than never.
The Market Saved You: the combination of increased market rents and the lower cap rate resulted in a big increase in value and a very successful sale.
So how do you do this again?
That’s tough to pull off.
Many investors believe they can time the market and/or improve a property so much that the next investor will pay a low cap rate for the property.
Some are able to achieve this, but very few can achieve it consistently.
The investors that achieve this tend to be vocal and their deals actively talked about. The deals where the market moved against the investor tend to be the ones you hear less about.
The key is to make investments that are not dependent on major rent growth or cap rate compression.
You want a deal that works based on current market conditions.
Don’t count on luck, but enjoy it when it happens.
Case Study 2: The Deal Where Everything Goes Wrong
Investing $60,000 in an out-of-state fourplex
Today we will continue our case study series with an investment in an out-of-state fourplex.
Last week I talked through a $30,000 investment in a duplex where you combined discipline and luck to create a successful first investment.
Let’s review what went right:
You had a clear focus and were patient in finding your first deal.
You underwrote accurately, with both the rehab costs and the post-rehab rents working out as you thought they would.
You built up cash so that you were able to rehab the units when they became vacant.
You had a successful sale.
You were able to turn your $30,000 investment into $55,915 in 3 years (excluding cash flow and before paying any taxes).
Nice work!
Now let’s add a sobering dose of reality.
Whether a deal goes well or poorly, you will never be able to definitively tell how much of the results were related to action you took or due to luck.
Be careful.
Most of us have a bias to think that any deal that went well is the result of our excellent decisions and actions. We think we are great, even invincible at times.
On the flip side, we tend to blame poor performance on things outside of our control like the market and the economy.
The reality is we will never know.
So for this second case study, I will describe an example of things going poorly.
As with last week, we will follow a consistent format:
The Target Niche
The Acquisition
The Operating Years
The Sale or Refinance
You may learn more from the mistakes than from the successes.
Let’s dig in.
The Target Niche
You are coming off nearly doubling your money with your investment in a duplex in Milwaukee, WI. You are feeling good, maybe even a little cocky.
You decide to stick with this niche, but go a little bigger:
Asset Class: fourplex (1-4 unit residential)
Geography: Milwaukee, WI
Strategy: Light Rehab
Key Takeaway:
Stick with What is Working: you spent three years in this market and had success. It makes sense to continue to focus there.
The Acquisition
You follow the same approach as you did to buy your duplex. As you have already invested in this market, you feel more confident in your ability to review properties for sale.
You are also doing a 1031 tax-deferred exchange so you can defer the tax from your duplex sale. This means you have time pressure to identify and close your next deal.
Within 30 days, you find a 4-unit residential property that you like. It is a little more run down and not on as good a street as your first property. You have to push up your rent assumptions to make the deal work in your underwriting assumptions. But…you are under time pressure with the 1031-exchange so you don’t want to take too long.
You have the broker write up an offer for you and, after a few rounds of negotiation, you come to an agreement on price and other deal terms with the seller. Here are the financial details:
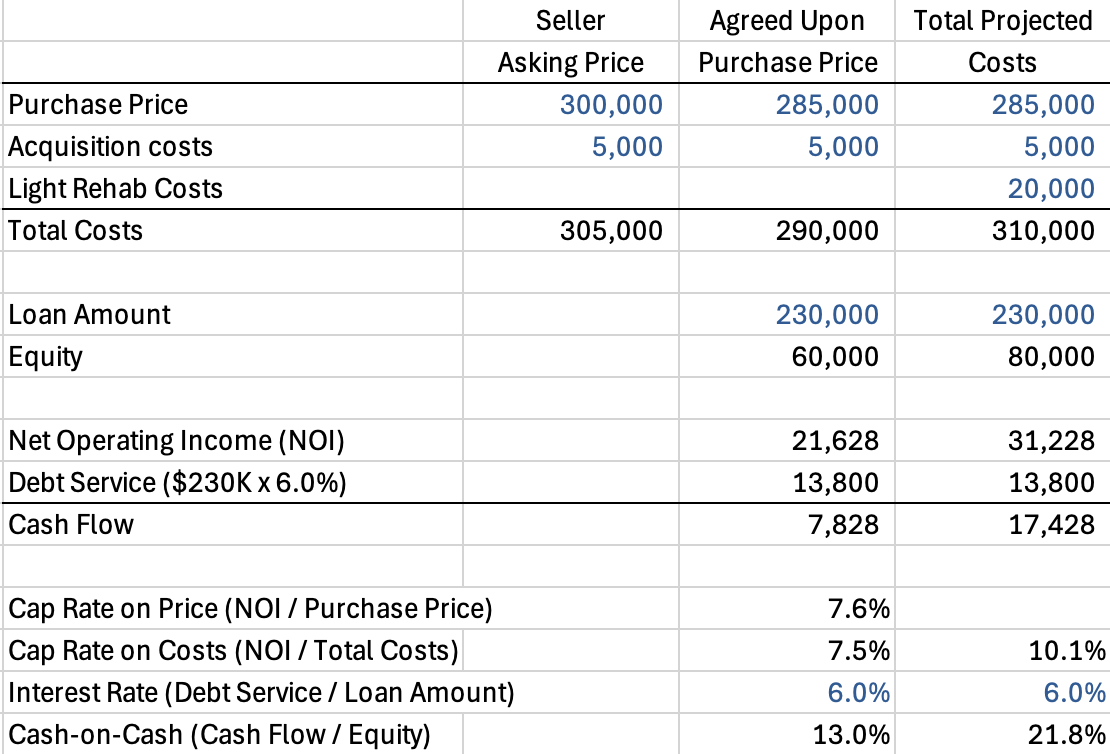
Table 1: Acquisition Financials
What does this tell us?
Equity & Debt
Your equity requirement to close is $60,000. With $55,915 coming from the 1031-exchange, you have to invest an additional $4,085.
Based on your experience with the duplex, you believe you will be able to fund the $20,000 rehab costs out of cash flow.
The interest rate on the debt is 6.0% vs. your first deal at 5.5%. This lowers your cash flow. Market interest rates have gone up in the 3 years since your first deal.
Financial Return Projections
The cap rate and return on cost economics are similar to your first deal, but not quite as good. In your first deal, you projected a 7.9% cap rate on total costs. This time you are projecting 7.5%. But, you believe it will stabilize at 10.1% vs. your first deal at 9.3%. This is because you are getting more aggressive in your rent assumptions. In your first deal, you projected rents going from $800 per month to $975 per month post-rehab. In this deal, you are projecting rents to go from $800 per month to $1,000 per month.
Your cap rate on cost is 7.5% and your interest rate is 6.0%, so you still have positive leverage.
This is where you run into problem number 1: your due diligence uncovers that something is wrong with the plumbing. The sinks don’t drain well and the toilets seem to clog. You try to get more time before closing to figure this out, but the seller is unwilling to give you the time you need.
With the pressure of the 1031-exchange, you brush it aside and hope it won’t be a problem.
Key Takeaways:
A 1031-Exchange Adds Time Pressure: being in a 1031-exchange gives you less negotiating leverage with a seller. You can’t just walk away from a deal without putting your 1031-exchange at risk.
Interest Rates Are Always Changing: the 5.5% interest rate you had in your first deal is gone. The new reality is 6.0%.
The Operating Years
Initial Onboarding
The initial onboarding goes smoothly because you used the local property management and accounting team from your first deal.
Year 1 - Water Damage
Things don’t go smoothly in year 1. That plumbing issue comes to bite you when you have a minor flood at the property. The toilet in one of the top floor units overflows. This floods their unit and part of the unit below.
You try to get the damage covered by the insurance company, but they deny the claim. It didn’t help that you neglected to tell the insurance company that your inspection report showed some plumbing problems.
Overall, the damage works out to $2,000 and you elect to give the tenant a $400 rent credit for the disruption.
Not a major setback. You have the cash to address the issue and feel the property will get back on track.
Year 2 - Light Rehab of Units 1 & 2
Two of the tenants move out in the beginning of year 2. You had $7,460 of cash flow in year 1, but used $2,000 for the water damage. This leaves you with $5,460 to renovate 2 units.
Instead of investing an additional $4,540 of equity into the property so you have the $10,000 needed to do the renovation ($5,460 + $4,540 = $10,000 or $5,000 per unit), you decide to find a cheaper contractor and reduce your scope to get it all done for $5,460 or $2,730 per unit.
This does not go well.
Not only does the “cheap” contractor do a bad job on the construction but they also hit you with a bunch of unfair change orders. You try to push back, but the contractor threatens to put a mechanic’s lien on your property if you don’t pay. The net result is that you spend $10,000 and have a poorer quality construction than if you had used your original contractor.
To make matters worse, the other owners of similar properties in the market have reduced their rents. Instead of leasing your renovated units at the projected rent of $1,000 per month vs. the in place rent of $800, you are only able to lease them for $900 per month.
The challenges keep piling on when you almost have another flood. You conclude you need to come up with a permanent fix for the plumbing issue. You spend $5,800 to complete this fix.
With the combination of the plumbing fix and the change orders for the unit rehabs, you have invested an additional $10,000 of equity in the deal by the end of the year.
Year 3 - Light Rehab of Unit 3
The tenant in unit 3 moves out and you decide to rehab it. You go back to your original contractor to do the work. Unfortunately, costs have gone up and the renovation costs you $6,000.
The leasing market is still pretty weak, so it takes you two months to find a tenant. That tenant pays $927 per month.
Year 4 - Light Rehab of Unit 4
The tenant in unit 4 moves out and you rehab it at a cost of $6,500. The leasing market is improving. You lease it for $975 per month.
Four Year Financial Summary
Here’s a table that summarizes it all:
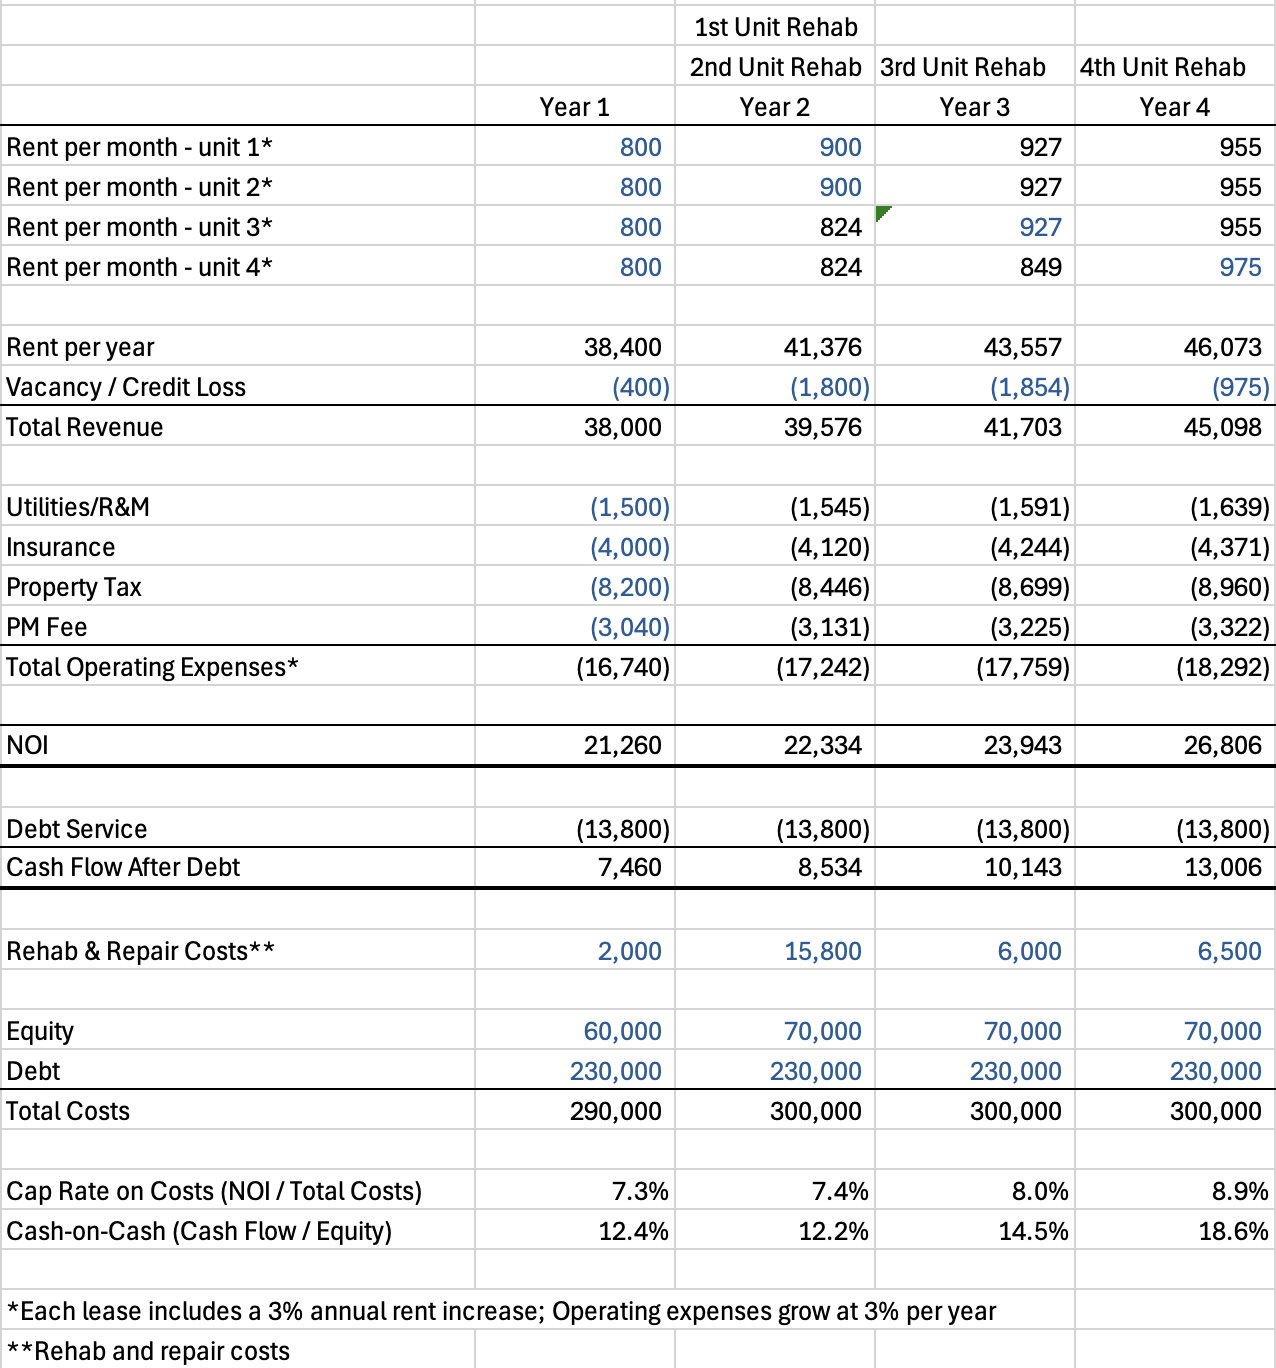
Table 2: Operational Summary
Key Takeaways:
You Ignored a Red Flag: you discovered a potential physical problem during due diligence and effectively ignored it. This ended up costing you $2,000 in damages and $5,800 in repairs, plus the rent credit to the tenant. This also resulted in your year 1 NOI being slightly less than your acquisition projection due to the tenant rent credit.
You Hid Information: not disclosing a defect to your insurance company can void coverage. Insurance is there to transfer risk to the insurance carrier. Don’t waste it by hiding information.
You Increased Your Equity: the timing of the repairs and unit renovations meant you had to increase your equity by $10,000 to $70,000.
Rents Were Lower Than Expected: you thought post-rehab rents would be $1,000 per month. They ended up being lower.
Going With the Cheap Contractor Cost You: as I discussed in Understanding the Critical Role of Contractors, the cheapest contractor is not always the best. In this case, it ended up costing you much more due to change orders. Additionally, you got poor quality work.
The Sale or Refinance
It has been a rough road. You spent more than you had planned and did not increase the rent (and NOI) as much as you hoped.
You are fed up with the property and have “deal fatigue”. You want to sell.
You go back to the broker that helped you buy the property and ask for a broker opinion of value. She believes you can sell it for an 8.50% cap rate on the $26,806 of annual NOI for just over $315,000. See below for the calculations:
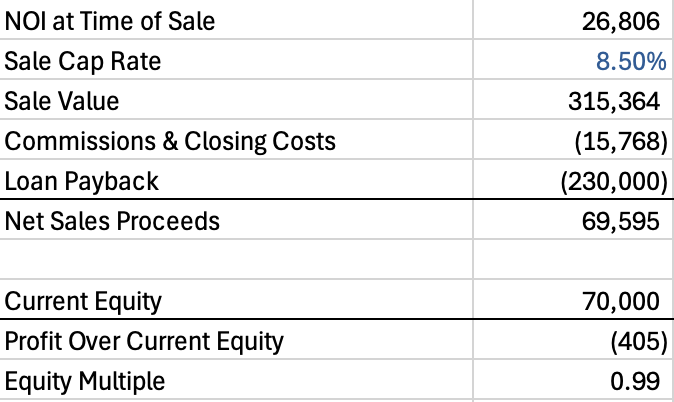
Table 3: Sale Projections
Wait what?!
You did all this work to lose $405?!
Yes, that is what the sale projection shows.
Note that this equity multiple counts sales proceeds only. A full return picture would also include any cash flow distributions from the property.
On the positive side, your cash flow after debt service is now $13,006 per year (18.6% cash-on-cash return). This is solid, but does not meet your goals of creating more equity to keep buying bigger and bigger properties.
You will need to either wait for the market to improve or get most of your original $70,000 of equity out and try to invest in a better deal.
Key Takeaways
Cap Rates Move: cap rates are always changing. In this case they increased from 8.0% to 8.5% vs. your duplex sale.
Lower NOI = Lower Value: the rents did not end up what you projected. This reduced the stable NOI that is used to value the property for a sale.
Closing Thoughts
This is an example of a deal that had a number of problems.
Property Damage: the plumbing issue resulted in emergency repairs and costs for a permanent repair.
Rents Lower Than Projections: your property does not operate in isolation. It is affected by what competitive properties do (as well as the economy). In this case, your competition reduced their rent which brought your post-rehab rent down.
Capex Timing Increases Equity: in the duplex deal, you were able to use cash flow to fund your unit rehabs. In this deal, you had to fund an additional $10,000 for rehab costs and plumbing issues.
The 1031 Exchange Fueled Many Problems: the time pressure of completing the 1031 exchange led you to ignore the plumbing issue, which increased your costs, which made you go with a cheap contractor. 1031 exchanges are a great strategy but come with their own burdens. Be careful.
So how much of this was bad luck vs. your decisions?
You will never know.
Certainly ignoring the red flag of the plumbing issue didn’t help. Additionally, maybe you should have taken the time to better understand the competition when you were projecting your market rents.
Not all deals work out.
The key is to not get wiped out by losing all your equity. By staying in the game, you can always invest in another deal or work your way out of a problem asset.
Take your punches and keep pushing forward.
Case Study 1: Where Discipline Meets a Little Luck
Investing $30,000 in an out-of-state duplex
Today we kick off a new series that will bring us from theory closer to reality.
Although I layer in many personal stories of investing into each newsletter, there is nothing like working through a single property example to bring it all together.
Let’s start by summarizing the main topics we have covered over the past 36 weeks.
Introduction to Real Estate
Investment Fundamentals
The Acquisition Process
Owning & Managing Real Estate
Executing Your Business Plan
Sales & Refinances
Today we move into our first case study.
In order to best convey the learnings, I have combined aspects of deals I have been a part of and information I have heard from other investors into individual case studies.
What this means is that the case study is “real” in that all the things I describe have happened on various investments, but they haven’t ALL happened on each of the case studies I write here.
This “fictionalization” is a trade-off worth having because many investments don’t have much going on for long periods of time. There wouldn’t be much to learn if the case study was effectively: You bought the property, painted the interior, and then sold it two years later.
Instead, I am going to concentrate the challenges, solutions, and key decisions into each case study, writing them as if you were the investor.
I will follow a consistent format for each case study over the next weeks:
The Target Niche
The Acquisition
The Operating Years
The Sale or Refinance
This is going to be fun.
Let’s dig in.
The Target Niche
You are an aspiring real estate investor living in Denver, CO. You have a good job with a medical device company. You have saved some money and can put $30,000 towards a real estate investment.
With 20% down, you can buy a $150,000 property ($30,000 equity + $120,000 loan = $150,000). Unfortunately, you can’t find any investment properties in this price range near Denver. Your friend has invested in Milwaukee, WI and says you can find a duplex in this price range. He also has a broker and property manager you can work with.
With this information, you define your niche:
Asset Class: duplex (1-4 unit residential)
Geography: Milwaukee, WI
Strategy: Light Rehab
Key Takeaways:
Don’t Reinvent the Wheel: learn from those who have “been there, done that”. Knowing (and trusting) someone who is already doing what you want to do is a huge plus.
Pick a Niche: without a niche, you will be looking at anything and everything.
The Acquisition
Now it is time to get to work. You have a call with the local broker and describe your niche. She starts sending you properties for sale. You also regularly check Zillow and other property listing sites. You take a long weekend to visit and tour Milwaukee with the broker.
Over the course of 60 days, you look at 20 properties for sale. You are starting to learn the market by following the key steps to finding your first deal.
In month three you see a property for sale that is a little better than the rest.
This is the one to pursue.
You have the broker write up an offer for you and, after a few rounds of negotiation, you come to an agreement on price and other deal terms with the seller. The property is 40 years old and 100% leased to two tenants. Here are the financial details:
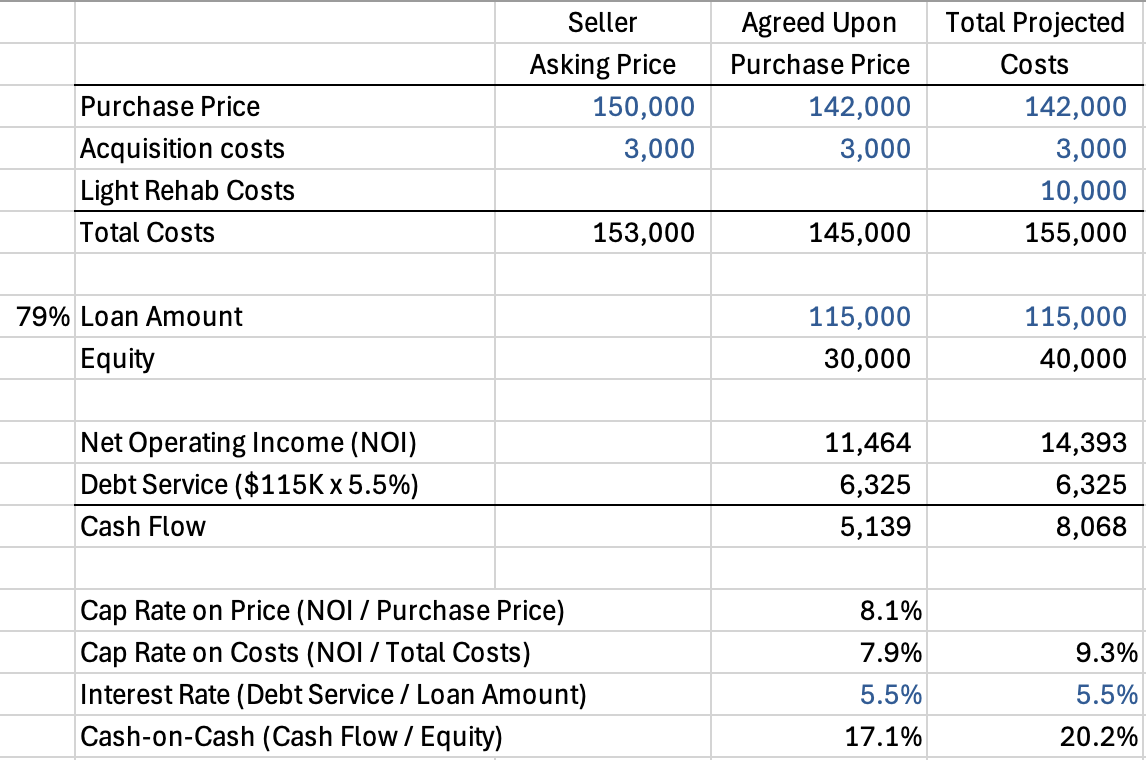
Table 1: Acquisition Financials
What does this tell us?
Equity & Debt
You were able to negotiate the purchase price down to $142,000 from $150,000.
You believe you can get a loan for $115,000 (79% of $145,000).
Your equity required at time of purchase will be $30,000, in line with your budget.
You will need to come up with another $10,000 to complete your light rehab.
Financial Return Projections
Your cap rate on cost is 7.9% and your interest rate is 5.5%.
You have positive leverage (7.9% > 5.5%) giving you a cash-on-cash return of 17.1% at time of purchase.
You believe you can increase the NOI from $11,464 per year to $14,393 per year after the light rehab of both units, bringing your cap rate on cost up to 9.3% and your cash-on-cash to 20.2%.
These are much better return projections than you could find in Denver.
You use a purchase and sale agreement template and hire local vendors to perform your due diligence. The local broker refers you to a debt broker who helps you get a loan in line with your projections.
The due diligence did not uncover any significant deferred maintenance items. Phew!
None of this was quick or easy, but you got through it OK.
Key Takeaways:
Get to Know the Market: talk with a local broker and tour the market with them.
Be Patient: it is only by looking at many deals that you start to have a sense of the market and the deal that looks better than the rest.
Build a Team: having a (local) team that can help you is critical. You want a team that does each function regularly as they know the pitfalls.
The Operating Years
Initial Onboarding
Despite being a flight away from the property, the initial onboarding went smoothly because you used the local property management and accounting team referred to you by your broker. They helped you with the “boots on the ground” work such as interacting with the tenants and directing vendors.
Year 1 - Smooth Sailing to Build Up Cash
This real estate investing is easy!
Money shows up in your account on the 10th of every month. The property manager is handling all the tenant requests. The tenants are paying rent. You are building up cash so that you can spend $10,000 to do the light rehab in the future and increase the rents.
So far so good.
Year 2 - Tenant Default, Light Rehab of Unit 1
Ugh! Right at the beginning of year 2, one of the tenants defaulted on their lease and moved out of unit 1 early. There was also $700 of damage to their unit. This resulted in $1,500 less cash flow than your budget due to a month of lost rent and fixing the damage.
You decide to take advantage of the unit being vacant and spend $5,000 to do new paint, flooring, and a light fix up of the kitchen. You had just enough money saved up from the property cash flow to make this happen.
You lease the renovated unit for $975 per month, up from $800 per month.
You are back on track.
This is a critical point to reinforce. By building up cash, as opposed to using it to fund your personal lifestyle, you had the money to do the rehab when the tenant defaulted as opposed to scramble to figure out whether to re-lease it at the lower $800 rent or somehow come up with the $5,000 to do the light rehab.
Year 3 - Light Rehab of Unit 2
You learn that the tenant is moving out of unit 2 at the end of the first month of year 3. Fortunately you have been saving the property cash flow and have built up enough to cover the $5,000 to rehab unit 2.
You complete the light rehab of the second unit and lease it for $975 per month, up from $800 per month.
Nice work!
Both units have been renovated and leased at higher rents in line with your initial projections at time of acquisition.
Three Year Financial Summary
Here’s a table that summarizes it all:
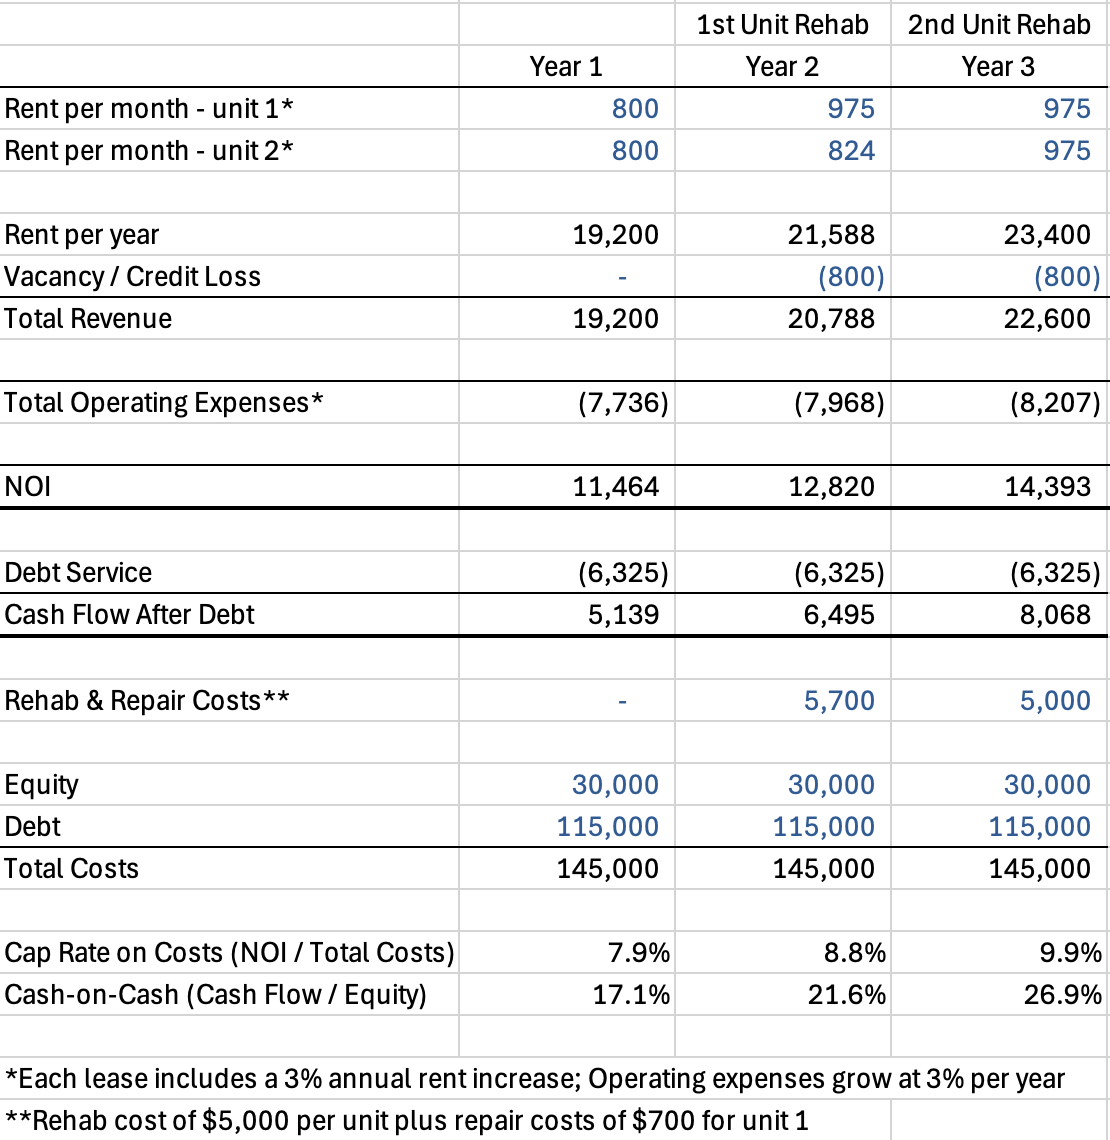
Table 2: Operational Financials
Key Takeaways:
You Had Very Little Drama: yes a tenant defaulted, but you didn’t have to evict them. No major plumbing, electrical, or roof issues came up. There were no lawsuits or insurance claims. It was relatively smooth sailing.
Consistent Economy: the economy didn’t move drastically up or down. This helped your property to perform as expected.
You Built Up Cash: this was key. By building up cash, you had the flexibility to rehab the units when the opportunity presented itself. Remember, it is impractical (and usually illegal) to evict a tenant during their lease so you can rehab a unit.
You Had No Cash Flow: the flip side of this was that your $30,000 equity investment did not give you any real cash flow as you chose to reinvest it into the property. It is not until you completed the rehab of the second unit and re-leased it that you could enjoy the $8,068 annual cash flow.
You Kept Your Equity Low: your acquisition projection was to increase your equity by $10,000 for the rehab to a total of $40,000. By saving cash flow, you were able to keep your equity at $30,000.
Lower Equity Results in Higher Percentage Cash-on-Cash Return: your original projection assumed you would fund the $10,000 rehab cost with additional equity, bringing your total to $40,000. Instead, you used cash flow to fund the rehab, keeping your equity at $30,000. This is why your actual cash-on-cash return is 26.9% ($8,068 / $30,000) vs. the projected amount of 20.2% ($8,068 / $40,000) on the same $8,068 annual cash flow.
Don’t Get Enamored with the Percentages: a 26.9% cash flow is big! But $672 per month ($8,068 per year) is not going to permanently change your life. Getting meaningful cash flow from real estate investing requires putting much bigger dollars at risk than $30,000.
The Sale
You decide that you have added the value and it is time to sell.
You go back to the broker that helped you buy the property and ask for a broker opinion of value. She believes you can sell it for an 8.0% cap rate on the $14,393 of annual NOI for just under $180,000. See below for the calculations:
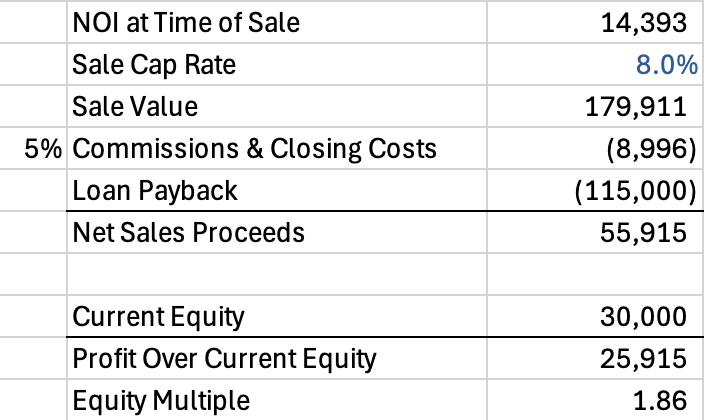
Table 3: Sale Projections
Over the next 90 days, you work with the broker to market and successfully sell the property for just under $180,000.
It wasn’t easy nor without stress. The buyer tried to re-negotiate the sale price the day before they went non-refundable, but you held firm and they agreed to hold the original purchase price.
This nets you $55,915 vs. your equity invested of $30,000 giving you a before tax profit of $25,915 and a 1.86 equity multiple. Note that this equity multiple counts sales proceeds only. A full return picture would also include any cash flow distributions from the property.
Amazing! Well done!
You decide to roll your original equity and the profit into a new deal via a 1031 tax-deferred exchange. This both deferred your capital gain taxes and allowed you to put $55,915 (less transaction costs) into your next deal.
Pro tip: 1031 exchanges can be expensive, especially when you are dealing with smaller deals like this. Make sure you understand the costs before you decide to pursue this path.
Key Takeaways:
Sale Timing: you sold when the property was stabilized at higher rents than your purchase. This allowed you to drive up the sale value.
You Got Out in Three Years: getting in and out in a relatively short amount of time minimizes your chance of a major physical problem (fire, plumbing leak, roof failure, etc.).
You Completed a 1031-Exchange: this is a good way to grow your equity over multiple deals so that the cash flow becomes more meaningful.
Closing Thoughts
This is an example of a deal that went really well.
You built up cash to pay for your light rehab, keeping your equity low.
This cash cushion allowed you to jump on the light rehab when you had a vacancy.
By sequencing the light rehab over time, the property was never 100% vacant, allowing you to maintain positive cash flow.
Your post-light rehab rent projections were accurate. You thought you could increase the rents to $975 per month and you were able to do this.
Luck was on your side. You didn’t have any major tenant or property problems. The economy remained stable.
Real estate investments don’t always go this smoothly, but a lot of them do.
By being proactive in fixing up the units, you were able to add value and significantly increase your equity.
Well done!
The Cash-Out Refinance: Too Good to be True?
A strong monetization strategy that pushes risk into the future
A couple of weeks ago I introduced the concept of “monetizing” your investment once you have added value. As a reminder, “monetize” is a fancy way to say that you turn created value into actual cash.
Last week I described the process of selling your property.
Today I am going to walk you through another option: the cash-out refinance.
A cash-out refinance can be an effective and tax-free way to get a significant amount of cash out of your property, sometimes as much as if you were to sell your property.
Sound too good to be true?
Your instincts are correct…it is not that simple.
That’s why your friendly Professor Bateman is here to guide you through it. Today we will cover:
What a cash-out refinance is.
How lenders size the refinance amount.
Finding the right lender.
When you should consider a cash-out refinance.
Why you need to be careful.
Refinances are a critical tool you should consider.
Let’s dig in.
What a Cash-Out Refinance Is
Let’s start with defining a refinance. A refinance is: replacing your current loan with a new loan. That simple. The new loan could be more, less, or equal in amount (and interest rate) to the current loan.
A cash-out refinance is when the new loan amount is more than the current loan amount. Example: $160,000 new loan vs a $110,000 current loan = $50,000 more in debt.
You pay off the loan with the current lender and keep the difference ($50,000) as cash for yourself.
It is more complicated than that due to closing costs and lender fees, but that is the basic process you need to get started.
Here’s a personal example from one of my limited partner investments. I invested $50,000 in a value-add deal. The property did so well that we had a cash-out refinance of 90% of my investment in year three. Three years later, we had another cash-out refinance of 160% of my original equity for a total of 250%.
$125,000 cash-out refinances in six years without cash. No taxes. Pretty cool!
I will come back to this example later, but first we need some foundational knowledge.
How Lenders Size the Refinance Amount
A refinance follows the same basic process as I described in Debt: An Amazing Tool with Strings Attached. The key difference with a refinance is how the lender determines the loan amount.
Lenders have three main tools they use to determine how much debt they will give you in a refinance, including a cash-out refinance.
Loan to Value
Debt Service Coverage Ratio
Debt Yield
Let’s describe each one.
Loan to Value (LTV)
Calculation: new loan amount divided by the appraised value of the property.
Example: $160,000 new loan amount divided by $245,000 appraised value = 65%.
A licensed appraiser will be hired by the lender (and paid for by you) to come up with a market value of the property using a combination of approaches: sales comparisons, capitalization rate, and replacement costs.
The lender will have a maximum LTV they will go to. As long as the LTV is less than their maximum, they will be OK funding the new loan.
Debt Service Coverage Ratio (DSCR)
Calculation: net operating income (NOI) divided by interest costs for the new loan.
Example: $15,000 annual NOI divided by $8,800 annual interest costs = 1.70.
Many lenders use the DSCR as the main metric to size the loan amount. Lender DSCR requirements can vary significantly with different lenders. Some go as low as 1.00.
Pro Tip: make sure you understand how the lender will calculate the NOI, as it is often different from the actual NOI. For example, they may include an artificial vacancy factor that reduces the revenue. This will be detailed in the loan agreement. Make sure you understand this before you sign the loan agreement.
Debt Yield
Calculation: NOI divided by new loan amount.
Example: $15,000 divided by $160,000 new loan amount = 9.4%.
I like to think of this as the lender’s cap rate. If you default on the loan and the lender gets the property back, this is what their cap rate is (at least at the moment in time they made the loan).
LTV vs. DSCR vs Debt Yield
Some lenders favor one more than the other and most will use a couple in conjunction with each other. Just remember that the lender will use the one that gives the lowest loan amount. Said another way, the most conservative constraint wins.
Get to know your potential lenders and which tools they favor. Understanding this could help you get to the best lender for your property.
Finding the Right Lender
Not every lender will do a cash-out refinance. Some only focus on loans for acquisitions.
Some will look closely at the amount of original equity you would still have invested in the property after the cash-out refinance. If they see that you are pulling out 100%+ of your original equity, they may see you as more likely to walk away if things get tough — you’re playing with house money (zero equity in the deal).
Here’s how to find the best lender for you:
Get quotes from multiple lenders. You want to talk with at least 2-3 lenders to understand your options. It may be worthwhile to hire and pay a debt broker to help you with this. Their 1% of loan amount fee may pay for itself in the better loan terms you get.
Understand the lender’s process. What tools do they use: LTV, DSCR, debt yield? What internal approvals do they need? Have they done similar loans recently?
Think about what you want. Don’t just go with the highest loan amount. It may be better to get a bit less debt in exchange for a lower interest rate and/or more flexibility in how you operate the property.
Don’t rush it. Take the time to carefully evaluate your options.
Here’s an example of why focusing on a single piece of the loan does not tell the whole picture.
I was working on a cash-out refinance and we ended up with two lender options to replace our $3,000,000 loan for our property with $250,000 of NOI:
$4,000,000 new loan - 4.0% interest cost = $160,000 and 1.56 DSCR
$5,000,000 new loan - 4.5% interest cost = $225,000 and 1.11 DSCR
Option 2 would have resulted in an additional $1,000,000 of cash-out refinance proceeds, but $65,000 per year more in interest costs and a much lower DSCR.
There was no correct answer. We decided to take the more conservative route of option 1. We still had a win of a $1,000,000 cash-out refinance, but retained more future flexibility with a higher DSCR.
When You Should Consider a Cash-Out Refinance
Now that you understand the fundamentals and have seen some examples, let’s talk about when it makes sense to consider a cash-out refinance instead of selling your property. Here are key characteristics of each strategy:
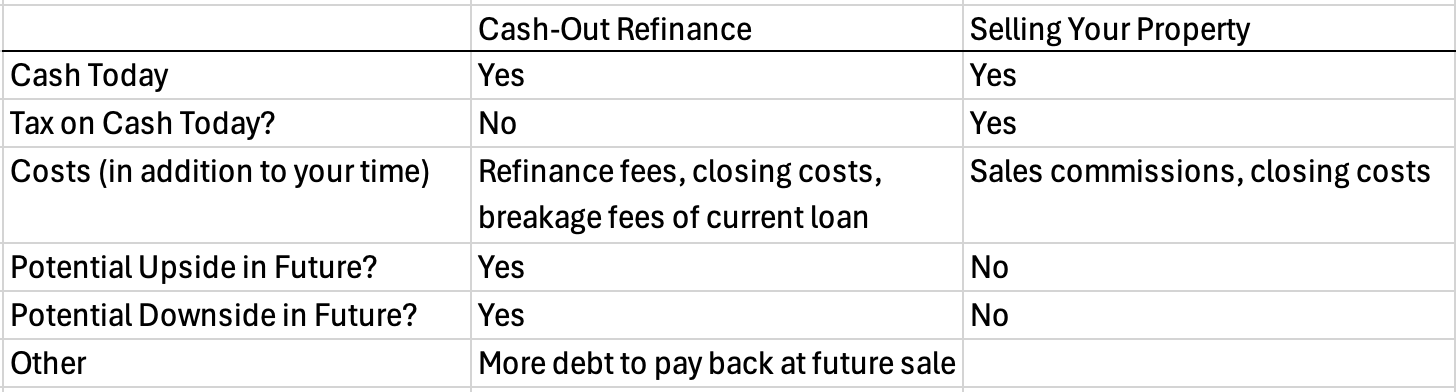
Table 1: Cash-Out Refinance vs. Selling Your Property
So how do you decide whether to do a cash-out refinance or sell?
As I have said in the past, it is all about understanding your investment goals.
A cash-out refinance is a great strategy if you want to continue owning the property longer term. You continue to believe in the long-term upside of your investment and want to benefit from its success.
Remember my cash-out example from the beginning? Had we sold the property we would have missed the strong performance that led to the second cash-out refinance.
Why You Need to Be Careful
I am a fan of cash-out refinances, but recognize they are not without risks and costs.
Here is what I recommend you keep in mind:
Refinance Costs: in addition to using your time, a cash-out refinance will include lender fees (example 1% of the new loan amount) and closing costs.
Current Loan Costs: be careful to review the terms of your current loan and talk with your current lender. Sometimes there are penalties for paying off your loan early, particularly if it is a fixed rate loan and interest costs have gone up. These can be huge.
More Debt = Less Cash Flow: if cash flow is your highest priority, you may be better off keeping your debt low.
A Sale is Final — A Refinance Keeps You in the Deal: Selling a property is your final move for that property. It doesn’t matter what the future holds. A cash-out refinance keeps you in the deal with an uncertain future that could be good or bad, all the while with more debt.
More Debt = More Risk: to state the obvious, a cash-out refinance means that you are adding more debt to your property. At some point, you are going to have to pay it back. Additionally, if things go wrong in the future you may have less cash flow cushion as your interest costs will be higher. Here’s an example of a cash-out refinance gone bad.
We bought a collection of office buildings in the mid-2000s and did a large cash-out refinance in 2007. Then the great financial crisis of 2008 hit. By 2009 we were struggling to make interest payments. The drastic slowdown of the economy almost forced us to default on the debt and give the property back to the lender. Had we had a smaller debt amount (and interest costs), we would have had much more flexibility.
Over my 20+ years of personally investing in real estate, I have benefited from 20+ cash-out refinances in the 60+ personal investments I have made. This compares to 30+ sales.
Cash-out refinances are a great tool. Just remember they are not without risk.
Knowledge is power.
Use it to make the right decisions for you.
How to Sell Your Property Without Leaving Money on the Table
The 7 steps of a sale — from picking a broker to picking a buyer — and why the highest offer isn’t always the best
Last week I introduced the concept of selling your property.
This is often the culmination of years of hard work, perseverance, and (hopefully) some luck.
You studied the investment fundamentals.
You took the time to pick your niche and build your team.
You reviewed many properties until you found the one with economics a little better than the rest.
You completed the acquisition and set yourself up for successful operations with your team.
You successfully executed your business plan and increased the net operating income.
Well done!
Now you are ready to reap the rewards by selling your property.
This week we are going to dive deep into the sale (aka disposition) process and unpack the key steps that will yield the best results including:
Understanding market and economic conditions.
Working with a broker.
Preparing your property for sale.
The marketing and bidding process.
Selecting a buyer.
Navigating the purchase and sale agreement, the due diligence process, and closing.
What to do with the sale proceeds.
Let’s dig in.
Understanding Market and Economic Conditions
One of the realities of owning real estate (and any other investment) is that there are two main things that affect value: (i) things you can control and (ii) things you cannot control.
Things you can control include the systems, processes, and actions you take to manage your property such as painting the building, selecting a broker, and how you treat your tenants.
Things you can’t control include everything else. Humbling, isn’t it?! Examples of things you can’t control include how the economy is doing, the policies politicians put into place, and whether your tenant can pay rent.
Understand and accept the difference between these two things and take advantage of the economic tailwinds when they are blowing in your direction.
If the economy is strong and buyers are paying high value for real estate like yours, this may motivate you to sell. On the other hand, if market conditions are poor, you may not want to sell until they recover.
A good broker will help you navigate this.
Working With a Broker
A good investment broker will be your main ally in the sale process. “Investment” brokers specialize in selling properties, as opposed to leasing them. However, there are many brokers that do both. The most important thing is to find one that regularly sells properties of your type (aka asset class) in your property’s market.
A good broker will:
Educate you on the market conditions.
Give you an estimate of what your property will sell for. This is known as a “broker opinion of value”. Values will mainly be based on cap rates as discussed in Cap Rates: The Simple Math of Real Estate Investing.
Advise you on how to prepare your property for sale.
Prepare marketing materials and run the sales and marketing process.
Help you select a buyer and navigate the closing process.
In exchange for all this critical work, you will pay them a sales commission when (and only when) the property sells. This commission will be between 1% and 6% depending on the value of the property. The smaller the property, the higher the commission. Here are two examples:
$1,000,000 property value at 6% commission rate = $60,000 commission.
$3,000,000 property value at 4% commission rate = $120,000 commission.
Commissions vary from market to market. Start by asking the broker what they think is fair and work from there. Once you come to an agreement, you will sign a broker listing agreement. This is just like a broker listing agreement for leasing I discussed previously, but modified for a sale. The broker will have a template to use.
Pro tip: talk with multiple brokers about selling your property before you select one. Getting multiple opinions of the market and value is extremely helpful. And remember, just because you talk with a broker doesn’t mean that you are committing to do anything. It is just a conversation at this point.
Preparing Your Property For Sale
Once you decide to sell and you select a broker, I highly recommend you follow their advice on how to prepare your property for sale. Here’s an example:
My company owned a 100% leased, 30-year-old industrial building in an excellent market. The only problem was that the building looked old. We followed the broker’s recommendation to (i) paint the building and (ii) re-coat and re-stripe the asphalt.
Wow! It looked almost brand new and made such a better first impression on buyers.
The result: our sale price increase far exceeded the money we spent on these two cosmetic upgrades.
The Marketing and Bidding Process
The first step the broker will take is to prepare the marketing materials which include a 1-4 page brochure and a 5-20 page offering memorandum (OM).
The brochure is the teaser that they will email out to their database of brokers and investors, as well as post to sale websites like CoStar and LoopNet. Interested buyers will then express interest and request an OM.
Most brokers will have potential buyers sign a confidentiality agreement before releasing the OM. This allows them to (i) register the potential buyer in their database for follow-up and (ii) legally require the potential buyer to keep non-public information confidential.
In a strong seller’s market where values are high, the broker may not list a sales price. They will run a bidding process with a group of buyers to maximize the price.
In a weaker seller’s market, the broker may list a sales price and react to offers as they come in.
It all depends on (i) the market conditions and (ii) the strategy you and your broker agree upon.
I have experienced successful sales as a seller using both strategies at different times. However, it is MUCH more thrilling as a seller to see a broker run a bidding process that drives up the sales price. Good brokers are masterful at this.
Selecting a Buyer
Selecting a buyer? This is just about picking the one with the highest price, right?
Yes and no.
Remember that an offer (aka a non-binding letter of intent) will include the price and other deal terms such as (i) the due diligence period, (ii) the closing date, (iii) whether there are extension options, and (iv) the deposit amounts.
Additionally, each buyer will have their own reputation based on previous purchases (if any) that the broker will share with you.
Here’s an example of three offers:
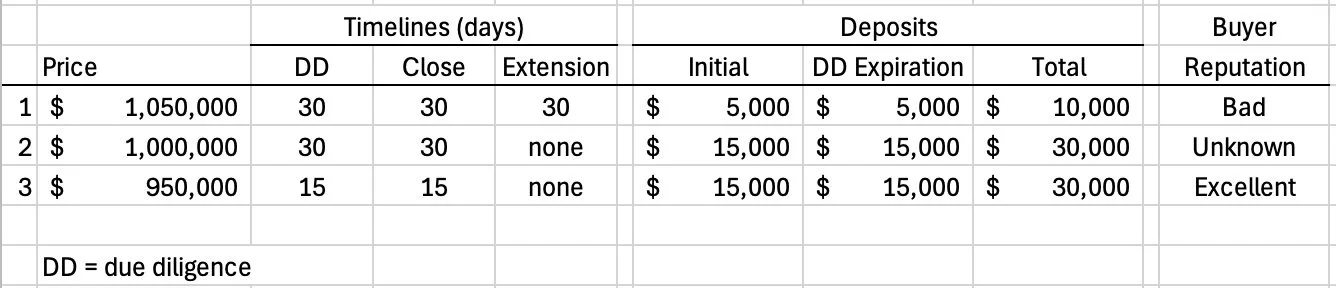
Table 1: Buyer Offer Sheet
You are faced with some trade-offs. The strongest price is from a buyer with a bad reputation (for not closing deals), the longest timeline, and the lowest deposit. The long timeline (30 + 30 + 30), the low deposit ($10,000 vs. $30,000), and the bad reputation are red flags. Be careful. You could spend 30-90 days with this buyer and end up with a dead deal.
The lowest price is from the buyer with the best reputation and timeline.
Who should you pick?
There is no right answer. Talk it through with your broker and make the best decision for you.
I have gone both routes in my investing career. My preference? If the price is close, I go with the buyer with the strong reputation. It is rough to spend 30-60 days with a buyer only to have the deal collapse at the last minute.
Pro tip: Watch out for “re-trades”. A re-trade is when a buyer tries to renegotiate the price down, typically because of an issue they find in due diligence. Sometimes this is warranted: the roof needs replacing immediately and you never disclosed this. Sometimes it is not: the buyer later decided their rent assumptions were wrong. Buyers typically develop bad reputations because they try to re-trade on each deal. If re-trades come up, lean on your broker to help you navigate a workable solution.
Navigating the Purchase & Sale Agreement, the Due Diligence Process, and Closing
Once you select a buyer, the process is very similar to the acquisition process I previously wrote about. I suggest you revisit:
But…there are two differences worth highlighting:
Due Diligence
As you prepare the due diligence for the buyer, make sure you look for potential red flags from a buyer’s perspective. Do this before or during the marketing process so that you have time to clean up any issues.
For example, I was once selling a property that had 8 years remaining on the roof warranty. As we prepared the due diligence, we couldn’t find the warranty document. We had to request this from the roof installer. They provided a copy, but it took a couple of weeks. No harm, no foul. But this would have been a stressful scramble if the buyer had found the problem in the last days of their due diligence process.
The lesson: review your files in advance of giving them to the buyer to address any gaps or red flags.
Lender Communication
As soon as you are considering selling the property, talk with your lender to confirm that you can sell it and what the loan payoff amount will be.
I was once selling a property and didn’t take this important step. The loan was set up such that if the loan was paid off at any day after the 1st of the month, the borrower (i.e. me) had to pay a full 30 days of interest. We closed on the 3rd, so had to pay for 27 extra days of interest.
Had I checked this in advance, I could have structured the sale to close on the 1st.
Learn from my mistake. Talk with your lender in advance of committing to sale terms and dates.
What To Do With the Sale Proceeds
A successful sale is the culmination of a successful investment. It is the “points on the board” of your hard work. Your profit is secured.
But…you will still need to pay taxes unless you complete a 1031 tax-deferred exchange as discussed in 5 Tax Advantages That Make Real Estate Investing So Powerful. I suggest you re-read the 1031 exchange section of that newsletter before you consider selling your property.
Here are two examples from my investing history:
Sell & 1031 Exchange
We successfully executed the business plan of a retail property. I didn’t need the cash and wanted to use the proceeds to invest in another property. I completed a 1031 exchange into another cash-flowing property.
Sell & Pay Long-Term Capital Gains
We successfully executed the business plan for an industrial property. I wanted to use the cash and was willing to pay the tax now.
Just remember that by completing a 1031 exchange, you are deferring (not eliminating) your tax to be paid in an uncertain date in the future. The economic conditions in the future are unknown. This is a future risk you are taking.
Closing Thoughts
Whether you decide to 1031 exchange or not, selling a property can be an excellent way to turn your hard work into cash.
The most important thing is to work with an investment broker who regularly sells properties similar to your property in your property’s market. They will know what the property is worth and who the likely buyers are.
Responding to a random offer you receive or trying to sell the property without a broker is like gambling: it may work out, but the odds are against you.
Be a professional.
Leverage the power of a good broker.
You got this.
You Improved the Property. Now How Do You Get Paid?
The three ways to turn a value-add into cash — and how to pick the one that fits your goals
We have covered a lot on executing your business plan over the last nine weeks.
I defined what it means to add value and discussed the many ways to do this.
I discussed the critical role of contractors and how to navigate construction contracts.
I then spent five newsletters breaking down leasing from a leasing overview to nailing your rent projections to understanding effective rent to reading leasing contracts to analyzing whether or not to renew a tenant.
Executing your business plan is a process. Early on I presented a formula for success:
Understand Your Goals + Focus + Talk with Experts + Budgeting + Develop a Game Plan = Setting the Property Up for Success
You then need to execute.
Today I will talk through what to do once you have successfully executed your business plan. Your hard work, patience, and perseverance have paid off. Maybe there was even a little luck along the way.
But here's the question most investors face next: how do you actually get your money out?
There are three main ways to do this:
Enjoy the cash flow.
Sell the property.
Cash out refinance.
Each way has its pros and cons. The decision of what to do depends on the goals you are trying to achieve, which may change over time.
Let’s dig in.
Your Real Estate Investment Example
Let’s create an example to use in explaining and evaluating the three ways to monetize your investment. The math will tie to my previous post: Cap Rates: The Simple Math of Real Estate Investing
Here’s the example:
A little over two years ago, you bought a property that was 100% leased to one tenant with two years left on the lease. The net operating income (NOI) at time of purchase was $10,000. [Reminder: NOI = revenue less operating expenses but before interest costs and capital expenditures.]
Your total cost to buy the property was $170,000 — a $165,000 purchase price plus $5,000 in closing costs. After securing a $110,000 loan with a 5.5% interest rate, your equity was $60,000.
$170,000 - $110,000 = $60,000
The property was old and in need of some cosmetic repairs. As it was fully leased when you bought it, you waited patiently until the lease expired to complete your light rehab.
You spent $30,000 to do a light rehab (paint, carpet) and paid a commission to a broker to find a new tenant. Because the loan amount is fixed, the $30,000 cost increased your equity (aka cash investment): $60,000 original equity + $30,000 light rehab and commissions = $90,000 total equity.
After the light rehab, you were able to increase the NOI to $15,000.
Here’s a summary table to help you keep track of everything.
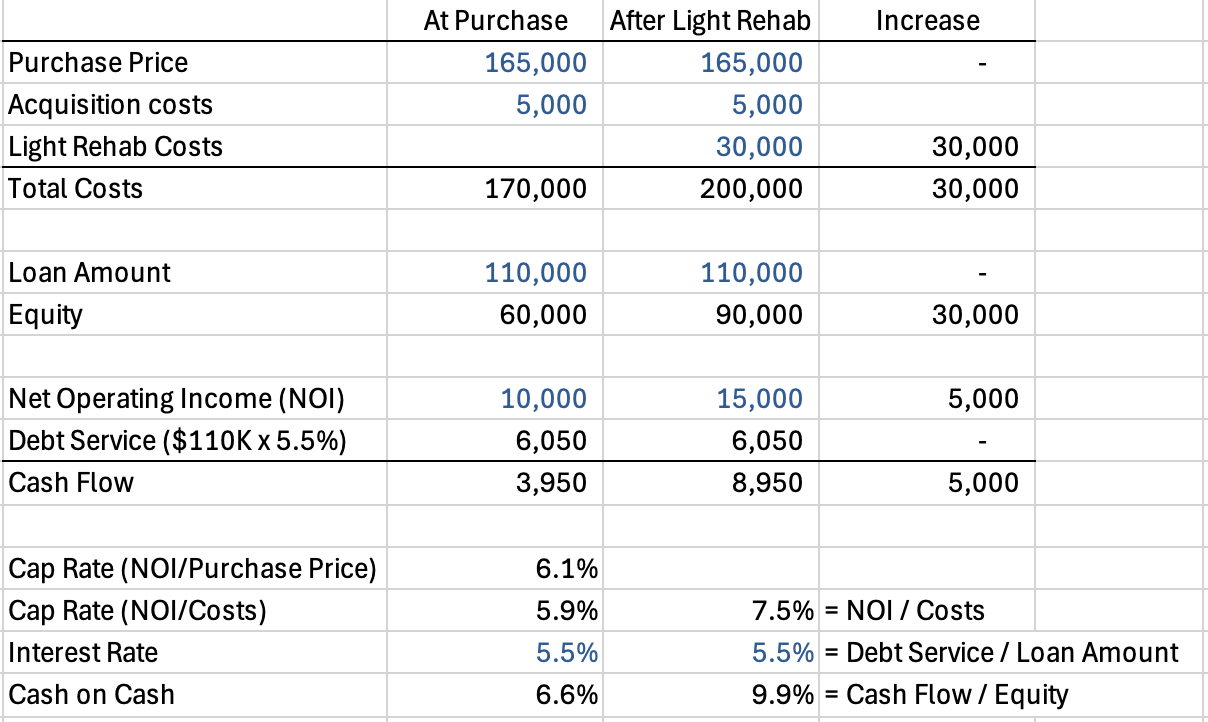
Table 1: Financial Impact of a Successful Business Plan Execution
Note that there are two ways to look at your cap rate.
Using purchase price (what you pay to buy the property): NOI / Purchase Price — $10,000 / $165,000 = 6.1%
Using total costs (your actual return on your cost basis): NOI / Total Costs — $10,000 / $170,000 = 5.9%
Neither is more accurate than the other. Each explains a way to look at your cap rate.
So what do these calculations tell us? Two main things:
#1) Cash Flow Increase
By spending a one-time cost of $30,000 for the light rehab and commissions, you went from $3,950 per year of cash flow to $8,950 per year. $30,000 to get $5,000 more per year? Well worth it.
#2) NOI Increase = Value Increase
You have increased the NOI. NOI is a key metric buyers and lenders use to value a property. To oversimplify a bit, the value of the property has increased.
Why is this oversimplifying?
Because cap rates can go up and down depending on overall market sentiment, independent of your individual property.
For this discussion, let’s assume they stayed fixed.
Monetizing Value
Now let’s get into the fun part. How do you turn your hard work into cash? Said another way, how do you “monetize” the increase in value?
Option 1: Enjoy the Cash Flow
The first way is the most straightforward and passive: do nothing and enjoy the increased cash flow.
The $8,950 cash flow per year after light rehab on your $90,000 of equity is a 9.9% annual cash-on-cash return. Much of it is shielded from tax by depreciation. See 5 Tax Advantages That Make Real Estate Investing So Powerful.
If you are a cash flow investor like I am, this may be the best fit for you.
Option 2: Sell the Property
Properties are typically sold based on a capitalization rate (cap rate). In this case you bought the property for a 6.1% cap rate: $10,000 NOI divided by $165,000 purchase price = 6.1%.
Let’s assume you can sell the property for the same 6.1% cap rate. $15,000 post light rehab NOI divided by 6.1% = $245,902.
This gives you a profit before commissions, closing costs, and income tax of $45,902. $245,902 - $200,000 total costs. Not a bad return in two years for your equity investment of $90,000.
If you are focused on increasing your total net worth as much as possible, this could be the path for you. You could consider a 1031 exchange to defer the taxes as I discussed in 5 Tax Advantages That Make Real Estate Investing So Powerful.
Option 3: Cash Out Refinance
Refinancing the property could be a way to have the best of both worlds.
The increase in NOI will likely allow you to put a bigger loan on the property. Your original loan of $110,000 was about 65% of total costs ($110,000 / $170,000 = 65%).
Using the same 65% on the new market value we calculated above ($245,902) would give you a new loan of just under $160,000. $245,902 x 65% = $159,836. This new loan amount is almost $50,000 more than your original loan.
Doing this is known as a “cash out refinance”. There is no tax on the $50,000. You could use it to invest in a new property.
But…you will have to pay back $50,000 more in debt when you eventually sell the property. This is additional risk you are taking on.
Important Caveat: Not all lenders will immediately give you a cash out refinance. Every situation is different so talk with multiple lenders.
Remember that your interest costs will go up and your cash flow will go down. If we assume the same 5.5% interest rate, your annual cash flow drops from $8,950 to $6,209.
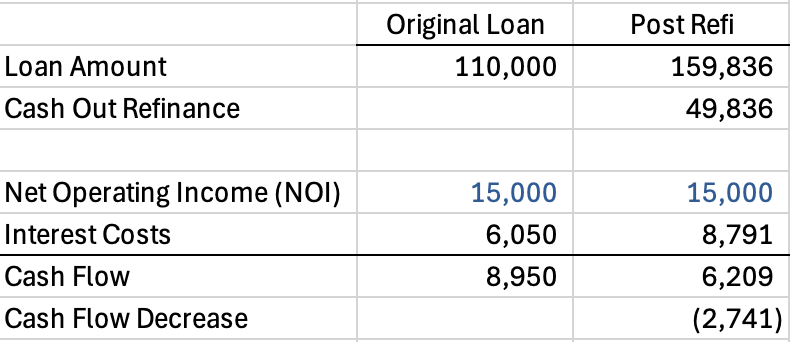
Table 2: Cash Out Refinance
You also have higher fixed expenses with the new interest costs. This gives you less cushion if you lose the tenant and/or the economy sours.
A cash out refinance is a good option for investors who want the best of both worlds (and are comfortable with higher fixed expenses): ongoing cash flow and additional money to invest in the next deal.
Sale vs Cash Out Refinance
In this example, the cash out refinance proceeds ($49,836) are more than the sales proceeds before closing costs and commissions ($45,902).
This is not always the case.
Interest rates and cap rates regularly move around depending on market conditions and market sentiment. If you are on the fence of which option is best for you, educate yourself by talking with brokers on market cap rates and lenders (or debt brokers) on loan options.
Pros and Cons
So let’s put it all together to see what the best fit for you is.
Enjoy the Cash Flow
Action: none; enjoy the additional cash flow.
Pros: passive; no further execution risk.
Cons: minimal current cash compared to a sale or cash out refinance.
Good for: investors focused on cash flow.
Sell The Property
Action: sell the property.
Pros: ability to unlock value and 1031 exchange into a new property to repeat the process of a new strategy on a new property.
Cons: execution risk on the sale; sale commission costs; tax exposure if no 1031 exchange.
Good for: investors focused on creating maximum wealth by buying, adding value, and then selling multiple properties over time. Buy > Add Value > Sell > Repeat
Cash Out Refinance
Action: refinance the property with a larger loan.
Pros: ability to unlock value without paying taxes and continue to benefit from (a reduced) cash flow; the proceeds from the cash out refinance could be used to buy a new property.
Cons: execution risk on the refinance; transaction costs of refinance; risk of having more debt and interest expense.
Good for: investors wanting to balance ongoing cash flow and ability to grow their real estate portfolio by buying new properties.
One additional very important note. This is a single tenant property. If you sell the property, you have eliminated any risk associated with the tenant vacating or defaulting. If you hold the property, whether for cash flow or through a refinance, the risk associated with the tenant stays with you. And a cash out refinance increases the risk because you have more debt you will need to pay back.
What Worked for Me
As with my investing strategy, my monetization strategy has changed over time.
Stage I (Years 1-10+): Buy > Add Value > Sell > Repeat
I was all about maximizing the power of the limited funds I had. The goal was to create value, sell a property, and invest it in a new one. This was an effective method to build wealth. I still have a number of investments that fit this strategy.
Stage II (Years 10+): Enjoy the Cash Flow & Cash Out Refinances
Once I had built wealth, or at least could see a path to that future with my existing investments, I started to be more focused on cash flow. I was able to build up a combination of assets under two strategies:
Cash Flow: I have one property that I own debt free. The strategy is focused on consistent cash flow.
Cash Out Refinance: Buy > Add Value > Cash Out Refinance > Repeat. The LP investments I have follow this strategy. I use the cash out refinances to buy more cash-flowing assets.
These stages have worked well together. I wouldn’t have been able to focus on cash flow investing without the capital I built up through selling properties.
Finding the Monetization Option That Fits You
Let’s think about what might work for you.
Situation A: Limited Capital, Long Time Horizon
This is likely your situation if you are early in your career. You are rich in time, energy, and health, but poor in money. You have a long time horizon for the power of compounding to go to work.
The buy > add value > sell > repeat is a path that could allow you to turn your limited funds into something more meaningful.
Situation B: Some Capital, Shorter Time Horizon
Maybe you are exploring real estate investing for the first time later in life. Your time horizon to retirement, or at least leaving a W-2 job, is shorter. You have worked hard and saved a decent amount of capital to invest.
In this case a combination of enjoying the cash flow and cash out refinances may be a better fit for you.
What is Right for You?
I have seen investors follow each of these paths successfully. It all depends on your available capital, time horizon, and goals.
Remember the fundamentals from the series on investment fundamentals: pick a nicheand choose your investment strategy.
Take the time to really think:
What are you trying to achieve?
What is your investment horizon?
How much time and money do you have today to work at this?
How much risk are you willing to take on while still having the ability to sleep well at night?
You can do this.
Renew or Roll the Dice on a New Tenant?
How to weigh a sure renewal against three prospects — and the tenant rights that can make or break the deal
Today is our fifth and final discussion on leasing where we will get into decisions you will need to make when managing your tenants and leases such as whether to:
Renew an existing tenant or try to find a new tenant.
Give a tenant a right to renew, expand, contract, or terminate their lease early.
All of this will build off of the four previous newsletters on leasing:
Leasing is dynamic.
It involves negotiating rights and obligations of each party (landlord and tenant). Some can be clearly measured financially. Others are non-financial in nature and harder to quantify.
Today I will break down the following:
The big four tenant rights: renewal, expansion, contraction, and early termination.
Defining “Deal Breakers”
Lease analysis example for decision making.
Let’s dig in.
The Big Four Tenant Rights: Renewal, Expansion, Contraction, and Early Termination
As discussed in How to Read Leasing Contracts Without Getting Burned, leases include rights and obligations for both tenants and landlords. Four of the rights that tenants often want that landlords may be more reluctant to give are:
Renewal Options
Expansion Options
Contraction Options
Early Termination Options
They are “options” in that the tenant has the option, but not the obligation, to exercise this right. Some of these options will be “unilateral”, meaning only one party (typically the tenant) has the right. Others will be “bilateral”, meaning both the landlord and the tenant each have the independent right to exercise the option.
Let’s define each one and then see how they factor into decision making.
Renewal Options
Definition: unilateral right of tenant to renew at the expiration of their lease.
Example: two 3-year options to renew at 100% of market rent.
Why Tenants Want It: gives them the right, but not the obligation, to continue running their business in that location.
Why Landlords Don’t Like It: a renewal option encumbers the space and reduces the landlord’s flexibility to lease to other tenants or sell the project to a business that wants to own and occupy the building (aka an owner user).
Typical Compromise: most landlords will give a renewal option or two at market rent unless they have specific plans for the building at the end of the lease.
Real World Example: We once leased a retail suite to a national restaurant chain with strong credit. It was a very attractive rent. The only negative was that the tenant would only do the deal if we gave them two 3-year renewal options at a pre-agreed upon fixed rent. This required us to pre-agree upon a rent in the future. We ended up agreeing to this fixed rate renewal option because the rent and tenant credit were so strong. The risk we took on is that the market rent could rise above the rent in the fixed rate renewal option.
Expansion Options
Definition: unilateral right of tenant to expand into another suite in the building or business park.
Example: existing tenant in suite A (10,000 square feet) has the ongoing right to expand into suite B (5,000 square feet) at 100% of market rent if the existing tenant in suite B vacates.
Why Tenants Want It: gives them the right, but not the obligation, to expand at the existing location if the business is growing.
Why Landlords Don’t Like It: an expansion right encumbers another suite and makes leasing more complicated.
Typical Compromise: most landlords will strongly resist giving this right.
Real World Example: Years ago we leased an office suite to a fast growing, venture capital funded technology start up in San Francisco. We gave the tenant multiple expansion rights at market rent in order to win the deal from another landlord because (i) the rent was strong (ii) the tenant improvements were low, and (iii) the space had been vacant for a year.
Contraction Options
Definition: unilateral right of tenant to reduce their leased square feet.
Example: existing tenant with a 5-year lease in suite A (10,000 square feet) has the one time right to reduce their leased square feet to 7,500 square feet at the end of year 3. Tenant will pay the cost of demising the suite.
Why Tenants Want It: gives them the right, but not the obligation, to downsize their business for any reason.
Why Landlords Don’t Like It: this reduces the stability of the landlord rent roll and income.
Typical Compromise: most landlords will strongly resist giving this right.
Real World Example: We bought an industrial park as part of a portfolio acquisition. The park was 30% leased. The existing tenant had multiple one-year contracts with its customers. As the tenant continued to bring on more customers, they expanded into a total of 70% of the park. In order to get these deals done, we agreed to give the tenant ongoing contraction rights with 3-months notice. It was worth it because (i) there were few other tenant prospects and (ii) the expanding tenant took the spaces immediately and without any tenant improvement costs.
Early Termination Options
Definition: unilateral (or bilateral) right of either landlord or tenant to terminate the lease early.
Example: either landlord or tenant may terminate the lease with 6-months notice at any time after the 36th month of the 5-year lease for a one time termination fee of $10,000.
Why Tenants Want It: gives them the right, but not the obligation, to downsize their business for any reason.
Why Landlords Don’t Like It: this reduces the stability of the landlord rent roll and income. A landlord may want this right if they plan to redevelop the project in the future.
Typical Compromise: most landlords and tenants will strongly resist giving this right to the other party.
Real World Example: Let’s go back to the tech startup example from the expansion option discussion. This same tenant signed a 10-year lease but negotiated a termination option at the end of year 7. We were able to accept this because (i) the termination penalty was equal to an additional year of rent and (ii) the other deal terms were so compelling.
As I said before, options can’t always be quantified financially. It helps to understand which options you can live with and which you can’t, which is where we will go next.
Defining “Deal Breakers”
As you can see by the real world examples, leasing is dynamic and full of trade-offs. Each party (landlord and tenant) will ask for things that the other party may not want to give.
Sometimes one party will not compromise on an issue no matter how compelling the other deal terms are.
These are “deal breakers”.
Knowing what your deal breakers are in advance will help you better analyze and negotiate leasing opportunities. Here are two examples:
Termination Option with Specialized Tenant Improvements
Situation: we had a tenant prospect that wanted to lease a suite for 7-years at a good rate but needed expensive tenant improvements to build a customized section in 30% of the space. Not only was the build out expensive, but it was also very unique. No future tenant would want to use it, so it would need to be demolished at the end of the lease. The tenant also wanted an ongoing termination right starting at the end of year 3.
Why It Was a Deal Breaker: we decided to pass on the prospect due to the combination of (i) the expensive, specialized tenant improvements and (ii) the ongoing termination right.
Expansion Option in a Strong Leasing Market
Situation: the leasing market was strong with high tenant demand. We had a tenant prospect who wanted to lease 10,000 square feet in a 50,000 square foot industrial park. The lease rate was good and the tenant improvements were low, but the prospect wanted an ongoing expansion option on the other 40,000 square feet for the entirety of their 10-year lease.
Why It Was a Deal Breaker: we decided to pass on the prospect due to the ongoing expansion option, particularly at a time when the leasing market was so strong. Note that we gave the expansion option in the tech startup example above. The difference was that (i) the tech startup was leasing 40,000 square feet vs. 10,000 square feet in this example and (ii) the leasing market was not as strong in the tech startup example.
Lease Analysis Example for Decision Making
Now that we have a strong foundation of leasing, let’s run through a lease analysis example to show how an owner might decide what to do in various leasing situations.
Imagine a situation in which you have a 5,000 square foot suite that is leased to a tenant that has paid rent on time for the last three years. Their lease is expiring and the tenant wants to renew.
You need to decide whether to renew your current tenant or lease to one of the three prospects your leasing broker has found. The deal terms are summarized in the table below.
Table 1: Lease Comparison Example
So what does this table tell us? Prospect C is the best option. Let’s go through each one in detail to understand why.
Current Tenant vs. Prospect A
Current Tenant: will renew for three years as-is (no tenant improvements) for an effective rate of $1.450 psf/mo. As the renewal starts the day after the lease expires, the effective rate incl. downtime is also $1.450 psf/mo. This is our baseline.
Prospect A: will lease the space at a better start rate ($1.50 vs. $1.40) and effective rate ($1.480 vs. $1.450 - even with 2 months of free rent), but their lease will start two months later than the current tenant. This delayed start date reduces the “Effective Rate incl. Downtime” to $1.406 vs $1.450 for the current tenant.
Conclusion: unless the owner wants a higher start rate of $1.50 to present better optics for a stronger refinance or sale, the current tenant offers a better effective rate incl. downtime.
Current Tenant vs. Prospect B
Prospect B: same effective rate as Prospect A, but with $15,000 more in tenant improvement costs and all four of the rights landlords don’t like (renewal, expansion, contraction, and early termination).
Conclusion: unless the owner really wants the excellent credit, this is a worse deal than Prospect A. Current tenant is still the best deal.
Current Tenant vs. Prospect C
Prospect C: these are the best economics as compared to current tenant - start rate ($1.70 vs. $1.40), effective rate ($1.677 vs. $1.450), and effective rate incl. downtime ($1.593 vs. $1.450). They have excellent credit and don’t need any tenant improvements. The only downside is that they want renewal options and an expansion option.
Conclusion: the improved economics would likely be compelling enough for the owner to go with Prospect C over the current tenant, even with the renewal and expansion options. The only way the expansion option might be a deal breaker is if (i) the leasing market is extremely strong or (ii) the landlord has other plans for that suite.
Closing Thoughts
Not all leasing decisions will be obvious. They will be filled with trade-offs relative to financial and non-financial terms. Here’s the process I recommend to help you make decisions on which tenant to go with:
Start with the pure math on the financial terms to see the best deal.
Then layer in the tenant credit.
Finally, factor in the options the tenant is asking for. Are any of these deal breakers for you?
Then take the time to think about what is important to you.
Financially, do you care more about (i) cash flow or (ii) maximizing net operating income so that you can sell or refinance?
How important is tenant credit to you?
Are you willing to take on the risk and uncertainty associated with the tenant options? If you are selling or refinancing in the near term, make sure you talk with a sale broker and/or debt broker to understand how these options will be viewed by buyers and/or lenders.
Trade-offs will always exist. Take the time to think about them and understand what is most important to you.
Think.
Analyze.
Negotiate.
Repeat.
Be patient and focused to negotiate the deal that works for you.
How to Read Leasing Contracts Without Getting Burned
Breaking down the big three — listing agreement, letter of intent, and lease — and the one skill that makes them readable
We are making good progress in our discussion on leasing. Let’s anchor in on where we are.
What we have discussed thus far:
What is still to come:
Understanding broker listing agreements, letters of intent, and leases.
Analysis examples of new leases, renewals, expansions, contractions, and early terminations.
As you can see, there is a lot to cover. Leasing is exciting, dynamic, and complex.
But you don’t need to be intimidated.
As you spend more and more time on it, you will see that it is anchored in a handful of fundamental negotiation criteria: start date, lease duration, rent, leasing costs, and the rights both the landlord and tenant have during the lease term.
These are all concepts that end up in a lease. Understanding how to read and negotiate a lease will pay dividends for you over time.
Today I will focus on breaking down the three key contracts that go into leasing, culminating in a lease agreement:
Broker listing agreement.
Letter of intent.
Lease agreement.
These are the “big three” when it comes to leasing.
Let’s dig in.
What Is a Contract?
Let’s start by reminding ourselves what a contract is: a contract is a written agreement between two or more parties through which they commit to certain terms. We have covered contracts in three previous newsletters:
Selling/buying a property - Demystifying Real Estate Purchase Agreements
Hiring vendors to maintain your property - Vendor Service Contracts: What You Need To Know
Hiring contractors to upgrade your property - Navigating Construction Contracts
In the future we will cover two additional contracts: loan agreements and partnership/joint venture agreements.
Contracts can be short or long. They have a start and (usually) an end date and are signed by all parties involved. They are often written by lawyers.
And they have something called “defined terms”.
Defined Terms
To read and understand a contract correctly, you need to understand the concept of a “defined term”. Here are the basics:
It is any word or set of words that is capitalized, but not because it is the first word in a sentence. Examples: “Expansion Right”, “Effective Date”.
It means something special that may or may not be similar to what you think it means. That meaning will either be described in the paragraph in which the defined term is first introduced or in an exhibit that lists all the defined terms in the contract.
It usually is referred to in other parts of the document.
Here’s an example - “Expansion Right”: a tenant could have a right to expand into the adjacent suite under certain terms and conditions (a specific time window, rent, and tenant improvement package). The lease will define this expansion right and then refer to it in other parts of the document. For example, it might read: “If the Tenant is in default at any time, the Expansion Right shall become null and void.”
The use of defined terms reduces the need to repeat the same concept and words over and over again. They can be both helpful and confusing.
If you take one thing from this entire newsletter today, this is it:
As a reader, the key is to look out for these capitalized words and then look up their meaning. This way you will read and understand a contract correctly. Never assume a defined term means anything other than what is written in the definition.
Let’s move to the first of the three main leasing contracts.
Broker Listing Agreement
The broker listing agreement is a 2-6 page contract between a landlord and a broker. The landlord hires the broker to market and lease the property. There would be a similar agreement if an owner were to hire a broker to SELL the property.
At its most basic level, the listing agreement says that the broker will use commercially reasonable efforts to present qualified tenants to lease the space. The landlord will decide whether to lease to this tenant. If a lease is signed, the landlord will pay the broker.
Here are the key components that make up the listing agreement:
Listing Period (i.e. the length of the contract): Start and end date; typically, 6-12 months.
Commission Amount (note that structures and amounts vary between markets and product types). Here is an example: the broker will be paid if a lease is signed as follows:
6% of total rent for months 1 - 60 | 3% for months 61 – 120; nothing after 10 years. Note: it is typical for the broker to earn less for the latter years.
100% to listing broker if no outside broker involved | 50/50 to listing and outside broker if outside broker is involved.
Payment Timing: Example - 50% paid at lease execution | 50% paid when tenant takes possession of premises.
Re-Leasing: Listing broker may be required to re-lease space if tenant vacates/defaults within 1 year.
Marketing Budget: Owner may provide a specific marketing budget.
Exclusions: Renewals and expansions may be excluded from earning a commission; property sales are typically excluded.
I discuss this in further detail and have downloadable abstract templates for all three contracts in the Downloads section of my website: creprofessor.com/downloads.
I have a number of battle scars from poorly drafted listing agreements. Here are some things to watch out for:
If you are a new or smaller commercial real estate investor, the broker will prepare the listing agreement based on their company’s standard form. It often contains more than you want to agree to. Don’t be shy about pushing back on certain terms.
Make the duration of the agreement no longer than 6 months. You want the broker to feel the pressure that they don’t have unlimited time. You can always extend the agreement.
Exclude payments for renewals. I have seen situations where we renewed an existing tenant, not realizing that the listing agreement required the broker to be paid even though they weren’t involved in the negotiations.
Exclude a commission for a sale. I once had a situation where we decided to sell the property and found that the listing agreement, which had been prepared by the broker, included a clause that they would be paid 2% on any sale. We had to get out of this agreement before we could hire a separate broker that specialized in property sales to sell the property.
The key is to read and summarize the agreement to make sure you understand what you are agreeing to. As with all commercial real estate contracts, you can always (try to) negotiate out what you don’t want to agree to.
Let’s move to the next contract.
Letter of Intent
A letter of intent (“LOI”) is a 1-6+ page document that outlines the key terms under which a landlord and prospective tenant would use as the basis for a lease.
We went deep into negotiating LOI terms last week, so I’ll just highlight some key points here.
The LOI becomes the foundation for the terms that will be included in the binding lease agreement. In the majority of cases, most of the terms, other than confidentiality, governing law, and possibly exclusivity, are non-binding. This means either party can walk away from negotiations for any or no reason at any time.
Deal terms such as rent, start date, and tenant improvements are negotiated using the LOI. We discussed this process last week in Why the Highest Rent Isn’t Always the Best Deal.
Here are the key terms in an LOI:
Start and end date.
Rent, annual increases, and free rent.
Security deposit and any personal guarantors.
Condition of the space and any tenant improvements.
Options and rights such as renewals, terminations, expansions, contractions, and right to purchase.
Any brokers involved and any commissions that are different from the listing agreement.
Most of the time a broker will prepare and negotiate the LOI on your behalf based on their advice and your decisions.
Always remember, you are the property owner and the one who makes decisions. Brokers (and any other lawyer, consultant, or advisor) are there to give you opinions, but the owner is the one who makes the decision. Never forget this.
Once the LOI is agreed to, a lease is negotiated. However, not all leases need to start with an LOI. I have done deals where we verbally agree to the key terms and go straight to a lease.
But before we get to the lease agreement section, let me share one story that illustrates the downside of an LOI being non-binding.
I was negotiating a large lease with an excellent credit tenant. We had a signed, non-binding LOI and the lease was fully negotiated and ready for signature. We were just waiting on the tenant’s proof of insurance before we signed the lease.
The next thing we knew, the tenant told us they were backing out of the deal. Something unrelated to our space had changed on their end. Because we hadn’t signed the lease, they had the right to back out.
Key takeaways: (i) an LOI is non-binding and (ii) a lease is not valid until it is signed by both parties.
Lease Agreement
Lease agreements are typically 5-15+ pages with a series of exhibits. They can be simple and not negotiated at all using the American Industrial Real Estate Association's standardized lease form or they can be complicated and highly negotiated over weeks and months, costing $10,000+ in legal fees.
It all depends on (i) how reasonable each party wants to be, (ii) whether the tenant is under pressure to move in due to their business needs, and (iii) whether either party has a biased lease template form that they want to use (i.e. overly landlord or tenant friendly).
There is not enough space to go into all the terms of a lease, so I will limit this discussion to the main sections:
General: parties involved, square feet, building, permitted uses, parking.
Key Dates: start, end, early possession, timeline for completion of tenant improvements.
Rent & Other Financial Obligations: rent, increases, free rent, reimbursement structure (NNN vs modified gross vs gross), security deposit, late charges.
Delivery Conditions & Tenant Improvements: condition of the space, who completes and pays for the tenant improvements.
Tenant Options/Rights: renewal, termination, expansion, purchase, sublease.
Landlord Options/Rights: relocation, termination.
Alteration Rights & Maintenance Obligations: who maintains what and whether the tenant has rights to modify the premises with or without landlord’s approval.
Defaults, Damage, Condemnation: what constitutes a default and what happens if the building is damaged or condemned.
Other Tenant Obligations: estoppels, financial statements, subordination and non-disturbance agreement.
Exhibits: such as rules and regulations, rent payment instructions, insurance obligations, tenant improvement details.
You can visit creprofessor.com/downloads to dig in deeper into what goes into a lease and download my summary template.
Leases can be 30+ pages long with exhibits, but make sure you read them in their entirety. One property acquisition almost fell apart due to a clause deep in the lease that gave the existing tenant the right to purchase the property.
The seller had missed the clause and had to do a last-minute scramble days before closing to get the tenant to waive the right.
The deal eventually closed, but not without some significant effort and stress.
Making Sense of It All
As I said before, don’t be intimidated by contracts. You can understand them if you follow these key steps:
Think about the purpose of the agreement and what each party is trying to achieve.
Listen to the advice of brokers, lawyers, and experts, but remember that you make the decisions. If the advice seems unreasonable, ask questions and/or don’t follow the advice.
Be reasonable. Getting through a contract usually involves compromise. Talk with the decision maker on the other side to understand their perspective.
Create YOUR best environment to read the contract. For me this means printing out a hard copy and reading it first thing in the morning without distractions. I highlight the important parts, strike out the parts I won’t agree to, and note the areas for further discussion. Find what works best for you.
If you don’t understand something, don’t sign the contract. It is better to be embarrassed by asking a question that might make you feel stupid than to agree to something that you don’t understand and could bite you in the future. Try saying: “I am not clear on what situation would come up where this language in the contract would come into play. Can you give me an example?”
Take your time.
Ask questions.
Keep learning.
You got this!
Why the Highest Rent Isn't Always the Best Deal
How to market your space, understand a letter of intent, and see what an offer is really worth
Last week I introduced the 4 tools you can use to accurately project your rents: competitive set, lease comps, understanding your local market, and working with brokers.
Today we are going to take the next step to understand how to (a) bring prospective tenants to your property so you can (b) pick the tenants that will be the best fit for your property.
“Fit” is a broad word.
It covers things like rent, concessions, start date, length of lease, tenant credit, tenant improvements, and broker commissions.
Different owners will have different priorities, making “fit” unique to each owner.
Regardless of your priorities, you want to maximize your options. As with anything, having multiple options usually yields better decisions and outcomes.
For example, if you are ready to lease a car, it helps to get quotes from multiple car dealers. Having multiple quotes and options allows you to compare price, timing, and other criteria.
It is often the process of comparing bids that allows you to see what is most important to you.
Getting multiple bids when you are buying something is straightforward. Make the calls or visit the sellers.
Comparing multiple tenants to lease your space is a bit harder. You can’t control when someone needs space, but you can control your marketing outreach to make sure all the tenants that are looking for space to lease consider YOUR space.
This is what we are going to get into today.
How to market your property.
Negotiating the best deal for your property.
Residential and commercial are fundamentally different in these processes, so we will discuss them separately.
Let’s dig in.
Residential: How to Market Your Property
As a reminder, residential refers to both 1-4 unit residential and multifamily (aka apartments). The tenants (aka residents) are individuals, not businesses.
The residential marketing process involves three components:
Value add initiatives to show the units and the amenities in the best light.
Maximizing the exposure of your property to bring in prospective tenants.
Having an effective sales process once a prospective tenant comes in to see the property.
We discussed value add initiatives in The Many Ways You Can Add Value to Your Real Estate Investment.
Maximizing exposure includes all the ways you can get the attention of potential tenants from signage to banners to search engine marketing to social media. These are tried and true marketing techniques across many industries beyond real estate.
The unique aspect of residential real estate is the sales process led by a member of the property management team. The sales person literally walks the prospective tenant through the property, highlighting key features of the property and the location.
For 1-4 unit residential the focus will be on the individual unit and the benefits of the location.
100+ unit apartments are much more involved. There will be a specific tour path the sales person takes all prospective tenants on.
I personally experienced this as a prospective tenant when I went to my first large apartment complex. Here’s how it went.
Leasing Center: it started with a bright and lively leasing center.
Pool: we then walked by the pool, where I saw people sunbathing.
Gym: next it was the renovated gym. In my head I was thinking that I could cancel my gym membership and use this instead.
Unit: we moved on to the unit where the sales person highlighted the renovated kitchen and view.
Dog Park: we ended by walking past the dog park area where I saw dogs running free in a fenced area.
All the while the sales person was listening to my reactions and adjusting the sales pitch, including saying that she already had another person interested in the unit I liked best.
I signed the lease that day. A sales job well done.
The larger and more professionally managed the apartment complex, the more likely they will follow a similar process.
Residential: Negotiating the Best Deal For Your Property
In Leasing: The Engine That Can Turbo Charge Your Revenue, I oversimplified the leasing process by saying that adding value to residential (as compared to commercial) is about making the improvements and watching your hard work pay off as the rents increase.
The marketing section above debunks some of this simplification, but the distinction between residential and commercial still holds.
Fair housing law affects how larger operators manage the leasing of their apartment complexes. This law prohibits discrimination on the basis of protected classes. Larger operators adopt uniform pricing as a risk-management practice. One price for everyone is a clean way to prove you didn’t treat applicants differently.
For buildings leasing under the uniform pricing model, the prospective tenant either agrees to the rent and signs the form lease or doesn’t. It is a “go, no go” decision without any negotiations. The only flexibility the prospective tenant may have is choosing the length of the lease.
The 1-4 unit residential segment is more actively negotiated, but not as extensively as commercial. The negotiations will typically be limited to the rent and length of the lease.
Commercial real estate leasing is all about negotiations. This is where we will go next.
Commercial: How to Market Your Property
Whether industrial, retail, or office, tenants for commercial properties are businesses. Some of the same marketing fundamentals apply, but the primary method for commercial is direct outreach to individual businesses and their broker representatives.
This is where leasing brokers come in.
There are two main types of brokers when it comes to leasing: landlord rep and tenant rep. “Rep” is short for representative. Some brokers do both, but many specialize.
A landlord rep broker specializes in representing building owners in marketing and leasing their property.
A tenant rep broker specializes in representing businesses (i.e. tenants) in finding space for them to lease and negotiating the best deal for them.
Both landlord rep and tenant rep brokers are compensated by earning a commission if a lease is signed. This commission is paid by the owner. We will cover commissions in a future newsletter.
The leasing process is as follows:
Owner hires a landlord rep broker on an exclusive basis using a broker listing agreement detailing the length of the agreement and how much the broker will be paid. We will cover the details of the listing agreement next week.
The landlord rep broker markets the property to brokers and businesses in the area using a leasing brochure. See below for links to some examples.
A prospective tenant will tour a space with or without a tenant rep broker.
If the tenant likes the space, negotiations will begin.
Negotiations are where we will move to next.
Commercial: Negotiating the Best Deal For Your Property
Negotiations play a HUGE role in commercial leasing.
The owner and landlord rep broker set an “asking rate” that is usually shown on the leasing brochure. The tenant rep broker then uses this as a starting point to try to negotiate the best deal for their client (the business that is interested in leasing the space).
At this stage the parties are negotiating a non-binding Letter of Intent (LOI) that outlines the primary lease terms that will be incorporated into a lease. We will cover the details of the LOI next week.
See below for a table that shows how the negotiations for an industrial building might play out, using the example from last week’s newsletter.
Table 1: Lease Negotiation Example
Let’s break down what is going on in the table above.
Asking Rate vs. Underwriting Target = $1.50 vs. $1.40: the asking rate is higher than the underwriting target to leave some room for negotiations.
Initial Offer from Tenant’s Broker: the broker started aggressively: $1.30 start rate (vs. the asking rate of $1.50) plus 5 months of free rent and $3 psf of TI’s. The effective rate is $1.159 vs. the underwriting target of $1.411. There is still a lot of work to be done.
Over the subsequent three LOIs, all parties came to an agreement on the terms shown in “Offer #4”. Let’s compare the amounts agreed to in Offer #4 vs. the Underwriting Target.
Start Rate: $1.40 vs. $1.40 = good outcome.
Effective Rate: $1.415 vs. $1.411 = good outcome. The owner was able to agree to 1 month of free rent but get an additional month of paid rent to help increase the effective rate (36 months of paid rent + 1 month free rent = 37 month lease).
Tenant Improvements: $0.50 vs. $0.50 = good outcome.
As I said in the beginning with any negotiation, you need to understand the criteria that are most important to you such as:
Maximum starting rent.
When the rent starts: start date plus months of free rent.
Length of lease.
Amount of tenant improvements (TI’s) you are willing to give.
Different owners will have different criteria preferences and these preferences will change over time. Examples:
An owner who plans to hold the property forever may be willing to take a lower starting rent in exchange for a sooner rent start date, no free rent, and no TI’s.
An owner planning to sell (or refinance) the property in the near term may want the complete opposite: maximize the starting rent but be willing to push out the start date and give more free rent and TI’s. This is because they want to maximize the net operating income to sell at a cap rate that maximizes the sales price.
Negotiations are about knowing which criteria are most important to you and the prospective tenant and then finding a deal that both parties can live with.
When it comes to comparing multiple prospective tenants, this can mean running parallel negotiations.
See below for a table that shows the initial offers (#1) from two prospective tenants.
Table 2: Lease Offer Comparison for Two Separate Tenant Prospects
Let’s break down what is going on in the table above.
Starting Lease Rate: both offers are below your $1.40 target. Tenant A’s offer is better at $1.30 vs. $1.20 for Tenant B, but…
Effective Rate: Tenant A’s offer is worse at $1.159 vs. $1.242 for Tenant B.
Credit: Although Tenant B has a better effective rate, they have weaker credit.
Other Criteria: Tenant B’s offer is more attractive in other areas vs. Tenant A:
Annual Rent Increases: 3.5% vs. 3.0%.
Free Rent: none vs. 5 months.
Tenant Improvements: none vs. $3.00 psf ($15,000 in TI’s).
Start Date: I have introduced a new factor showing when the lease will start. You have an underwriting target of September 2026. Tenant A is proposing March 2027. Tenant B is proposing August 2026. That is a 7 month difference. 7 months at $1.40 psf/mo x 5,000 square feet = $49,000 of rent. This is huge, especially for an owner focused on cash flow.
Tenant B is a better deal despite the lower starting rate. You need to get comfortable with the weaker credit, but this is an analysis exercise.
So how do you approach this?
Understand the criteria that are most important to you.
Recognize that these are just the first round of offers. Remember Table 1. Things will evolve during the negotiations.
Accept that you often need to simultaneously negotiate with multiple tenant prospects at once to see where you end up.
Remember that you can say “no.” You won’t come to acceptable terms with all tenant prospects.
Negotiations can go on for weeks and even months. Or they can happen in a matter of days. Here are three real world examples of industrial leases I have experienced.
Example 1: Typical
Negotiations for the industrial building happened over two offers and then moved to the lease negotiations.
Example 2: Extremely Fast
We knew the tenant needed a building immediately and that they were considering multiple options. We skipped the letter of intent and sent them a lease ready for signature with terms that we felt were reasonable. They signed the lease immediately without any negotiations. Very unusual, but true.
Example 3: Extremely Slow
The negotiations with this Fortune 50 company over the LOI took over six months and then the lease negotiations took another year. Painfully slow, but we didn’t have any other tenant prospects.
Closing Thoughts
This discussion highlighted the similarities and differences between residential and commercial. They follow different formulas.
Residential
Effective Marketing + Strong Sales Process = Strong Leasing Performance
Commercial
Hire a Broker + Direct Marketing + Active Negotiations = Strong Leasing Performance
In both cases, you as the owner need to make sure you understand the criteria (ex. maximum rent vs. steady cash flow vs. spending more money) that are most important to you so that you can take action and make decisions that yield the best results for you and your investors.
Take the time to think about what you want, measure the results of your team’s actions, and make adjustments as needed.
You got this.
The 4 Tools to Nail Your Rent Projections
Competitive sets, lease comps, local market review, and broker intel - how the pros figure out what a property will rent for
Last week I gave you an overview of the leasing process and the differences between commercial and residential leasing.
Today we are going to deep dive into how to understand a market and where your property fits into it. This will help you accurately project (aka underwrite) your rent.
Real estate investing is about buying investment properties. This is fundamentally different from buying a home you will live in.
An investment property needs to perform by bringing in rent.
From the tenant’s perspective, rent is an expense. Tenants (i.e. businesses and individuals) want to minimize expenses. Therefore, they want to minimize rent.
Owners want maximum rent. Tenants want minimum rent.
This is where we see the tension of supply and demand.
When you are buying a property, you need to project what the property will rent for. Unfortunately, this is when you know the least about the property and you have a due diligence deadline. You run the risk of making a costly underwriting error if you estimate market rents too high.
But don’t worry. There are ways to mitigate this risk.
Today I will navigate you through the tools and techniques to understand the market in which your property is located. This mitigates risk. They include:
Your competitive set.
Lease comparables (aka lease comps).
Understanding the local market.
Working with brokers.
Macro factors that change market conditions.
How to make sense of it all.
Let’s dig in.
Tool #1: Your Competitive Set
Unless you are developing a property in the middle of nowhere (do not do this!), you should be able to use similar properties in the same market to better understand the leasing prospects for your property.
Similar properties in your property’s geographic market are known as your “competitive set”.
They won’t be exactly the same, but they will be similar. You will take into account things like location, building age, condition, square feet or number of units, multifamily amenities, occupancy, owner, and any other factors you think are relevant.
Creating your competitive set allows you to define your competition. These are the properties you will be competing with for tenants. As with any competitors, each will have strengths and weaknesses.
One property may be in a better location than yours, but have some functional challenges. Another might have worse curb appeal than yours, but have access to cheap electric or some other unique feature. Create your competitive set by:
Putting the buildings and their characteristics in an excel table with a picture of each asset.
Adding notes on the pros and cons of each property.
Adding a row for the asking rent for each property. This is how much the property is “asking” tenants to pay.
Creating a map of each building showing their location relative to your property.
Here is an example of a competitive set for an industrial property.
Table 1: Competitive Set Example for Industrial Property
Now let’s add in lease comps.
Tool #2: Lease Comparables (aka Lease Comps)
The competitive set helps you understand the market, but it is limited in that it only includes asking rents.
You want to look at deals that have actually been signed in the market.
This is where lease comps come in.
Lease comps are a table of data that includes details on leases that have been signed in your market in the past 12-24 months. You want recent comps because markets change over time and older comps become stale. Here is an example of a set of lease comps:
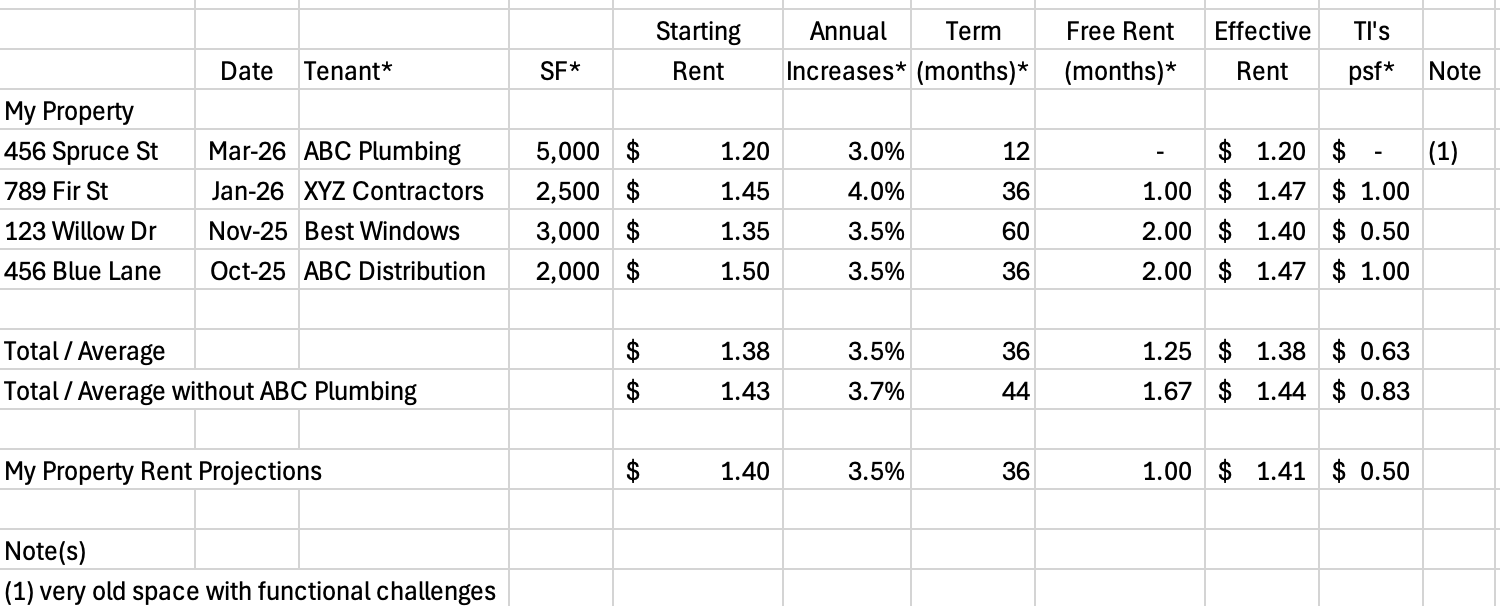
Table 2: Lease Comps Example for Industrial Property
Effective rent refers to the average rent taking into account annual increases and free rent over the full lease term. We will cover this in a future newsletter.
Lease comps are history, not speculation. They are made up of leases that have been signed at properties that are similar to yours.
In the table above, I compared my starting rent projections of $1.40 per square foot (psf) per month to the comp average of $1.38. We are a bit high.
Then I removed the first comp with ABC Plumbing because it was a short-term deal in a challenging space. This brings the average up to $1.43 compared to my assumption of $1.40, which makes me feel more comfortable.
The effective rent also checks out at $1.44 (after removing ABC Plumbing) vs. my assumption of $1.41.
It can be sobering to look at the lease comps relative to what you are projecting for rents for your property. Be realistic. If the lease comps don’t support your projections, this is a red flag.
In this case you better have some secret sauce to convince you, your investors, and your lender why you will be able to hit your rent projections.
I have made the mistake of not taking into account free rent and tenant improvements when looking at lease comps. I relied on a high lease comp to support my rent projections only to find out after I owned the property that the rent was so high because the owner had given 6+ months of free rent and a huge tenant improvement package to get the starting rent unusually high. This is why it is so important to track both free rent and tenant improvements as separate columns.
Don’t make this mistake yourself.
Sometimes you will see a lease comp that looks much higher or lower than the rest. Ask for details on this and consider removing it from your set of lease comps.
Let’s move on from lease comps to understanding your market.
Note on table 2: columns marked with an asterisk (*) refer to data used in commercial, not residential. For residential, the competitive set and the lease comp data are often combined into a single table that includes the asking rent but no lease comps.
Tool #3: Understand The Local Market
Each market has its own unique characteristics. These affect how a market will perform. Characteristics will include:
Population size.
Health of the local economy.
Major employers.
Universities and the quality of education.
Tax policy and whether the local municipality is pro or anti-development.
Access to freeways and airports.
Housing affordability.
Quality of life factors such as entertainment, outdoors, weather, and schools for children.
Any other unique factors of that market.
All of this translates into determining whether people want to live there. Can they find a job that allows them to afford housing, send their kids to a good school, and have a good quality of life?
The key is to understand the market you are investing in and how your property fits into it. Take the time to read research materials and talk with market experts.
Let’s move on to the role of brokers.
Tool #4: Working With Brokers
You may be reading this and wondering how you are going to get all this data to understand the market, develop your competitive set, and build out your lease comps.
There are professional databases out there such as LoopNet & CoStar for commercial and Zillow & Redfin for residential. These can be excellent sources of information but (a) they can cost money for premium subscriptions and (b) there is no substitute for talking with people who work a geographic market every day.
Local market brokers will be your market experts.
The key word in this statement is LOCAL. You want to work with brokers (and property managers for residential) that focus on the market your property is in. Finding a broker who has “done a deal” in that market is different from a broker who focuses on your market.
Always pick the broker with market focus. They live and breathe the market. They are the experts.
They will understand the market drivers, the characteristics of the other owners, and most importantly, what the tenants in that market value most.
They are used to helping investors new to the market understand it. Look at properties for sale that fit your target market and asset class. Find a broker who is selling one or two properties. Then reach out to them to say that you plan to invest in this market and would like to meet them to help get a better understanding of the key market drivers.
Make it clear that you are ready to invest soon, so they know you are not wasting their time.
They will put together competitive sets and lease comps from their database. The good ones will give you an overview of the market by (a) giving you a Google Earth tour of the market in their office and (b) driving you around the market to see the properties that make up the competitive set and lease comps.
Pro tip: don’t just take one broker’s opinion of the market. Try to talk with 2-3 brokers to triangulate the information. Lease comps are facts, but there is subjectivity as to which lease comps to select and how the competitive buildings compare to your building. Be respectful of brokers’ time, but don’t feel you need to be exclusive to just one.
That wraps up the four key tools, but there is one more thing to watch: macro factors.
Macro Factors That Change Market Conditions
So far we have been property specific while also understanding market factors.
But there can also be major changes in market conditions that can completely adjust how all properties in the market perform by fundamentally changing the supply and demand dynamics for a period of time.
Here are some examples:
Major new development(s): rents have been going up so developers decide it is time to build. A few years later, the market is flooded with new supply giving leverage to tenants and reducing rents. This is what has happened to the multifamily / apartment market over the past few years (2023-2025).
Global pandemic: the COVID-19 pandemic of 2020 and the resulting government actions completely changed the dynamics for multiple asset classes:
Apartments: increased demand due to stay at home orders.
Office: reduced demand due to increased amount of remote work.
Industrial: increased demand due to online shopping and consolidation of supply chains to be more local.
Retail: reduced demand due to stay at home orders.
Macro-economic slow down: when the economy slows, demand across all asset classes tends to decrease as both people and businesses cut expenses. The reverse happens when the economy is growing.
War and geopolitical uncertainty: fear tends to make people uncertain and spend less.
Some of these examples affect all markets and asset classes. Some are more local and asset specific. All tend to be uncontrollable from an individual property owner’s perspective. All you can do is decide how to interpret the information and take (or not take) action.
So how do you bring it all together?
How To Make Sense of It All
Competitive sets, lease comps, broker guidance, market factors…it is a lot to take in.
Here’s my guidance on how to make sense of it all.
Analyze the market before you make your first offer. Pick your niche. Take the time to understand the market before you have a due diligence deadline.
Kick the tires. Get out in the market. Walk and/or tour your competitive set.
If you will be adding value to your property, have two versions of your rent projections: (a) before your value add initiatives and (b) after. Compare your lease comps against each. You may even decide to create a second competitive set to compare your “post renovation” property to.
Talk with multiple, local brokers. Don’t just rely on one person’s opinion.
This is not a “one and done” exercise. Revisit the data and talk with brokers regularly. The market will continue to change, as should your projections and asking rates.
Markets go through cycles. Sometimes they favor the owners/landlords. Sometimes they favor the tenants.
At some point during your property ownership, most of you will be blindsided by some macro event that will turn your world upside down (examples: 2025 tariffs, 2020 global pandemic, 2008 great financial crisis, 2001 internet bust).
Welcome to living in an uncertain world. This is life.
When it happens, breathe.
Take it slowly.
Think. Don’t react too quickly.
The tools and techniques described here will help you navigate the market in good times as well as when the world feels like it has turned upside down overnight.
Competitive Set + Lease Comps + Broker Reconnaissance + Local Market Conditions = Accurate Rent Projections
The process is there to help and guide you.
You got this!
Leasing: The Engine That Can Turbo Charge Your Revenue
Why your leasing strategy is so important to increasing the value of your real estate investment
Welcome to another edition of Real Estate Investing Explained.
We are well underway on our current series: Executing Your Business Plan. So far we have covered:
Today we transition to leasing.
The most common way to add value is to physically upgrade the look and functionality of your investment and then execute your leasing strategy to increase revenue, which will drive up the value of your property.
Physical Upgrade + Leasing = Value Increase
Physical transformation first.
Leasing strategy second.
It doesn’t always work this way, but it is the most typical.
Sometimes the market rents increase (or decrease) regardless of what you do to the property.
Sometimes you will get lucky and find a property where the rents are below market and can be increased without doing anything. The previous owner may have not paid attention to market rents or had a different strategy.
Over the next set of newsletters we will get into all things leasing including:
Leasing strategies.
Analyzing lease comparables.
The leasing process and the role of brokers.
Negotiating a letter of intent (LOI) and a lease.
Leasing is not something that will fit into a single newsletter. It is much more complex.
But don’t worry! I will guide you through it.
Today we will cover:
Differences between commercial and residential leasing.
What to expect in the leasing process.
Defining your leasing strategy.
Leasing is one of the most interesting and dynamic aspects of the business. It is where all your hard work manifests into value.
Let’s dig in.
Differences Between Commercial and Residential Leasing
When it comes to leasing, there are some key differences between commercial and residential.
As a reminder, commercial refers to industrial, retail, and office. Residential refers to apartments and 1-4 unit residential.
Let’s start with the similarities.
Everyone wants tenants to lease their space. This is where revenue comes from.
These tenants should be able to pay the rent, not beat up the space, and be a “good neighbor” to the other tenants.
All tenants have a lease that details the rent, term (aka lease duration), and other “rules” of occupancy.
Proactive owners actively market their space and may be willing to offer incentives such as free rent.
That being said, they are fundamentally different in key ways.
Negotiating Rent: residential is covered by federal fair housing law to protect against discrimination. Every tenant needs to be offered the same terms. Therefore, rent is never negotiable. Commercial rents are actively negotiated in conjunction with free rent and tenant improvements. Commercial leasing is all about negotiations.
Tenant Improvements (TI’s): think of TI’s as a custom remodel of the suite for a specific tenant. This doesn’t happen in residential but is very common in commercial.
Leasing Broker Involvement: leasing brokers play an active role in most commercial leases. They are on the front line of the negotiations. Leasing for residential is typically done by someone on the property manager’s team.
To oversimplify, adding value to residential is about making the improvements and watching your hard work pay off as the rents increase.
Commercial is a two stage approach of making the improvements and then actively marketing and negotiating to get the right tenants in at the best combination of rents, TI’s, and tenant credit.
It is an oversimplification to highlight the differences.
As you read the rest of the discussion on leasing, keep these differences in mind to recognize which are going to be applicable to you as you pick your asset class (commercial or residential).
Let’s continue to the leasing process.
What to Expect in the Leasing Process
Despite the differences between commercial and residential, leasing does follow a fairly standard process. Here are the steps:
Understand the market and how your property fits into it.
Define your leasing strategy.
Assemble your leasing team: leasing broker and/or property manager.
Market and screen potential tenants.
Negotiations: letters of intent and leases.
Delivering the space for occupancy.
A simple process, but not always an easy one to execute. Much of this will depend on your leasing strategy, which is where we will focus on next.
Defining Your Leasing Strategy
Your leasing strategy should be part of your overall strategy beyond just leasing. We discussed this in The Risk-Return Spectrum: Choosing Your Real Estate Investment Strategy. There are three main strategies:
Core/Turnkey: low risk, low return. You buy a property that is well leased and maintained. There is minimal work to do.
Light Rehab: medium risk, medium return. There is some work to do, but it is mainly cosmetic (paint, carpet, clean up).
Value Add: high risk, high return. There is a lot of work to do. The property might even be vacant. You will be repositioning it and taking on a lot of risk for superior returns.
If you are buying core deals, you are unlikely to take an active role in leasing because there won’t be much to do. It is either a commercial property leased long term or a residential property with high ongoing occupancy and rents due to the location and construction quality.
Light Rehab and Value Add deals will require a more hands on approach. You will need to think about questions such as:
How aggressive do you want to be in your rent?
How important is maximum rent vs. occupancy?
How long can you last with low or no occupancy relative to your other expenses?
What is your budget for customizing the suite for the right tenant?
How important is the tenant’s credit and financial strength?
What is the condition of the economy and where are you in the real estate market cycle?
These are important questions that you need to really think about.
Talk with your partner and team. Ask for the advice from people you trust. Talk with your leasing broker.
The answers to these question should not be set in stone. They should be revisited regularly, particularly when circumstances change.
In your first year of ownership you may be full of confidence and enthusiasm. If things don’t go well, you could find yourself wishing you had done the lease you passed on 12 months ago.
Welcome to the dynamic world of real estate investing!
Time and changing circumstances change your perspective, adding to or reducing your confidence and tolerance for risk.
This is normal and to be expected.
But we are just scratching the surface of leasing.
This newsletter was just the teaser.
Next week we will dive deeper into the details with a discussion on how to analyze the market and the critical importance of understanding lease comparables (aka lease comps).
This is where things get interesting and the experienced operators start to distinguish themselves.
As always, I will share my knowledge and experience so that you can turbo charge your learning curve.
Stay tuned for next week.
This is going to be fun!
Navigating Construction Contracts
Pricing structures, change orders, and mechanic liens
Last week we discussed the critical role of contractors. I also reiterated the process of adding value to your real estate investment by taking the time to:
Understand your goals.
Focus (aka think).
Talk with experts.
Get a budget.
Develop a game plan.
I wrote about the importance of talking with experts and budgeting.
This week is about navigating the process of executing a binding document with a contractor to do the work.
It builds on the contract fundamentals I discussed in Vendor Service Contracts: What You Need To Know. Today we will expand our scope from a service contract to the specifics of construction contracts.
With the exception of the initial purchase of your investment property, construction will be where you spend the most amount of money at a single point in time. Understanding the components that make up contracts and where the risks are is critical.
Today we will cover:
Contract fundamentals.
Specific components of construction contracts.
The four types of pricing structures.
Being clear on the scope of work & navigating change orders.
Understanding mechanic liens and retainers.
Best practices.
As always, we will walk through the jargon of commercial real estate to understand the fundamentals and empower you with knowledge.
Let’s dig in.
Contract Fundamentals
The newsletter on vendor service contracts is a useful reference for some of the core components that will go into a construction contract. These components include:
Owners - both property owner (i.e. you or your entity) and vendor / contractors.
Scope of work.
Whether there is a warranty.
Cost and payment timing.
Duration, frequency, and termination.
Insurance.
Construction contracts build off of these components.
Specific Components of Construction Contracts
All the components above will exist in a construction contract with some caveats:
Cost: there are four alternative types of pricing structures to define the cost.
Scope of Work: this is critical to define clearly and include in the contract.
Payment Timing: how payments are managed is more nuanced. This process includes risks and leverage.
Let’s break down these additional components in the following sections.
The Four Types of Pricing Structures
The construction industry has evolved to have four fundamental pricing structures that each have pros and cons. Different circumstances lend themselves to individual pricing structures. The pricing structures are:
Time and materials.
Lump sum (aka stipulated sum).
Cost plus.
Guaranteed maximum (aka GMAX).
Let’s break down each one.
Time and Materials
Best For: small jobs with a single contractor (no subcontractors).
Pricing structure: based on number of hours at an hourly rate plus the cost of materials.
Example: electrician at $120 per hour for 6 hours = $720 in time plus $480 in materials = $1,200.
Pros: minimal paperwork to get contractor started. Sometimes you don’t even use a contract. The contractor just bills you for the work. Fast and efficient.
Cons: pricing uncertainty until the job is done.
Lump Sum (aka Stipulated Sum)
Best For: jobs where the scope of work can be clearly defined in advance and the cost is more than $5,000 or so.
Pricing structure: fixed fee for a defined scope of work. The contractor has taken the time to understand the scope of work and given you a fixed fee to complete this work. Sometimes they give you a breakdown of the costs by line item including their general conditions and profit (see role of contractors). Other times they just give you a single amount with no backup. Either way, they are saying they will do the work for that price.
Example: general contractor will clean up the interior of the suite / unit including paint, carpet, lighting, plumbing fixtures, and electrical improvements for a fixed price.
Pros: clarity in the scope and costs.
Cons: takes more time as the contractor needs to bid the work. This takes even more time for you as the owner when you are getting and comparing bids from multiple contractors.
Cost Plus
Best For: custom remodels where price is less important OR the scope cannot be clearly defined up front.
Pricing structure: whatever the general contractor pays their subcontractors PLUS agreed upon general conditions and a percent profit.
Example: a unit renovation where the owner or their designer is actively involved in each step, figuring out the materials and scope of work in real time as the job is being completed.
Pros: owner sees the cost impact of each decision but does not unfairly put the price increase risk on the contractor. This would be unfair because the scope has not been clearly defined. The contractor can’t accurately bid the work without a clear scope.
Cons: price uncertainty until the job is complete.
Guaranteed Maximum (aka GMAX)
Best For: very large jobs.
Pricing structure: similar to lump sum with transparent subcontractor costs BUT costs are tracked on an ongoing basis. At the end of the job any cost savings against the original contract are shared between owner and contractor at a pre-agreed upon split.
Example: major renovation (or even new construction) where the pricing is in the millions.
Pros: owner has a cap on their costs with the ability to see some cost savings.
Cons: only appropriate for very large jobs. You are unlikely to use this as a new or smaller real estate investor.
As I said earlier, the characteristics of the work will lend themselves to a specific pricing structure. You will likely use time and materials or lump sum 90%+ of the time.
Many contractors have their own contract forms or use the AIA templates. This is fine. Just read the contract before you sign it to understand what you are agreeing to.
Regardless of which pricing and cost structure you choose to proceed with, you will still have the risk of change orders. This is where we will focus next.
Being Clear on the Scope of Work & Navigating Change Orders
What is a change order? Have you heard of one? Does it make you squirm?
A change order is your contractor asking for more money to complete the work than already agreed to in the contract. [Note: this is not applicable for a cost plus structure. A cost plus contract is set up so everything is a change order because you are figuring out the scope as you go.]
A change order is a 1-3+ page addendum to your construction contract that adjusts the scope and cost. It must be signed by both the owner and contractor.
Change orders occur when (a) the owner changes the scope of work or (b) the contractor finds an “unforeseen condition”. Let’s give an example of each.
Example 1: Owner Changes the Scope of Work
At the start of the job the scope has been defined, the contract has been signed, and the work has started. You (the owner) see the work as it is being installed and you are having second thoughts. Maybe you don’t like the paint color or the broker gives you new information on something at a competitive building that is being well received by tenants.
You decide you want to make a change.
The contractor may be able to make the change without disrupting the timeline, but they will charge you for it.
This is fair and appropriate. A change order will be created.
Now let’s discuss the second example.
Example 2: Contractor Finds an Unforeseen Condition
The contractor is proceeding with the work and comes upon something unexpected. Maybe the wood framing is rotted out when they remove the drywall or there is a sink hole discovered under the flooring.
The contractor would have had no way of knowing this without tearing up the unit in advance. These are legitimate change orders. These are risks you take on as a real estate investor.
That being said, not all contractor initiated change orders are that clear. Sometimes you will have contractors issue a change order for something they should have known in advance or because the work is taking longer than they thought.
These are not always legitimate and you should push back on them. Discuss them with the contractor and work together to come up with a fair solution.
The best defense against all change orders is to be clear on the scope of work. If you want the job to be on time and on budget, define the scope of work in advance and stick to it.
Let’s move on to paying your contractor. This is where you have some leverage if you have a disagreement.
Understanding Mechanic Liens and Retainers
Contractors need to get paid for the work they do. In order to protect themselves from owners not paying them, there is the lien process.
A lien is a document filed against your property with the county when there is a payment dispute. This tells anyone looking at the title documents of your property that you have a dispute, which will affect your ability to sell or finance your property.
Bad news.
Avoid this.
Here’s the sequence of steps.
Your contractor sends you a preliminary notice saying that they are performing work on your property for a specific dollar amount. Some larger material suppliers will even follow this same process.
You pay them for the work. Keep evidence of your payments. You could even consider asking for a lien release for larger jobs. Once complete, move on.
If you don’t pay them for the work, the contractor could decide to file a lien which will be recorded against your property.
As long as you pay the contractor, all will be fine. For larger jobs there is the risk that the contractor doesn’t pay one of their subcontractors and the subcontractor files a lien. This is unusual, but does happen. Just keep careful record of your payments.
The flip side of this process is that not paying your contractor can be an effective tool for the owner. Just be careful and reasonable with this.
Large jobs with multiple payments made over time have a built in mechanism for this: the retainer.
A retainer is an amount that is not paid to the contractor. Example: 10% of each bill. It really only comes into play when the job is long enough in duration that there are monthly payments. You are unlikely to see this much if at all, but the concept is useful to discuss.
As soon as you pay your contractor for 100% of the work, you lose any leverage you had.
Why is this relevant?
Let’s say the job is 95% complete. Everything is done except for the final light fixture installations. The contractor tells you the work is basically done and the light fixtures will be installed in 2 weeks when they arrive. They ask for full payment.
Don’t pay them yet.
Pay them an amount equal to the percent of work complete.
You want to hold back some money until the work is 100% complete so you can keep some leverage. Contractors are busy. Once you pay them 100%, their natural inclination is to focus on the next job.
But…a contractor’s profit is often tied to the last dollars of payment. Be fair, but don’t give up this leverage to make sure the job is completed in a timely manner.
Now it is time to wrap all of this up in some best practices.
Best Practices
Construction is risky, whether it is a renovation of an existing property or building a new one. It often involves multiple trades and work on parts of the building you can’t see until you open up walls, floors, or ceilings.
This is the risk of being a real estate investor.
Here are some best practices to reduce your risk.
Define scope clearly in advance of bid(s). The only thing more important than having a clearly defined scope of work included in the contract is picking a contractor you trust.
Pay attention to payments. Track the cost and invoices in excel. Check that the amount you are being asked to pay (a) ties to the amount in the contract and (b) reflects the scope of work that is complete. Visit the property to verify this or have the contractor send you pictures.
Having pictures and notes sent from the contractor to you each week is an excellent protocol, especially when you are not able to get out to the property regularly.
Be clear on start date and duration. You want this in the contract. I once agreed to the scope and cost of a roof repair in the summer, signed the contract in September, but the contractor didn’t start the work until November at the start of the rainy season. It was a nightmare! Put the target start date and duration in the contract.
Manage the punch list. A punch list is a list of items that need to be fixed once the work is substantially complete. It could include paint touch up, missing electric outlet covers, or other small items that the contractor needs to fix at the end of the job. Walk the job with the contractor when the job is complete to agree upon the punch list items. Don’t pay them 100% until the punch list is complete.
Warranty documentation. If there is a warranty, make sure you get the documentation of this warranty from the contractor.
Watch out for liens. Keep records of your payments and the invoices. Consider asking your contractor for a lien waiver for larger jobs.
Make sure you get the contractor’s proof of insurance.
Work with a contractor you trust. This is the most important thing you can do. Things happen. Work with someone you trust so you can fairly navigate issues as they come up.
As always, keep learning. Increase your knowledge. Ask good questions and treat others fairly.
You got this.
Understanding the Critical Role of Contractors
How to know enough to not feel like an imposter
Last week I shared the many ways you can add value to your real estate investment: asset class by asset class.
Today I will discuss the critical role contractors play in helping you understand costs, refine your business plan, and execute your value add initiatives.
Contractors are the key player in bridging the gap between what you think you might want to do and what you can afford to do.
Have a vision of an amazing new porch on your 6-unit apartment or a new facade on your industrial building? It is all just a concept until you have a realistic sense of costs.
Contractors give you these costs.
Today we will get into the details. You don’t even need to know what a “contractor” is. I will explain it all including:
General contractors vs contractors vs subcontractors.
The role of a general contractor and how they make money.
How to find a contractor and the key questions to ask them.
How to go from an idea to a price estimate to a real bid.
Signing a contract and navigating change orders.
Best practices.
By the end of this newsletter you will know enough to work with a contractor without feeling like an imposter.
Let’s dig in.
General Contractors vs. Contractors vs. Subcontractors
These terms are used casually and often incorrectly. Let’s get them straight.
General Contractor (GC)
A general contractor is in the business of managing construction work across multiple disciplines. Disciplines refer to things like painting, asphalt, electrical, plumbing, etc.
The key word is “general”. They are generalists as opposed to specialists.
They typically don’t have a huge team that does all of the work across disciplines. It is more likely that they subcontract out some or all of the work to others.
Subcontractors
A subcontractor is someone who specializes in a specific discipline such as painting, electrical, or asphalt.
Sometimes they are hired by a general contractor. Sometimes they are hired directly by an owner.
They are specialists in one or more discipline. They are the ones who will actually do the work.
Contractors
The word “contractor” is used as a general term to refer to someone an owner is hiring to do construction work. For example: “We need to find a contractor who will help us with our value add plan.”
It could either refer to a general contractor or a subcontractor.
If you (as owner) hire a “subcontractor” to paint your building, you would likely refer to them as a contractor. They only really become a subcontractor when hired by a general contractor.
Now let’s discuss how a general contractor makes money.
The Role of a General Contractor and How They Make Money
Let’s use an extreme, but not that unusual example, to explain how a general contractor (aka GC) makes money. In this case the GC doesn’t do any of the work. They have a very small team and hire subcontractors to do all of the construction work.
They will typically add one or two line items to the cost reflecting money that is going to them as opposed to the subcontractors.
General Conditions or Overhead and Supervision: this reflects some allocation of their team that will oversee the work on a day-to-day basis.
Profit or Fee: this is the profit they will make on the job.
Combined these two line items will reflect a 15% to 20% increase over what the GC is paying the subcontractors. Example: if you have a $30,000 job, expect to pay an additional $4,500 to $6,000 if you hire a GC. [Pro tip: if you have a much bigger job - example $500,000 - you will likely be able to negotiate a lower percentage.]
So what to you get for this additional cost? Two key things:
Subcontractor Relationships: GCs work with lots of subcontractors. They know the good ones and the bad ones. They can put pressure on one when needed as they may be giving them work in the future. As an owner with one property, you don’t have the same leverage.
Project Management: the GC will manage the day-to-day project. This includes obtaining and evaluating bids, creating subcontracts, and managing the work. The painter doesn’t show up? The GC will deal with it. Timing and coordination issues? The GC will deal with it.
Many owners think the GC earns their fee. Others want to manage the subcontractors themselves.
My perspective: when there are multiple disciplines (aka trades) required such a painting, asphalt, electrical, drywall, and plumbing, I prefer the GC route. When it is only one discipline (ex. painting), I am more likely to go direct to a painter.
Your property, your choice.
Whichever route you take, there are some key questions to ask a potential contractor.
How To Find a Contractor and The Key Questions To Ask Them
Let’s say you have your first property and some value add ideas as discussed in last week’s newsletter: The Many Ways You Can Add Value to Your Real Estate Investment.
Ask your broker and/or property manager which contractors they have worked with and who they would recommend. Then pick one or two to talk with to ask them the following key questions.
How long have you been in business? You want at least five years. Longer is generally better as it shows they run a fair and profitable business.
Are you licensed and insured? It is risky working with a contractor who is not. You could also consider asking for references to speak with.
Is this type of work typical for you? “This type of work” refers to your specific scope of work for your property. You want a contractor who is comfortable with both the scope and size (aka cost) of your job. Don't work with a contractor who only does $500,000+ jobs if you have a $30,000 job.
Do you have in-house design capabilities? Maybe you want to do an exterior renovation that includes painting, wood, and metal work. Many contractors have in-house design teams that can come up with a plan so you don’t have to hire a separate architect or designer.
What components of my scope will require a permit and what is the permitting process? Not all work (ex. painting) requires a permit. Some permitting is fast. Some is slow. Some triggers other upgrades. You want to understand this.
How soon could you get started and what would be your estimated timeline for the work? You don’t want to spend a bunch of time with a group only to learn that they can’t get started for 6 months.
What is your level of interest in working together? You want someone who wants to work with you.
You can see by this list that there is more to selecting a contractor than only costs.
But costs are important so let’s transition to pricing.
How To Go From an Idea To a Price Estimate To a Real Bid
As I described in the last newsletter, there are multiple steps in going from ideas to pricing, most notably understanding what you can afford. The steps are:
Understand your goals.
Focus (aka think).
Talk with experts.
Budgeting. This is where we will focus now.
Develop a game plan.
There are two main stages of budgeting and understanding how much something will cost.
Stage 1: Price Estimate or Rough Order of Magnitude (aka ROM)
This is when you are in the early stage. You need some general sense of how much it will cost to paint vs. redo the parking vs. renovate a kitchen.
A contractor will help you do this, but they will be spec’ing their time to do so without a guarantee of getting the work.
Be mindful of this dynamic and don’t abuse it. Only work with one contractor at this stage.
Stage 2: Contract Pricing
Once you have defined your scope, then you move to getting real bids that you could go to contract on with a contractor.
Some like to get final pricing only from the same contractor that gave you the ROM pricing. Others like to get multiple bids.
Getting multiple bids is more work and guarantees you will have to tell 1-2 contractors they are not getting the work even though they put time and energy into the process.
But there is nothing like getting multiple bids. You always learn something and may find you get better pricing.
You don’t always have to pick the lowest price, but you do get a comfort level that you are not overpaying.
Signing a Contract & Navigating Change Orders
Once you have pricing you are comfortable with, you will move to signing a contract. There are multiple types of contract and ways contractors like to do them.
We will go through all the details of this next week.
Best Practices
So how do you make sense of all this?
Here are what I believe are the best practices.
Interview the contractor. Don’t skip this part. You will learn a lot in the process.
Value their time. Don’t view getting a bid as “free”. It may not cost you anything at the time, but you don’t have unlimited “credit” to exercise contractors for bids forever without at some point paying them to do some work (i.e. giving them a job).
GCs are a good fit when you have multiple disciplines. If only one, consider going directly to a subcontractor.
Don’t pick the cheapest option automatically. There is a saying in the contracting business: Cheap, Quality, Fast. You can only pick two. You may find the cheapest, but you may pay the price with low quality. Look at the total package.
The best contractors are found with experience and repeat business. If you are new, ask others for referrals. If you have a good experience with a contractor, keep using them. Build a win-win relationship over time.
It can be hard navigating your first job, but like anything you will get better with practice and repetition.
Good luck!
The Many Ways You Can Add Value to Your Real Estate Investment
Options for industrial, retail, office, multifamily, and 1-4 unit residential
Last week we kicked off the series on executing your business plan and I discussed the general ways you can add value to your investment: cosmetic and functional improvements that lead to better leasing (and revenue) performance.
Today we are going to get into specifics by asset class.
As discussed in Asset Classes Explained, there are five main asset classes:
Industrial
Office
Retail
Multifamily aka Apartments
1-4 Unit Residential
There are different ways to add value to each of them. The themes are similar, but the details are different.
In today’s discussion, we will focus on improving the physical building(s) in both cosmetic and functional ways. We will go asset class by asset class.
By the end of this reading you will have a clear menu of options to choose from for yourinvestment. You won’t be an expert, but you will know enough to be dangerous.
Let’s dig in.
Industrial
Industrial is the most straightforward asset class. It is basically a warehouse building made out of concrete with a small amount of office inside. Industrial is used for manufacturing, storing, and/or distributing product. Anything you buy online goes through an industrial building, typically referred to as a warehouse.
So if it is a simple concrete box, there is nothing to do right?
Wrong!
There are plenty of ways to add value:
Paint & Asphalt: It is hard to find a better bang for your buck to change the look and feel of a warehouse than painting the building and doing a new slurry coating (aka painting) the asphalt. It does nothing functionally, but it drastically improves the first impression of tenants.
Signage: Adding signs above each suite can give a better sense of identity. You could also add a monument sign on the street with slots for tenants’ names.
Facade Enhancements: There are ways to make a building look more modern and create better suite identity by adding additional material elements to the exterior. For example: wood panels or metal awnings in sections of the building.
Adding Parking or Re-striping Existing Parking: Industrial users often need space to store their trailers and other materials or for more parking for their employees. Sometimes you can expand or reconfigure your existing site to meet these needs.
Warehouse Improvements: Industrial tenants want functionality. Your space will lease faster and at higher rents with increased functionality. Talk with local leasing brokers to understand the local tenant needs. Then consider improvements to lighting, smoothing the concrete floor, air circulation, power, and truck doors.
Office Improvements: Although the office portion of a warehouse building may be a small percentage of the total square footage, it is important to make it clean and functional. Nothing fancy, but nothing too beat up. Your local leasing broker will guide you.
Let’s move on to retail.
Retail
Retail is much more complicated than industrial. It generally includes multiple buildings laid out across a site with ample parking. Example: a neighborhood shopping center anchored by a grocery store with 20 additional small suites such as restaurants, hair salons, workout studios, and various other stores. Customers are coming and going throughout the day, so traffic (and pedestrian) flow is very important.
With all these moving parts, there are many ways to add value.
Paint & Asphalt: Same concept as industrial.
Signage: Same concept as industrial, but WAY more important for retail. There should be a universal signage program that works for all tenants. It should look like a cohesive center. This often includes a large monument sign (10’+ tall) on the main road with major tenants listed.
Facade Enhancements: Retail buildings often incorporate lots of interesting architectural elements using different materials and elevations. See figure 1 below for an example.
Adding Parking or Re-striping Existing Parking: Same concept as industrial, but even more important. Few things deter retail customers from coming to your center more than not being able to find parking. Get the most parking you can.
Suite Improvements: Most retail tenants want their suite to be a clean, functional box to work with. Retail suites tend to be fairly consistent in size and shape, so national tenants are used to working with these sizes. They will then customize their improvements inside that consistent shape. Go into a few Subway sandwich shops or postal annex stores and you will see what I mean.
Amenities: Retail is about place making. The longer customers stay at your center, the more likely they are to buy from your tenants, and the more rent you can charge. The best retail operators figure out ways to make their centers inviting by adding things like outside seating, fountains, water features, fire pits, and other attractive amenities. They create places people want to hang out in.
Figure 1: Example of a Retail Facade
Let’s move on to office.
Office
When I refer to office, I am referring to buildings where people generally work on computers. I spent 20+ years of my career working inside office buildings. They can be a single building or an office park.
Here are some ways to add value.
Paint & Asphalt: Same concept as industrial, but not always an option. Many times an office building is made of a stone material and the parking is in a concrete structure. In these cases, there is little to be done.
Signage: Monument and building signage can be very valuable to tenants. Sometimes you can charge extra for these.
Adding Parking or Re-striping Existing Parking: Parking can be very important for office tenants. Sometimes you can even charge more for covered parking (in a structure or under a carport).
Suite Improvements: Office suites, particularly larger ones, are usually customized to the individual tenant needs. It is expensive and wasteful. Imagine if you remodeled an apartment every time a new tenant moved in. Welcome to the wonderful world of office! If you have a vacant suite, work with your leasing broker on a plan to create a clean, functional layout that will work for most tenants.
Amenities: Same concept as retail. Office tenants need to attract employees. Good amenities are appreciated by employees. They include workout facilities, coffee shops, attractive seating for lunch, and anything else that feels inviting.
Let’s move on to multifamily.
Multifamily
Reminder that multifamily is a fancy way of referring to apartment buildings. This could be a single 12 unit apartment building or a 10+ building community with 200+ units or a downtown tower with 300+ units. The higher the number of units, the more likely there are interesting opportunities to add value.
Paint & Asphalt: Same concept as industrial, but apartment buildings are often made out of wood. Sometimes the wood siding needs to be replaced.
Facade Enhancements: Same concept as retail. The more interesting and inviting you can make your apartment community look, the more likely you are to attract tenants.
Adding Parking or Re-striping Existing Parking: Same concept as office, including the potential to charge for covered parking.
Unit Improvements: Here’s where things get different than the other asset classes. Apartment tenants don’t have the ability to customize their space. They “get what they get”. The best multifamily operators do two things to their units that give them pricing power and reduce maintenance costs: (a) they put in the amenities that tenants want the most such as in unit washer & dryers, newer appliances, new cabinet doors, and new countertops and (b) they put durable materials in place that last longer such as luxury vinyl plank (LVP) flooring. These improvements command more rent, lease faster, and cost less to maintain when a tenant moves out.
Amenities: Just like retail and office, multifamily is often about place making. This is where people literally call home. The best operators add amenities residents want most such as secure dog parks, workout facilities, nice pools with seating, BBQ areas, and business centers.
Now let’s see how 1-4 unit residential compares to multifamily
1-4 Unit Residential
Let’s remind ourselves why this is a separate asset class. It is driven by the way it can be financed. Lender’s will consider giving you a loan for your property based on your personal credit. For all the other asset classes, they evaluate and underwrite the propertyperformance. This personal credit evaluation can mean it is an easier entry point for investors.
All the same concepts of multifamily value add apply to 1-4 unit residential, but the smaller size will likely limit the number of amenities you can add.
Now that we have covered all the asset classes, let’s touch upon some additional items that apply to all asset classes.
All Asset Classes
Sometimes you will be faced with the decision of whether to repair or replace a building system. Repairing will be significantly cheaper but replacing will last longer. If a building system is too old or has been left without proper maintenance, replacement may be your only option. This can be true with parking lot asphalt, wood siding, and HVAC units.
There are also two potential value add options that are applicable across all asset classes.
Convert the Use: Your property may be worth more if you convert the allowable use to a different asset class. Example: industrial to multifamily. It is not fast or easy, but can add a ton of value. You could then sell the land/building or redevelop it yourself.
Parcelization: This is the process of dividing an existing piece of land (aka lot or parcel) into two or more legal lots so they can be sold individually. You may have a property with a lot of excess land. Divide it into a separate parcel to sell or redevelop it.
How to Bring it All Together
We have covered a lot. Asset class by asset class. Many ways to add value.
So how do you make sense of it all?
Here’s the formula:
Understand Your Goals + Focus + Talk with Experts + Budgeting + Develop a Game Plan = Setting the Property Up for Success
Understand Your Goals: start here. Re-read Stop Chasing Every Deal: Why Successful Investors Pick a Niche. If you don’t know your goals, you will be lost at how to address each decision.
Focus (aka Think!): now is the time to focus on the list of options within your asset class. Which are most appealing to you? Drive the neighborhood your property is in and look at what your competitors are doing. Take pictures and keep notes.
Talk with Experts: this is the most important step where theory meets reality. Share your ideas and brainstorm with the local team (brokers and/or property managers) that will lease your building. They are the market and leasing experts. Ask them what they think of your property. Ask them to rank the list of options I gave you in order of priority and impact. Ask them what else they recommend doing. Check back on You Don’t Have to Do Everything Yourself: Building Your Real Estate Team to understand how to build the right team around you.
Budgeting: once you have narrowed and ranked your list of initiatives, it is time to start getting a rough sense of cost. You need a budget to work with. This is where contractors come in, which is next week’s topic.
Develop a Game Plan: Finally, look at all the information together and come up with a game plan. Don’t hesitate to circle back with the leasing team to re-visit the list now that you have a better sense of costs.
You may need to stagger your plan over multiple years due to construction lead times, seasonality, budget constraints, or timing of your leases.
Be patient and realistic.
As with many things in life, it can feel overwhelming. By breaking it down into manageable parts, you can make progress.
You can do this!
Step by step.
One piece at a time.
Stay calm and carry on.
New Series Kickoff: Executing Your Business Plan
From business plan creation through completion
We are making great progress in our journey of understanding how to personally invest in real estate. We have covered four main subject areas so far:
Introduction to Real Estate Investing
Investment Fundamentals
The Acquisition Process
Owning and Managing Real Estate
See the end of this newsletter for the link to all 20+ newsletters so far.
Today we are kicking off a new series: Executing Your Business Plan.
Whereas owning and managing real estate anchors you in the tasks with which every investor will be faced, executing your business plan leads you down a proactive approach to adding value to your investment and making you more money!
This is one of my favorite aspects of owning investment properties. The ability to take action to improve performance and make you more money.
Some like to say that most of the money is made in the buy (aka the acquisition).
I agree to a certain extent.
You can never change your original cost basis or location. These two factors play a huge role in how the property will perform.
But…they are not everything.
Your ability to identify and execute a business plan will play a material role in how well your property will perform over the months and years of your ownership.
In this series we will cover:
Ways to add value to your property.
How to create a property business plan.
Construction.
Leasing.
Investor and lender constraints and opportunities.
Today we will start with an overview of ways to add value to your property.
Let’s dig in.
Definition: Adding Value
The terms “adding value” and “value add” are thrown around a lot in real estate investing. They are very similar terms that mean different things.
Adding value is the act of doing something to increase the value of your property. Usually you have to spend some money to create the value, but this is not always the case. Let’s list some examples of adding value:
Cosmetic improvements
Exterior: this could be as simple as painting your property or cleaning up the landscaping. Anything that makes the property look better.
Interior: same concept for the inside of the property. Think paint and carpet.
Functional improvements:
Interior: we are staying inside the building, but we are improving the way the tenant can functionally use the property. Examples could include: improved lighting, an additional room, or new HVAC.
Exterior: same concept on the outside. Examples could include: expanded driveway or a new tenant signage program.
Leasing: sometimes the biggest value creation will be through leasing. This could be through renewing and/or restructuring the leases with existing and/or leasing to new tenants. As we discussed in Cap Rates: The Simple Math of Real Estate Investing, much of real estate value is determined by the NOI. The biggest driver to NOI is usually the rent the tenants are paying.
Improving the interior and/or exterior of a property usually go hand in hand with increasing the rents and driving up the property value.
These are examples of “adding value”. Let’s compare this to “value add”.
Definition: Value Add
Value add is most commonly used as an investment category signifying the amount of risk associated with a real estate investment. We discussed this in The Risk-Return Spectrum: Choosing Your Real Estate Investment Strategy. A quick summary:
Low Risk/Low Return ←――――――――――――→ High Risk/High Return
Core/Turnkey → Light Rehab → Value Add → Development
Core/Turnkey: low risk, low return. You buy a property that is well leased and maintained. There is minimal work to do.
Light Rehab: medium risk, medium return. There is some work to do, but it is mainly cosmetic (paint, carpet, clean up). If you do the work, you can increase the rent and value of the property.
Value Add: high risk, high return. There is a lot of work to do. The property might even be vacant. You will be repositioning it and taking on a lot of risk for superior returns. You will either find a tenant once the work is complete or sell it (fix and flip).
Development: highest risk, highest return. You build something from scratch.
So when someone says this is a “value add” deal, they are usually referring to the risk involved.
Comparison: Adding Value vs Value Add
Even in the lowest risk deals, there are often ways to add value.
However, not all deals with the ability to add value are considered “value add” relative to risk/return.
Again, similar terms with different meaning. Here are examples of how each might be used:
Value Add: “We have a big appetite for risk at our company. We focus exclusively on value add industrial deals.”
Adding Value: “The deal has a ton of upside because there are so many ways to add value in the first few years.”
We will focus on adding value in this series.
A Menu of Options: Choose Your Own Adventure
Those of you born in the 1970s or 1980s may remember a book series called “Choose Your Own Adventure”. In it, the reader started in chapter 1 and was faced with a choice at the end of the chapter. Choose one option, go to page 22. Choose a different option, go to page 45. This continued throughout the book.
Creating and executing your property business plan requires a similar approach.
You start by assessing the opportunity and options available to you. From there, you start executing the plan and adjust as you go.
You have to adjust because (i) you continue to learn more about the property and the impacts of your plan as you go and (ii) the world and circumstances are always changing.
A Variety of Approaches
I introduced the analogy of three types of cars to give examples of types of real estate in Daily Issues You Will Face While Owning Real Estate. They were:
A top of the line Mercedes
A reliable but basic Honda
A car that constantly breaks down
Understanding the type of property you have at acquisition and the type of property you want it to become will guide your business plan.
For example, you may buy a property that is beat up (#3) but have a plan to turn it into a clean, functional property (#2) by executing your business plan.
Or you buy a property similar to a Honda (#2) but plan to not put a dime into it during your hold period knowing that it may get beat up over time (trending towards #3) but you will be able to maximize the near term cash flow.
Your money. Your property. Your choice.
What’s Next
Next week I will expand on the menu of options by sharing specific details of the ways to add value to each of our five main asset classes: 1-4 unit residential, multifamily, industrial, retail, and office.
This will give you a comprehensive “menu” of what can be done to add value.
You will then be able to combine this menu with the characteristics of your specific property and goals to come up with your own business plan.
Get ready to get your creative juices flowing.
This is the fun part!
Vendor Service Contracts: What You Need To Know
A simple contract you will use over and over again
Welcome to another newsletter of Real Estate Investing Explained.
Today’s topic will mark the end of the series on Operating & Managing Real Estate. In this series we covered the foundation of operations including:
Next week we will be moving on to the series on Executing Your Business Plan where we will cover leasing, construction, and ways to add value.
But before we get there we need to cover service contracts. These are legal documents that are used to engage another company to do work at your property. It could be one-time or on a recurring basis.
Examples include landscaping, pest control, cleaning, HVAC service, and many other services.
If you own a home, you might be used to bringing in vendors and technicians to fix something. You are unlikely to sign a contract. You simply pay them when the work is done.
With real estate investment properties, particularly commercial, a better practice is to use a service contract to document the details in advance including:
Who is the owner.
Scope of work. How the work will be performed and to what quality.
Whether there is a warranty.
Costs and payment timing.
Duration, frequency and termination.
Insurance required.
Many other “legal” sections if prepared by a larger real estate company such as confidentiality, indemnities, dispute resolution, notices, limitations of liability, non-discrimination, OFAC compliance, and some others. Don’t worry about these sections for this discussion. You can understand them later if you develop a larger portfolio.
Yes, it is more cumbersome. But a little bit of paperwork up front will save you misunderstandings and problems in the future.
Today I will explain each of these and why they matter.
Let’s dig in.
Who is the Owner
Do you own the property as an individual or through a separate legal entity such as an LLC? There are pros and cons to each.
Individual:
Pros: easier to get a loan for a 1-4 unit residential property. Lower annual tax cost.
Cons: more risk of personal liability.
Legal Entity Such as a LLC:
Pros: additional layer of legal protection.
Cons: annual LLC tax and separate tax return.
Whatever you choose, you need to make sure the service contract lists the “Owner” correctly. If you own a property through an LLC (ex. 123 Main Street Owner, LLC), don’t list and sign the contract under your name individually. Sign it under the LLC. In this case, the LLC is the owner.
Scope of Work, How the Work Will Be Performed and To What Quality
This describes what the vendor is going to do. It might be monthly landscaping or repairing a broken HVAC unit.
A simple approach can be to ask the vendor for a proposal and then include the proposal as an exhibit to the service contract. The exhibit serves as the details of the scope of work. This way, everyone is clear and in agreement.
You could also consider adding language saying something like: “work shall be performed in a professional manner to industry standard quality”. It is not perfect, but it does set some basic expectations beyond what is written in the proposal.
Whether There is a Warranty
Not all work will include a warranty, but some should.
Anything new, such as an HVAC unit, should include a warranty. You want at least one year.
The contract is where you agree what the warranty will be, what it will cover, and how long it will last. The vendor may also give you a separate warranty document once the work is complete.
Costs and Payment Timing
A clearly documented scope of work and list of costs will reduce the chances of there being disputes after the work is complete. They go hand in hand.
If the scope is not clear, the vendor may hit you with “change orders”. Change orders are a fancy way of saying that the vendor is going to charge you more than the amount in the contract for various reasons including (i) increased scope of work or (ii) unforeseen or unanticipated conditions.
Unscrupulous people may even try to hit you with a change order because they feel they aren’t charging enough or this is part of their strategy (low bid to get the work then multiple change orders).
Avoid the risk of change orders by being clear on the scope, the costs, and the timing under which you, as owner, will pay them.
And don’t necessarily take the lowest bid if it is materially below the others. This can be an indicator of a vendor who doesn’t understand the scope.
Let’s move on.
Duration, Frequency, & Termination
This describes how long the agreement lasts and the frequency of the work. This varies depending on the type of work. Examples:
Landscape Maintenance: this could be a one year contract where the frequency of service is bi-weekly or weekly.
HVAC Repair: this could be a one-time service that needs to be done in 30 days, after which the contract is done.
For recurring services such as landscape maintenance, the practical approach is to have a one year contract that can be renewed at an agreed upon rate (example 3% increase) with 30 days notice.
There should also be language that either party can terminate with 30 days notice if one party is not following the agreed upon terms of the contract.
Let’s transition to insurance.
Insurance
We talked about insurance in Real Estate Insurance: The Transfer of Risk.
Any time someone is coming to work on your property, there is the risk that (a) they could hurt themselves or someone else or (b) they could damage your property.
You want to require each vendor to have some basic types of insurance such as worker’s compensation to protect their employees and commercial general liability to protect you and your property. There are many other types of insurance that could be requested, but these are the two major ones.
Now that we have covered the components of a service contract, let’s discuss where to find one and how to use it on a day to day basis.
[Note: I am not discussing the “legal” sections referenced in the introduction as giving legal advice is not part of my scope.]
How to Get a Service Agreement Template
Now that you understand the basics of what is in a service contract, what do you do with the information? How do you get a contract?
As discussed in The Property Manager: On the Front Line of Your Property, I believe there is real benefit to hiring a property manager.
A good property manager will have a standard service contract that they use. The great ones will be able to talk you through their form and explain it to you.
Don’t feel you need to reinvent the wheel. Review their template. If it looks good, use it or make the edits you need to make it work for you.
My Perspective
I believe in using service contracts, but I like them to be short and easy to understand.
I am also mindful that asking a vendor to sign a form they are not familiar with slows down the process. Sometimes the vendor will even have to talk with a lawyer to confirm they are ok with this. This can really slow down the process when you are trying to get work done.
I try to be reasonable.
If the vendor has their own form, I am willing to read it based on the information described above. If it is clear, then I am willing to sign it. Other times I might hand-write edits to the document to make something more clear or to make a small change.
I try not to get caught up in going back and forth on language in a document. I want to focus the majority of our efforts on getting work down at the property, not negotiating documents.
Some might say this is taking on more risk than I need to. Fair enough.
But remember that real estate investing is not risk-free. There are always things that could go wrong. If that scares you, real estate investing may not be for you.
Don’t be reckless.
Be practical and reasonable.
I try to do business with vendors (and people in general) I trust. If an issue comes up outside of the contract, we work it out as two reasonable people.
Property Tax: The Expense That Never Goes Away
The ongoing expense that varies from state to state
Last week we discussed insurance in detail. Today we are getting into property taxes.
My original plan was to do them as a combined newsletter, but when I started writing about insurance I realized just how many layers of information there are.
Why was I planning to cover them in a single newsletter? Because they share multiple similarities:
The amount of each expense is largely outside of your control.
They are generally permanent. You could get rid of almost every other expense, but property taxes and insurance will always be with your property.
They are specialized subjects that benefit from the owner having a certain amount of knowledge and expertise.
But…property taxes are simpler to explain than insurance. Phew!
Today we will discuss:
Why property taxes exist and what they fund.
How they are determined.
Ways to reduce your property taxes.
Owner best practices.
That’s it. Much more simple than insurance.
Let’s dig in.
Why Property Taxes Exist and What They Fund
Property taxes are revenue for the county the property is located in.
Read that word carefully: county. Not the state.
They are the way each county (in each state in the U.S.) funds basic services such as public schools, police, and libraries. A portion of the revenue is sometimes distributed to each city within that county. [Yes, this is a U.S. centric newsletter.]
You may have seen a proposition or other measure on your local election ballot that talks about adding an additional fee to homeowners to fund XYZ. If passed, this would add to every homeowner’s property tax expense. Here’s an example of a property tax bill with propositions and measures that passed the voting ballot and were added to each homeowner’s property tax bill:
Table 1: Example of Propositions on a Property Tax Bill (California). Each one increased the “rate”. More on this later.
To add another layer of complexity, property taxes are determined at the state level but administered, collected, and used at the county level.
Your main takeaway should be that property taxes fund your local government and services. They are never going away. All 50 states have some type of property taxes.
But wait - some of you may be thinking that certain states don’t have property taxes. This is not correct. Some states don’t have income taxes or sales tax, but every state has property taxes.
Let’s transition to how they are determined.
How Property Taxes Are Determined
As I said above, every state has property taxes. But unfortunately every state calculates them in a different way.
Here are the similarities across all states:
County Assessor: the team at each county that determines, administers, and collects property taxes.
Assessed Value: the value of the property and land as determined by the county assessor.
Rate: a percentage that is applied to the assessed value to determine the property tax.
Here are the differences:
Assessment Methodology: how the assessed value is determined (generally, but not always, via fair market value appraisal).
Assessment Frequency: how often the assessed value is determined (every 1-4 years).
Payment Timing: frequency and timing of payment throughout year (1-4 times per year).
Payment Period: whether the payment is in advance or in arrears.
Appeal Options: whether and how the property taxes can be appealed with the goal of reducing them.
So we have a basic framework (the similarities), but a unique way of implementing it within each state (the differences).
Here are some examples:
California
Assessment Methodology: the value is determined by the most recent purchase price and then grown at 2% per year. That’s it. Super simple. That is why you hear of people that have owned their property for 30+ years and have a low property tax basis (and expense), while the person next door who recently bought their property has a much higher property tax basis (and expense).
Assessment Frequency: July 1 every year add the 2% increase and adjust for propositions and measures.
Rate: a little over 1%. Example: $1,000,000 x 1.132% = $11,320.00 per year.
Payment Timing: twice per year in December and April.
Payment Period: December covers the second half of the year (7/1 to 12/31). April covers the first half of the year (1/1 to 6/30).
Appeal Options: through property tax consultants, who do not need to be licensed.
Texas
Assessment Methodology: fair market value appraisal.
Assessment Frequency: beginning of each year.
Rate: changes each year.
Payment Timing: January of the year after assessment.
Payment Period: 100% in arrears.
Appeal Options: typically through a lawyer.
These are just two examples. Each of the 50 states in the U.S. has a different approach.
Ways to Reduce Your Property Taxes
There are ways to appeal and reduce your property taxes. Why would you want to do this? To reduce your operating expense. And you may feel the assessed value is unreasonable.
If you own properties in multiple states with different rules, it may be helpful to use a property tax consultant such as Ryan.
The typical structure will be that they work on 100% contingency. They only get paid if your property taxes are reduced. Example: they might keep 10% - 30% of the reduction as their fee.
My personal opinion is that property tax consultants serve an important role in the industry as this is a specialized area of expertise that varies from state to state. These consultants can help save you money and estimate your future property taxes for properties you are purchasing.
My approach has been:
Personal Home: I appealed this one myself because (i) I understood the California process and (ii) I live in a 100+ home community where the homes are very similar, making it easy to supply sales comparables. I had bought my home a couple years before the Great Financial Crisis of 2008. By successfully appealing my property taxes, I saved quite a bit of money each year.
Industrial Portfolio: when I worked for a company with 100+ properties across many states, we used property tax consultants. It was too complex and labor intensive to justify using one of our internal team members.
Educate yourself by talking with a property tax consultant. If you own a small property (less than $5M), find a smaller local property tax consultant who may give you more focus than a larger, national firm.
Owner Best Practices
Here are my recommended best practices when working on property taxes for your investment property.
Due Diligence & Underwriting - Assessment Methodology
Remember, these vary from state to state. Don’t assume the seller’s property taxes will be your property taxes growing at inflation each year.
Do the research and/or talk to a property tax consultant before you commit non-refundable money towards the purchase of the property. You need to understand how they will change during your ownership.
Propositions & Measures - Expiration Dates
These often have an expiration date. This is especially important when you see a very large additional charge on a property tax bill.
My former company once bought a property where the additional charges were as much as the base property tax bill. This was related to a fee that would expire two years after our acquisition. Knowing the near term expiration changed the way we thought about the deal.
Closing Statement - Payment Timing
The timing of the payment will determine how the property tax expense is prorated in the closing statement on closing day. This could be a big charge or credit.
For example, if property taxes are paid in advance, you (as buyer) could find yourself owing the seller for their prepayment and have to pay this amount through the closing statement.
What would this mean? You could be short on cash on the day of closing. Understand this in advance to avoid surprises.
Appeals
Be proactive. It doesn’t cost you anything to have a conversation with a property tax consultant. If there is a way to save money on your property taxes, you should consider this.
Pro tip: there is usually a deadline by which you must file the appeal. Do the research so you don’t miss it.
Remember, property taxes vary from state to state. Take the time to understand how things work in the state you are buying the property.
As always, have a learning mindset. Be patient. Talk to experts. Take the time to understand it.